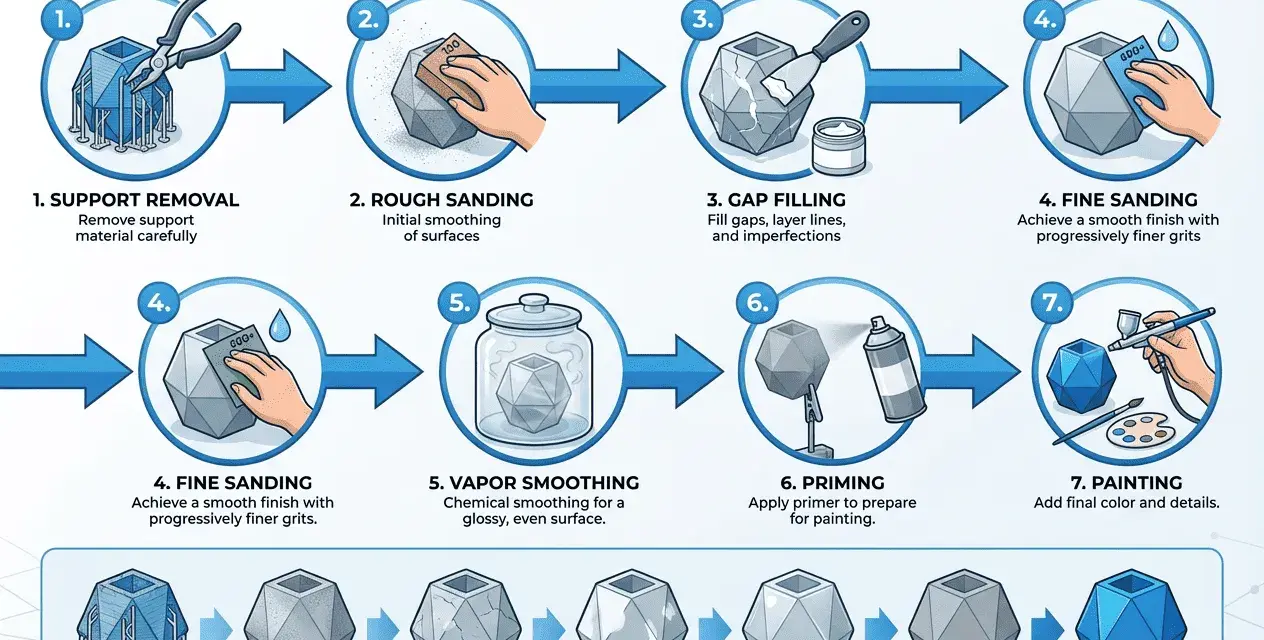
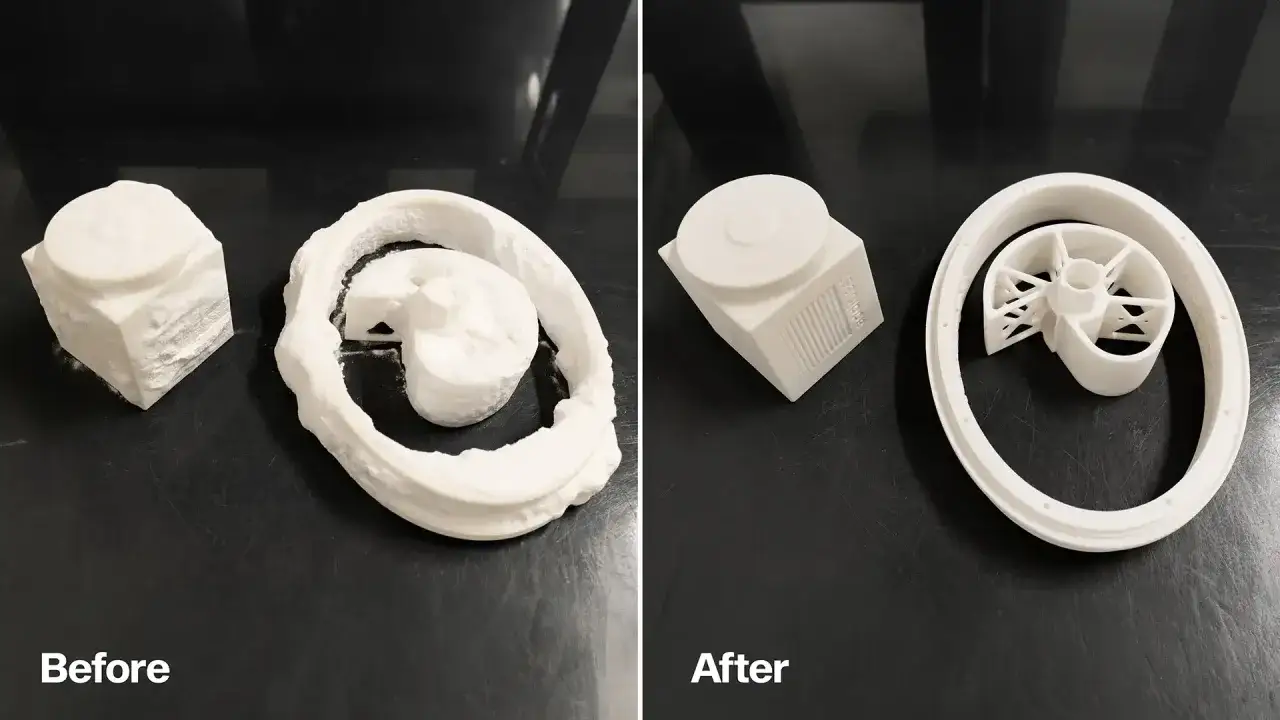
After a print comes off the machine, the part is usually close, not complete. The last stage is where you remove support scars, stabilize the material, smooth visible layers, and add color or protective coatings when the job calls for it. In 3D printing post-processing, the goal is not to make every part glossy; it is to make the part fit its function, appearance target, and budget without wasting labor on steps that do not matter.
The fastest improvement comes from matching the finish to the part’s real job
- Support removal and cleaning come first, because every later step depends on a clean surface.
- SLA parts usually respond well to sanding and polishing; FDM parts often need more help to hide layer lines.
- SLS and MJF parts usually benefit more from blasting or vapor smoothing than from heavy hand sanding.
- Paint, dye, coating, and plating work best when the surface has already been prepared properly.
- The best finish is the one that balances appearance, durability, turnaround time, and cost.
What post-processing actually changes after a print comes off the machine
I usually separate the job into three buckets. Cosmetic changes hide layer lines, support marks, powder texture, and rough edges. Functional changes improve sealing, cleanability, surface toughness, or fit. Manufacturing changes tighten tolerances, add color, or prep a part for paint, coating, or assembly.
That distinction matters because not every print needs the same amount of work. A bracket inside a machine enclosure may only need support cleanup. A customer-facing prototype may need sanding and primer. A fluid-handling part may need smoothing or coating to reduce porosity. If you start by asking what the part must do, the rest of the process becomes much easier to plan.
That also tells you where to stop. Over-finishing a functional surface can be just as costly as under-finishing a display part, so the sequence matters more than most beginners expect.
The workflow I follow when I need a clean part without overworking it
The safest approach is usually the least aggressive one that still reaches the target. I start with support removal, then cleaning, then surface correction, and only after that do I add color or a protective layer. If I reverse that order, I end up sealing in dust, fingerprints, or rough support scars.
Remove supports and loose material first
Support structures, loose powder, and brim remnants should come off before any serious finishing begins. If you cut supports too aggressively, you can tear the surrounding surface. If you wait too long on some resins or thermoplastics, the supports can become harder to remove cleanly. The point is to leave the part stable, not perfect, at this stage.
Clean before you smooth
Wash resin residue, degrease fingerprints, and dry the part fully before sanding, blasting, or painting. Residue makes abrasive work uneven and can create tiny defects that only show up after a clear coat. On resin parts, a proper post-cure step should happen before the final finish if the material still needs to stabilize.
Move from correction to finish
Once the part is clean, I move from coarse correction to fine finish. For exposed faces, that often means stepped sanding with progressively finer grits. For powder-based parts, bead blasting or vapor smoothing is usually more consistent. For parts that will be painted, I want a surface that is already free of obvious defects, because primer can hide only so much.Inspect fit surfaces last
Mating faces, holes, threads, and sealing surfaces deserve a final check after finishing, not before it. Some techniques remove material; others change surface feel without changing dimensions much. If a tolerance surface matters, I mask it, machine it later, or leave it alone entirely. That small decision saves a lot of rework.
Once the sequence is clear, the next question is which route fits the printing technology itself.
Which finishing route fits which printing technology
The right method depends as much on the printing process as on the final look. FDM, SLA, SLS, MJF, and metal prints all leave the machine with different surface problems, so they do not respond equally well to the same treatment. I find it useful to choose the finish from the process backward rather than forcing one universal approach.| Printing process | Typical surface issue | Best finishing route | Watch out for |
|---|---|---|---|
| FDM | Visible layer lines, stringing, support scars | Sanding, filler primer, paint, and sometimes vapor smoothing on compatible materials | Edges round off quickly, and uneven sanding shows through paint |
| SLA | Support marks, fine layer texture, resin residue | Support cleanup, sanding, polishing, clear coat, or paint | Over-sanding can soften crisp detail and distort small features |
| SLS | Powdery or grainy surface, loose powder in recesses | Depowdering, bead blasting, vapor smoothing, dyeing | Hand sanding rarely gives a truly uniform cosmetic finish |
| MJF | Matte texture and slightly rough powder-bed finish | Bead blasting, dyeing, vapor smoothing, primer and paint | Texture improvement is real, but it is not the same as a resin polish |
| Metal | Support remnants, rough as-built finish, visible build texture | Support removal, machining, heat treatment, brushing, polishing | Post-processing can affect tolerances, strength, and surface flatness |
For SLA, careful sanding can go very far. The finishing guide I reviewed from Formlabs notes that a part can become glossy around 3,000 grit and reflective around 12,000 grit, which is useful when the geometry can tolerate the labor. For powder-based parts, the same level of smoothness is usually better chased with blasting or smoothing than with sandpaper.
Protolabs shows a similar process-specific logic on MJF: vapor smoothing can reduce roughness from 250+ μin Ra to 64 to 100 μin Ra on selected materials. That is the kind of change that matters when a part has to look and feel production-ready instead of merely printed.
The broader lesson is simple: the finish method should match the physics of the print, not just the mood board.
The methods that deliver the biggest gains
When I narrow the field to methods that really move the needle, I keep coming back to five. They do different jobs, and none of them is universal.
Sanding and polishing
Sanding is the most familiar option because it is accessible and cheap to start. It works well on SLA and on the outside faces of FDM parts, especially when you can move through grits in stages. Wet sanding helps keep heat down and reduces clogging, which is useful on resin parts and detail-heavy edges. The limitation is obvious: it is slow, it is labor-heavy, and it can erase crisp geometry if you push too hard.
Media blasting
Media blasting gives you a uniform satin or matte finish and removes loose material quickly. It is especially useful on powder-bed parts where the goal is consistency rather than mirror-level smoothness. Glass bead, ceramic bead, sand, or grit can all be used depending on the material and the finish target. I would not use it as a shortcut to a polished surface, but for a clean, even look it works well.
Vapor smoothing
Vapor smoothing is a strong option for compatible thermoplastics because it softens the outer skin and blends out the texture. That can improve appearance, cleanability, and even sealing performance. It is not a universal finish, though. The material has to be compatible, the process has to be controlled, and you need to accept that tiny features may soften or shift slightly.Painting, dyeing, and clear coats
Paint gives you the most control over color and brand match, while dyeing is usually faster and cheaper, though it offers fewer color choices. That is why dyeing often makes sense for batch work and paint makes sense when a part needs a specific visual identity. Clear coats help when you want gloss, UV resistance, or a cleaner feel without hiding the base material completely.
Read Also: 3D Printing in Education - Maximize Learning, Not Just Prints
Electroplating and metal coating
Metal coating processes can turn a plastic part into something that feels far more premium. They can improve appearance, conductivity, or durability, but they are not a casual add-on. The part usually needs to be clean, smooth, and structurally stable before coating begins. In practice, I treat plating as a premium finish for parts that truly benefit from a metallic surface, not as a cosmetic fix for a rough print.
Choosing between these methods is mostly about the end use. The next question is how much they cost in time and money.
Cost, time, and when outsourcing makes sense
Post-processing cost is rarely just a material question. Labor, setup, equipment, ventilation, curing time, masking, and inspection usually matter more than the raw finishing chemistry. For that reason, a cheap print can become an expensive part if the surface target is unrealistic.
| Approach | Cash cost | Labor load | Best use case |
|---|---|---|---|
| Manual sanding | Low | High | One-offs, prototypes, small cosmetic corrections |
| Bead blasting | Medium | Low to medium | Batch parts that need a consistent matte finish |
| Vapor smoothing | Medium to high | Low once set up | Compatible polymers, sealed surfaces, repeatable batches |
| Painting | Medium to high | High | Customer-facing parts, color matching, branded products |
| Machining or heat treatment | High | Medium to high | Tolerance-critical or metal parts |
One batch example I reviewed put vapor smoothing at roughly $0.49 to $0.98 per part, which shows why the method becomes attractive once you have quantity and repeatability. That figure is not universal, but it does show the real pattern: setup cost drops out of the picture only when the batch is large enough to absorb it.
For U.S. product teams, outsourcing usually makes sense when the finish is part of what the customer is buying, when the geometry is too complex for consistent hand work, or when the process needs equipment and safety controls you do not want in-house. If you only need a quick functional prototype, keep it simple. If the finish is visible, touched, sealed, or branded, the economics change fast.
The expensive mistake is not paying for finishing. It is paying for the wrong finishing step.
The mistakes that ruin a good print after the printer is done
The failures I see most often are rarely dramatic. They are usually small process errors that become very visible once the part is painted, polished, or assembled.
- Skipping full cleaning leaves dust, resin residue, or oil under the final finish.
- Using one aggressive grit removes defects quickly but creates new ones that are harder to hide later.
- Over-sanding edge details rounds off geometry that was supposed to stay crisp.
- Painting too early traps moisture or uncured material and causes adhesion issues.
- Choosing the wrong finish for the material wastes time, because not every polymer responds to the same method.
- Ignoring fit surfaces leads to parts that look better but assemble worse.
The practical fix is boring but effective: clean first, test on a small area, and stop as soon as the part meets its real target. Most finishing problems come from chasing perfection after the part is already good enough.
That leads to the last decision, which is really a design decision disguised as a finishing question.
The finish decisions that pay off later
The parts that look intentional usually had the finish planned before the first layer went down. I try to decide three things early: which faces must look clean, which faces must hold tolerance, and which surfaces can be hidden, masked, or simplified. That one habit saves more time than any single polishing trick.
If you are designing for a visible part, orient the model so support marks land on hidden faces. If you expect sanding or machining, leave enough stock for it. If you expect paint or coating, account for added thickness before you commit to a final dimension. For most teams, 3D printing post-processing works best when it is treated as part of design, not as a rescue step after the fact.
That is the mindset I would use for any plastic part that has to look finished, feel finished, and still perform like a real component.