The best process depends on volume, geometry, and launch timing
- 3D printing is strongest when the design is still moving, the batch is small, or the part geometry is hard to tool.
- Injection molding wins when the part is stable, the run is large, and repeatability matters more than flexibility.
- Thermoforming is often the practical answer for large, shallow parts where full-cavity tooling would be overkill.
- Tooling cost is the tipping point, not just unit price. In one Formlabs cost model, the crossover landed near 13,050 parts for a sample part.
- Cosmetic finish, tolerance, and design risk often matter more than people expect on the first pass.
How the two processes behave differently in production
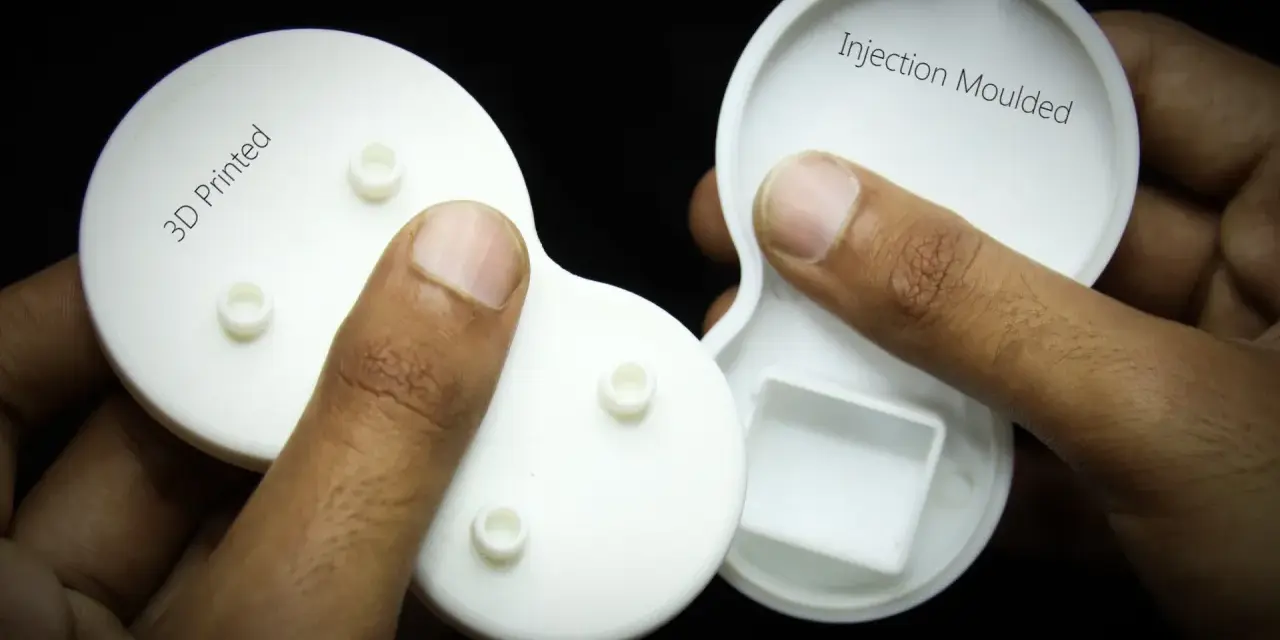
The mechanics are simple, but the consequences are not. 3D printing builds a part layer by layer from a digital file, while injection molding pushes molten plastic into a closed cavity and lets the tool define the shape. That one difference changes almost everything else: tooling cost, iteration speed, finish, dimensional repeatability, and how freely I can design the geometry.
| Criterion | 3D printing | Injection molding | Thermoforming |
|---|---|---|---|
| Upfront tooling | None | High | Moderate |
| Typical lead time | Hours to days | Weeks to months | Days to weeks |
| Best volume | Prototypes and low volumes | Stable production runs | Medium runs, especially larger parts |
| Geometry freedom | Very high | Moderate | Moderate to low |
| Surface finish | Process dependent | Excellent from the tool | Good, but sheet texture and stretch can show |
My practical rule is straightforward. If the part is still changing, the digital route usually saves time and money. If the geometry is locked and the run will be repeated often, the mold starts to pay for itself. Thermoforming sits in the middle when the part is too large or too simple for the cost of full injection tooling to make sense.
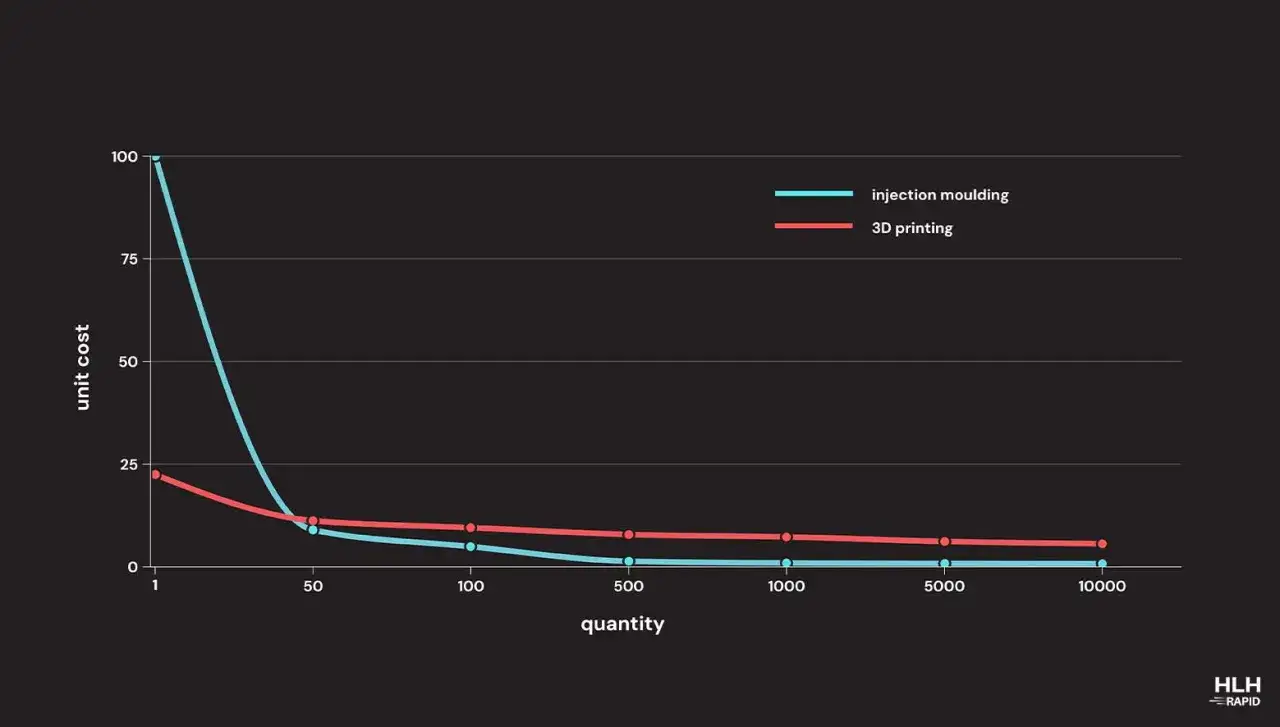
Where the cost crossover really happens
Raw piece price can be misleading if you ignore tooling. In one Formlabs model, 3D printing was about 85% cheaper at 1,000 units, and the crossover point fell near 13,050 parts for the sample part they tested. I would not treat that as a universal law, because the real crossover moves with part size, wall thickness, cavity count, resin choice, and cosmetic requirements.
- Tooling spreads over volume. Injection molding gets cheaper per part as the tool cost is amortized across more units.
- Design changes are expensive in steel. A CAD edit is easy; a mold revision is not.
- Secondary operations add up. Sanding, finishing, trimming, and assembly can erase the apparent advantage of a low-cost process.
- Part complexity changes the math. A simple housing and a highly detailed bracket do not land on the same break-even point.
Protolabs makes the same practical point from another angle: printing is easier to revise because you update the file instead of reworking the mold. That is why I usually treat additive manufacturing as a design-validation tool first, and a production tool only when the volume or geometry justifies it. Once the design stabilizes, molded parts usually take over on unit economics, especially if a multi-cavity tool can raise output.
What matters more than unit cost for quality-sensitive parts
When I evaluate a part, unit cost is only one line on the sheet. Tolerance, cosmetics, and functional behavior usually decide the result. Injection molding is strong when you need a consistent finish, crisp edges, and repeatable dimensions across a long run. Printed parts can be excellent too, but the outcome depends heavily on the process: SLA can capture fine detail, SLS and MJF are strong for functional parts, and FDM usually shows its layers more clearly.
- Finish: molded parts can come out with a polished or textured surface straight from the tool, while printed parts often need sanding, blasting, vapor smoothing, or coating.
- Repeatability: molding is usually more stable over volume, which matters when parts must fit together reliably on an assembly line.
- Geometry: printing handles internal channels, lattice structures, and undercuts far more freely.
- Design discipline: molding rewards draft, controlled wall thickness, and ejection-friendly shapes; printing is more forgiving when those rules are hard to satisfy.
If the part is customer-facing, I tend to think harder about finish and consistency. If it is hidden inside a product or being used only for validation, the design freedom of printing often matters more than a perfect surface. That distinction becomes even more important once thermoforming enters the picture.
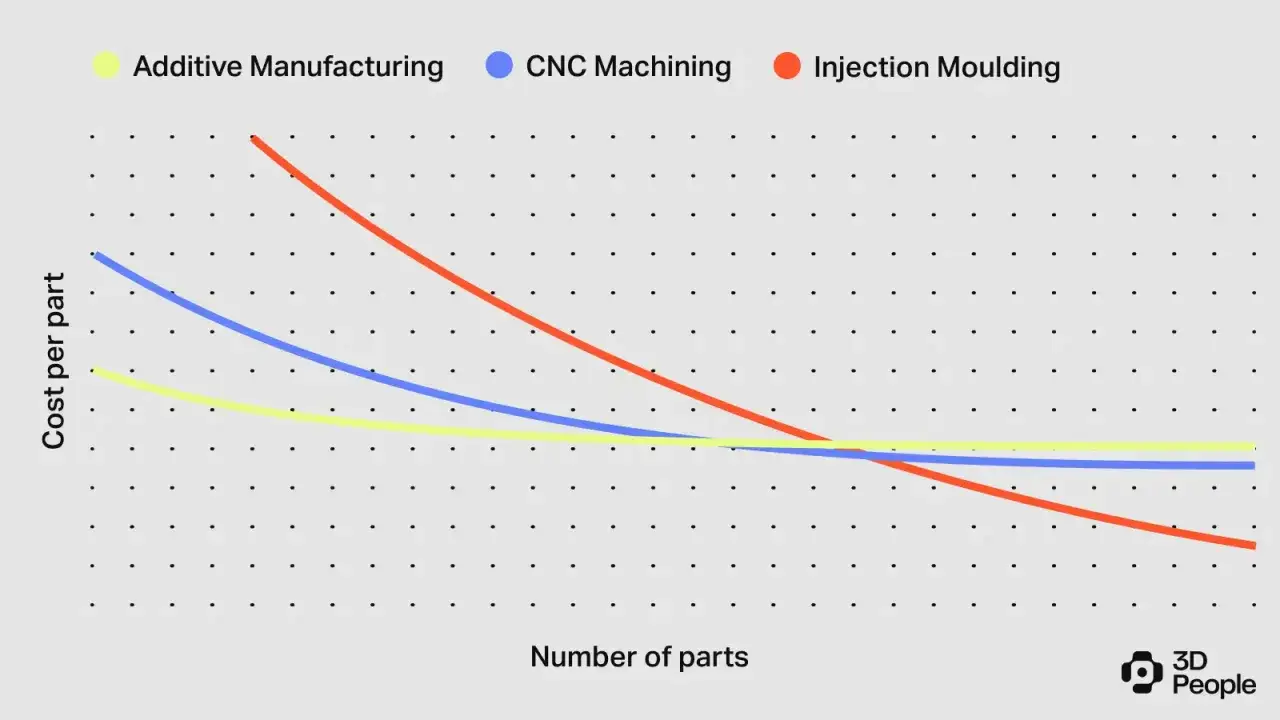
Where thermoforming fits between printing and molding
Thermoforming starts with a flat plastic sheet, heats it, and forms it over a mold with vacuum or pressure before trimming it to shape. That makes it less flexible than 3D printing and less detailed than injection molding, but it is often the smartest option for large, shallow parts such as enclosures, liners, trays, panels, and packaging components. I like it when the geometry is broad, the visual surface matters, and paying for a full injection mold would be unnecessary.
| Thermoforming is a strong fit when | Why it works | Watch out for |
|---|---|---|
| Large panels or housings | Sheet-based forming keeps tooling simpler for oversized parts | Wall thickness can thin in stretched areas |
| Packaging and protective covers | Fast tooling and good throughput for simpler shapes | Deep undercuts are difficult |
| Medium-volume production | Lower tooling cost than full injection molding | Not ideal for tiny, highly detailed features |
| Designs with broad cosmetic surfaces | Large smooth faces can look clean and intentional | Sharp corners and fine ribs are limited |
The tradeoff is that thermoforming starts from a sheet, so wall thickness is never as uniform as it is in a closed-cavity mold. That is not a flaw if you design for it, but it does mean the process is better suited to shallow forms, generous radii, and parts that do not depend on highly sculpted internal detail.
How I would choose the process for a new part
When I review a new part, I do not start with tooling. I start with four questions: how many parts are needed, how stable is the geometry, how cosmetic is the surface, and how much risk can the launch tolerate. Once those answers are clear, the process choice becomes much easier.
- If the design is still changing, I start with 3D printing. It gives me fast feedback and cheap revisions.
- If the part is large and relatively shallow, I test thermoforming. It often delivers a better balance of cost and scale than full molding.
- If the part is stable and volume is high, I move to injection molding because the per-part economics will usually improve quickly.
- If the part must look finished from day one, I pay closer attention to tool finish, post-processing, and material choice before I commit.
Lead time is another hard constraint. Printed prototypes can arrive in hours or days, thermoforming tools are usually measured in days to weeks, and injection molds often land in the weeks-to-months range. For prototype molds, 2 to 6 weeks is common, while production molds can easily stretch to 8 to 20+ weeks depending on complexity and validation. That gap matters more than people admit when a launch date is fixed.
What I would do for prototypes, bridge runs, and full production
For prototype validation, I would almost always choose 3D printing. It is the fastest way to find fit problems, test ergonomics, and catch design mistakes before money gets locked into tooling. For a bridge run, I would look harder at thermoforming if the part is large and sheet-friendly, or at printing if the design is still unstable and the quantities are modest.
- Prototype and design validation: 3D printing first.
- Large enclosures, trays, liners, and panels: thermoforming first.
- Stable consumer or industrial parts at scale: injection molding first.
- High-mix, low-volume production: printing often stays competitive longer than people expect.
If I had to simplify the whole decision into one sentence, I would say this: print when speed and flexibility matter most, thermoform when the part is large and the geometry is modest, and mold when the design is settled and the volume justifies the tooling. The best projects usually come from treating these as stages rather than rivals, because the smartest manufacturing path often changes as the product moves from concept to launch to scale.