When a plastic part needs crisp surface detail, controlled wall behavior, and tooling that does not behave like an injection-mold budget, the process people often call press molding sits in the pressure-assisted branch of thermoforming. I usually see it on covers, enclosures, trays, signage, and formed panels where appearance and turnaround matter more than extreme all-around tolerances. In the sections below, I break down how the process works, where it beats vacuum forming, which materials behave well, and what mold details decide whether the part looks engineered or merely heated.
The main things to know before you spec the part
- Pressure-assisted thermoforming heats a thermoplastic sheet and pushes it tightly against a mold with air pressure, often alongside vacuum.
- It is a strong fit when surface quality, texture, and moderate production volumes matter more than ultra-tight 3D tolerances.
- Mold design, venting, draft, and temperature control usually matter more than the forming machine itself.
- Compared with injection molding, tooling is cheaper and faster to build, but part complexity and repeatability are more limited.
- Material choice is not cosmetic; it affects clarity, impact resistance, UV stability, heat performance, and how easily the sheet stretches.
- Most real problems show up as thinning, webbing, poor detail transfer, or warpage, and all four are preventable if the setup is right.
How pressure-assisted thermoforming works
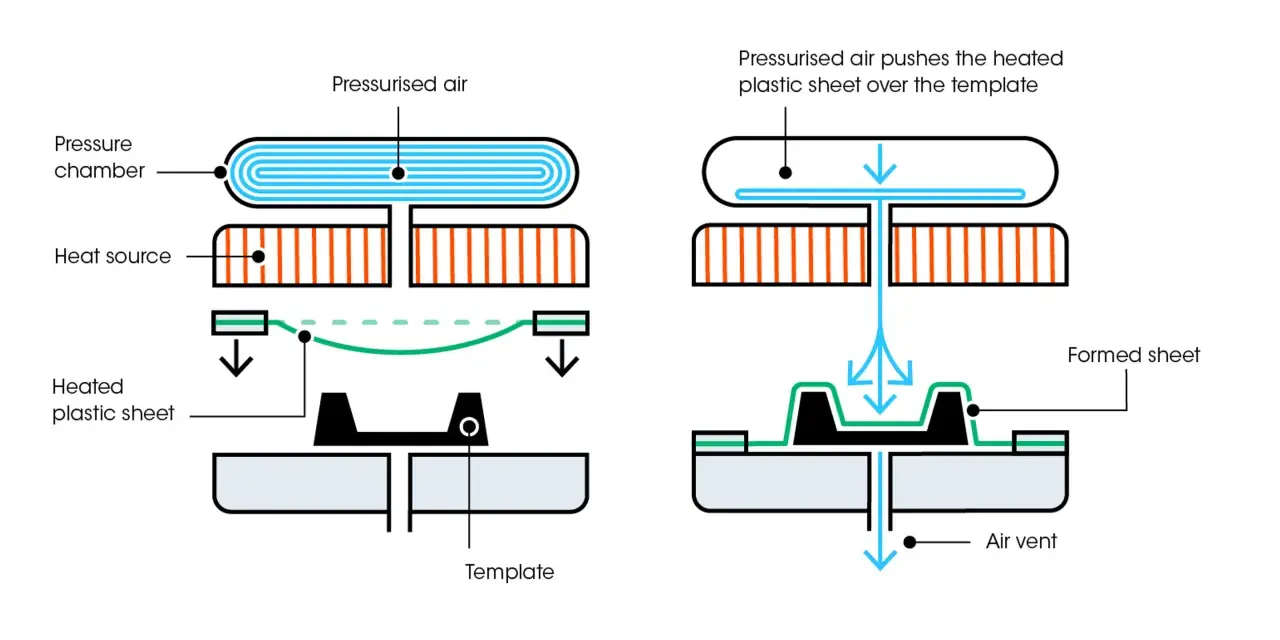
I think of the process as thermoforming with an extra push. A thermoplastic sheet is heated until it becomes pliable, then clamped in place and formed over or into a mold while positive air pressure helps force the material into the tool’s surface detail. In many setups, vacuum is part of the same cycle, so the sheet is pulled and pressed at the same time.
The basic sequence is straightforward:
- The sheet is heated evenly across its forming window.
- The sheet is clamped so it cannot shift during forming.
- The mold closes, and pressure helps drive the softened plastic into the cavity.
- Vacuum and venting remove trapped air so the sheet can pick up detail.
- The part cools, releases, and moves to trimming or secondary finishing.
The real challenge is not the motion of the machine. It is the balance between heat, stretch, pressure, and cooling. If the sheet is too cool, it will resist detail and show stress. If it is too hot, it can thin excessively, sag, or lose surface definition. That is why the same machine can produce a clean automotive panel one hour and a warped, cloudy shell the next if the setup drifts.
Once the mechanics make sense, the next question is why this route is chosen instead of simpler vacuum forming or a closed-mold process.
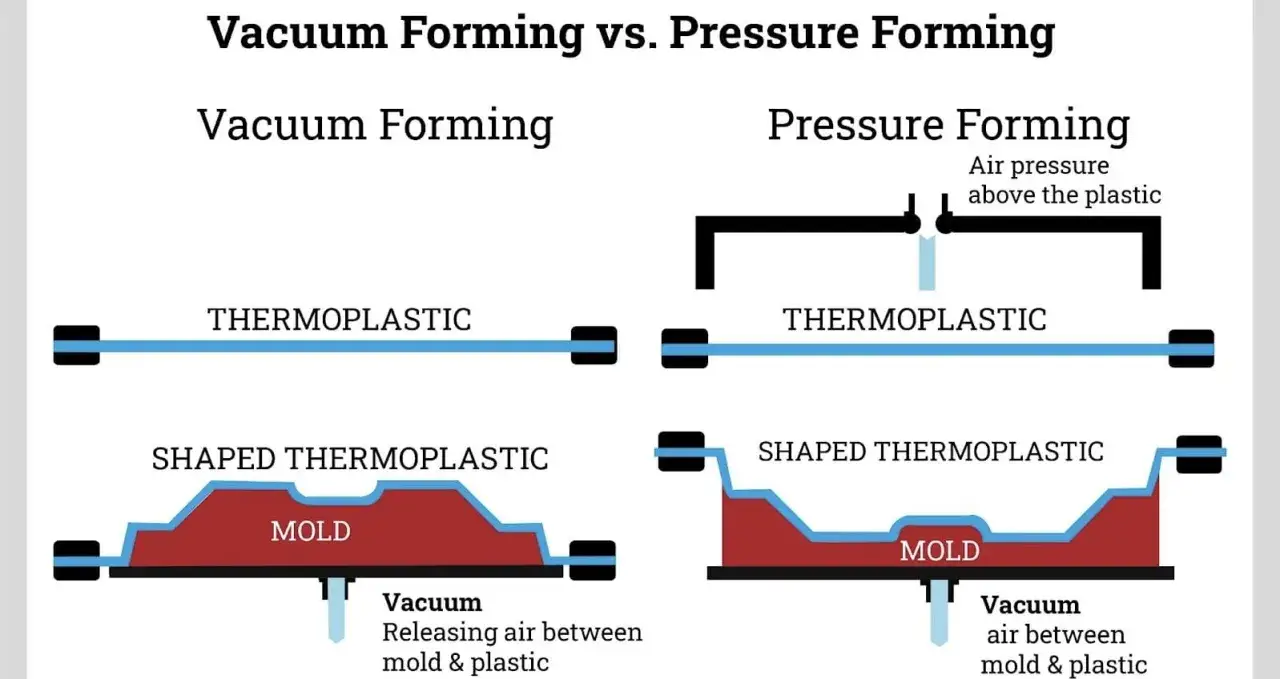
Why manufacturers choose it over vacuum forming
In practice, the appeal is simple: better detail without jumping all the way to injection molding. Vacuum forming can do a lot, but pressure-assisted forming improves how sharply the sheet picks up fine texture, lettering, edges, and tighter cosmetic features. That is especially useful when the visible side of the part has to look polished straight out of the mold.
| Process | What it does best | Main trade-off |
|---|---|---|
| Vacuum forming | Lower tooling cost, fast setup, simple shapes, large parts | Less detail transfer and softer edges |
| Pressure forming | Sharper texture, better surface definition, cleaner styling lines | Tooling and setup are more demanding than vacuum forming |
| Injection molding | High-volume repeatability, complex 3D geometry, tight feature control | Highest tooling cost and longer development time |
That table is the short version. The longer version is that pressure forming wins when a part needs a premium look, moderate part counts, and lower capital risk than injection molding. I would not choose it for parts that need true all-around dimensional precision, hidden undercuts on both sides, or very deep internal detail. It sits in the middle for a reason: more refined than vacuum forming, less rigid than injection molding.
The process only works that well if the sheet material cooperates, which is where selection becomes more important than most buyers expect.
Materials that form well and the ones that fight back
Material choice drives everything from cycle time to surface finish. Some plastics stretch cleanly and hold texture well. Others need more careful heating, better mold design, or a more forgiving part geometry. I usually start with the part’s real service conditions, then work backward to the sheet.
| Material | Why it is used | Watch-outs |
|---|---|---|
| ABS | Tough, practical, and common for enclosures and panels | Can lose gloss or show stress if overheated |
| HIPS | Affordable, easy to form, good for trays and display parts | Lower impact and heat performance than tougher grades |
| PETG | Good clarity, decent impact resistance, easy to process | Can scratch more easily than some alternatives |
| PVC | Useful for chemical resistance and some industrial covers | Process window and compliance requirements need attention |
| Polycarbonate | High impact strength and better heat resistance | More sensitive to process control and costlier than basic grades |
| Acrylic | Excellent clarity and appearance for display parts | More brittle and less forgiving on deep draws |
If the part will live outdoors, I would look hard at UV stability. If it touches food or medical environments, compliance matters more than finish. If it sits near heat or impact, the material choice shifts again. In other words, the sheet is not just the raw input; it is part of the design decision.
That choice only pays off when the mold is designed to support the material instead of fighting it.
Mold design details that decide the outcome
This is where a lot of projects win or lose. A good mold does more than shape the sheet; it manages air escape, controls stretch, and protects the finish during release. I look at five details first: draft, radii, venting, texture, and cooling.
- Draft helps the part release cleanly. I usually want 3 to 5 degrees on smooth walls, then more if the texture is deep or the geometry is tall.
- Radiused corners reduce thinning. Sharp corners pull material too aggressively and create weak spots.
- Venting lets trapped air escape. Without it, the sheet cannot fully contact fine detail in the tool.
- Texture depth needs enough draft to release cleanly. Fine grain can look great, but it raises the release burden.
- Cooling control keeps the part from warping after form and before trim.
Plug assists matter on deeper draws. A plug assist is a shaped pre-stretch tool that pushes material into the cavity before full pressure is applied, which helps distribute thickness more evenly. Without it, the material often thins at the corners and ends up looking good on the surface but weak where it matters.
I also pay attention to trim allowance. Many teams design the form and forget the trim line, then lose time fixing a part that was never given enough flange in the first place. The mold should support both the finished shape and the trimming strategy, because the forming stage and the finishing stage are connected.
Once the tooling behaves, the economics become much easier to read.
What it really costs in the US and where the economics make sense
For US buyers, the attraction is usually the tooling math. Pressure forming tends to sit in a comfortable middle ground: more detail and better cosmetics than vacuum forming, but far less investment than injection molding. Exact prices move with part size, surface finish, depth, and how much post-processing you need, but these rough ranges are realistic for planning.
| Cost item | Typical planning range | What pushes it up |
|---|---|---|
| Prototype aluminum tooling | $2,000-$10,000 | Larger parts, tighter detail, better polish |
| Production tooling | $10,000-$50,000+ | Matched tooling, complex texture, high repeatability |
| Large or highly detailed tools | $50,000 and up | Big footprint, deep draws, heavy trim requirements |
| Cycle time | Seconds to a few minutes | Sheet thickness, cooling time, part depth, and trim setup |
I would treat those numbers as planning bands, not promises. A simple cover may come in quickly and cheaply; a large panel with tight cosmetics, deep texture, and secondary machining can climb fast. Also, secondary work is often underestimated. If you need CNC trimming, paint, inserts, silk screening, or assembly, those costs belong in the quote from day one.
The process makes the most sense when you need a visually strong part in low to mid volumes, especially when the geometry is too large or too shallow to justify injection molding. That said, good economics can still be lost to bad process control, which is where most defects come from.
Common defects I watch for and how to prevent them
Most forming defects are predictable. I rarely see a mysterious failure; I see a sheet that was too hot, too cold, too thin in the wrong place, or not vented correctly. Once you know the patterns, the fixes are practical.
- Webbing usually shows up between tall features. The fix is often better temperature control, a different part orientation, or improved pre-stretch with a plug assist.
- Thinning in corners points to poor radii, too much draw, or insufficient material distribution. Adding radius and changing the stretch path usually helps.
- Poor detail transfer often means the mold is not venting well enough or the sheet is not hot enough to pick up fine texture.
- Warping after release usually comes from uneven cooling, uneven thickness, or trim stress.
- Surface haze or whitening is often a sign of overstretching or material that has been pushed past a comfortable forming window.
The lesson I keep coming back to is that the machine rarely saves a weak design. If the part has deep recesses, long flat spans, or a texture-heavy cosmetic side, the process has to be tuned around that reality instead of hoping the pressure will fix everything. Better tooling and a more realistic drawing usually solve more than a later machine adjustment ever will.
That leads to the last question I ask before I approve a run: is this the right manufacturing route for the part, or just the most convenient one?
What I would verify before approving a run
Before I sign off on a pressure-formed part, I check the requirement list against the process limits. If the part needs premium appearance on one side, moderate volume, and reasonable tooling cost, the answer is often yes. If it needs deep undercuts, exact wall uniformity around the whole geometry, or highly complex closed-mold features, I start looking elsewhere.
- Is the visible face the one that needs the best detail?
- Can the draft, radii, and trim line support easy release?
- Does the material match the heat, impact, and UV requirements?
- Are the expected volumes high enough to justify tooling, but not so high that injection molding becomes the cleaner answer?
- Will trimming, assembly, and finishing stay consistent across the full run?
When those answers line up, the process is hard to beat for large cosmetic parts and functional covers. When they do not, the issue is usually not the machine; it is the fit between the part and the process. I would rather redesign early than keep paying for small process corrections that never fully solve a structural mismatch.
Used well, this forming route gives designers a practical middle ground: better surface fidelity than basic vacuum forming, far lower tooling risk than injection molding, and enough flexibility to support real product development. That is why it remains a dependable choice for manufacturers who need parts that look finished without turning the program into a tooling project first.