The best plastic parts are rarely the most complicated ones; they are the ones matched to the right process. Plastic injection molding is the route I reach for when a part needs repeatable detail, stable dimensions, and a unit cost that improves as volume rises. This article breaks down how the process works, when thermoforming is the smarter choice, and which design decisions matter before you commit to tooling.
The fastest way to choose the right plastic process
- Injection molding is strongest when a part needs fine detail, repeatability, and medium to high production volume.
- Thermoforming is often better for large, shallow, thin-walled parts with lower tooling cost and faster launch.
- Draft angle, wall consistency, and undercuts usually decide whether a design runs cleanly or becomes expensive.
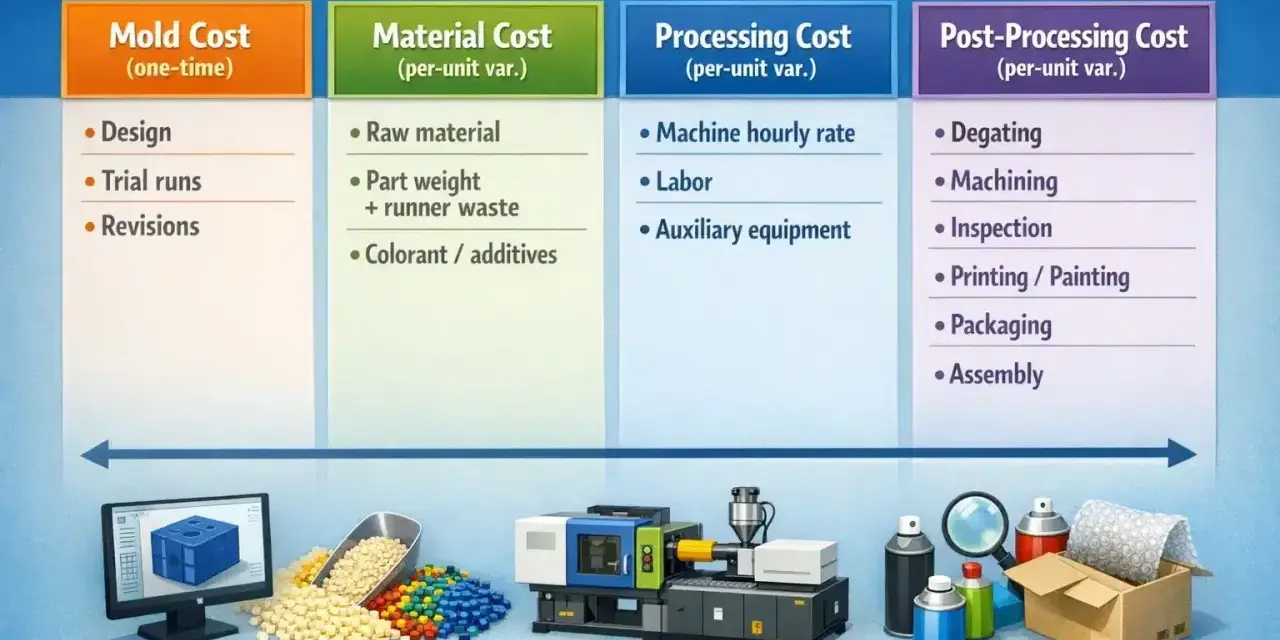
- Tooling can start in the low thousands for simple tools and climb well past $100,000 for complex molds.
- Cycle time can be as short as about 10 seconds on simple parts, but thicker walls and cooling demands can stretch it to a couple of minutes.
- Material choice affects shrink, finish, heat resistance, compliance, and even how the part should be designed.
What the process does well
Injection molding is built for repeatability. Molten thermoplastic is injected into a closed cavity, packed under pressure, cooled, and ejected as the cycle repeats. The mold defines the shape, the surface, and most of the consistency, which is why the process works so well for clips, caps, housings, connectors, appliance parts, and many medical or industrial enclosures.
I think of it as a geometry-first process. If the part needs ribs, snaps, bosses, logos, or fine surface texture in exactly the same place on every shot, molding is usually the cleanest path. If the part is mostly a shell or panel, the advantage is less obvious, and that is where thermoforming starts to look attractive.
That distinction matters because the process is not just about making a shape. It is about how much detail, control, and production stability that shape needs once the program moves out of prototype and into repeat manufacturing.
Once that is clear, the next question is how the cycle actually runs on the floor.
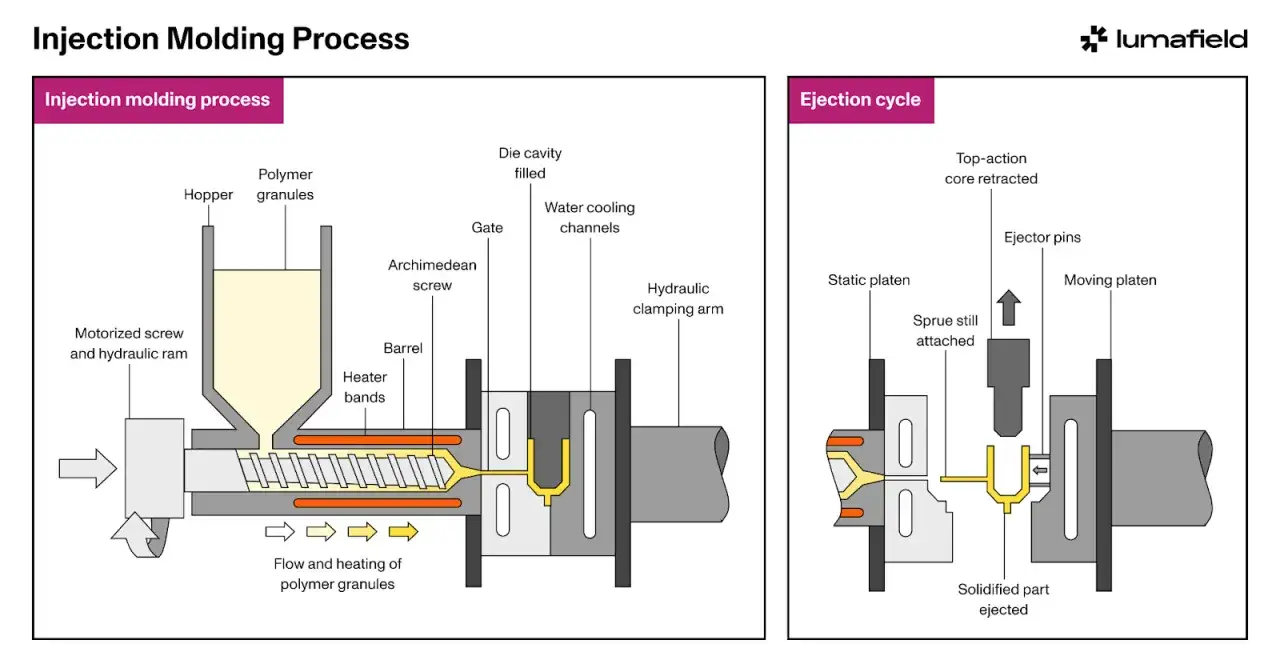
How the process works from pellet to finished part
The cycle is simple on paper, but the details are where part quality lives or dies.
- Clamping keeps the mold halves locked together under enough force to resist the injection pressure.
- Injection pushes molten resin through the sprue, runner, and gate into the cavity.
- Packing and holding add pressure after fill so the part can compensate for shrink as the polymer cools.
- Cooling turns most of the cycle into waiting time; thicker sections usually cost the most time here.
- Ejection uses pins, sleeves, or air to release the part, after which the runner may be trimmed or recycled.
On simple parts, cycle times can be as short as about 10 seconds. On thicker or more cosmetic parts, the cycle can stretch to a couple of minutes because cooling, not injection, becomes the bottleneck. That is also why hot runners and better cooling layouts can make a meaningful difference when volume matters.
The mechanics explain why injection molding behaves so differently from sheet-based forming, and that is the comparison most teams need before they pick a manufacturing path.
Where thermoforming wins and where it does not
I do not treat thermoforming as a lesser process. I treat it as the better process for the wrong geometry. If a part is large, shallow, thin-walled, and relatively simple, thermoforming can launch faster and cost less upfront. If it needs crisp detail, deep features, or repeatable molded-in geometry, injection molding usually earns its higher tooling investment.
| Decision factor | Injection molding | Thermoforming |
|---|---|---|
| Best-fit geometry | Small to medium parts with detail, ribs, bosses, snaps, and controlled features | Large, shallow, shell-like parts such as trays, liners, covers, and panels |
| Tooling cost | Higher upfront investment, especially as complexity rises | Lower upfront cost, usually with simpler aluminum tooling |
| Lead time | Longer to tool, but fast once production starts | Often quicker to launch and easier to iterate early on |
| Part detail | Crisp detail, tight geometry, and better feature repeatability | Simpler detail and more dependence on trimming or secondary work |
| Production volume | Usually stronger from medium volume upward | Often better for lower to mid volumes, especially on larger parts |
If I have a part that looks like a shallow tray or panel, I seriously consider thermoforming first. If the part needs molded-in functional features, I accept the higher upfront mold cost because it usually comes back as lower risk and better repeatability later.
That tradeoff leads directly into design, because the same geometry that makes a part beautiful in CAD can make it expensive on the shop floor.
The design choices that decide whether a part releases cleanly
Wall thickness
I try to keep wall thickness as even as possible. Thick sections cool more slowly, pull more shrink, and create sink marks, warpage, or internal stress. When a part needs stiffness, ribs are usually a better answer than making the whole wall heavier. A rib adds structure without forcing the mold to fight a giant mass of plastic.Draft angle
Draft is the small taper that lets the part leave the mold without scuffing or sticking. I start around 0.5 to 2 degrees on vertical faces, then increase the draft when the part gets deeper, textured, or more difficult to eject. Light texture often needs around 3 degrees, while heavy texture can need 5 degrees or more. If draft is an afterthought, the mold becomes more expensive and the finish becomes less predictable.
Ribs, bosses, and undercuts
Ribs help support flat areas, and bosses give you controlled mounting points for screws or inserts. The mistake is making both too heavy, which creates sink and cooling problems. Undercuts are possible, but every undercut asks for side actions, lifters, or other moving mold hardware. That can be worth it when the feature matters, but it should never be treated as free geometry.
Read Also: Injection Molding - Design, Cost & When to Choose It
Finish and texture
Surface finish affects more than appearance. A smoother finish usually releases more easily, while texture can demand much more draft and careful tooling access. If I know the part needs a matte or leather-like look, I account for that early because the finish changes both the visual result and the moldability of the design.Good CAD is not just about shape; it is about how shape, cooling, ejection, and surface finish work together. Once those are aligned, the next major variable is money.
How cost and volume change the decision
Tooling is the upfront investment, and unit cost is the long game. Simple aluminum tools can start in the low thousands, while complex hardened-steel molds can move well beyond $100,000. That spread is why the same part can be a smart business decision at 20,000 units and a bad one at 200 units.
| Order size | Typical fit | Why it makes sense |
|---|---|---|
| Up to about 200 parts | Prototype or early validation | Flexibility usually matters more than low unit cost |
| About 200 to 2,000 parts | Short-run production | Thermoforming, soft tooling, or short-run molding can all be competitive |
| About 2,000 to 10,000 parts | Break-even zone | The best process depends heavily on geometry, compliance, and finish |
| 10,000 parts and above | Stable production | Injection molding usually becomes the strongest option if demand is steady |
I also pay attention to lead time. A simple aluminum tool can sometimes be ready in about a week, while more complex steel tooling usually takes several weeks or more. Once the tool exists, multi-cavity layouts can push output much higher, but only if demand justifies the added complexity.
So the financial question is not just "Which process is cheaper?" It is "Which process gives the right cost structure for this exact volume, this exact geometry, and this exact launch schedule?"
Materials and compliance choices that matter in the U.S.
Material choice changes almost everything that follows. It affects shrink, impact resistance, chemical resistance, heat performance, appearance, and sometimes the mold design itself. I usually decide on the resin before I freeze the tool, not after, because the wrong polymer can undo an otherwise good design.
A few common examples make the point quickly:
- ABS works well for cosmetic housings and durable consumer parts.
- Polycarbonate is strong and impact resistant, which makes it useful when toughness matters.
- Polypropylene is popular for chemical resistance and living hinges.
- Nylon is a good fit for wear, strength, and functional components.
- TPE and TPU are common when a grip, seal, or soft-touch feature is needed.
In the United States, compliance often enters the discussion earlier than teams expect. For electrical housings, UL 94 flammability can matter early. For food-contact or medical parts, I verify the exact resin grade and its documentation before tooling, because the material family alone is not enough. Colorants, fillers, and glass fiber can also change shrink and surface behavior, so appearance decisions should not be left to the last minute.
Material selection is where engineering and production planning finally meet. If that part is rushed, the rest of the program usually pays for it.
The mistakes that cost the most time
- Designing for aesthetics first and only later asking how the part will eject, cool, and vent.
- Using thick walls to buy stiffness instead of adding ribs where the load actually is.
- Specifying tight tolerances everywhere instead of limiting them to the features that truly control fit or function.
- Ignoring undercuts until DFM review and then discovering that side actions add cost and lead time.
- Choosing finish too late and finding out that texture needs more draft than the current CAD can support.
Most of these mistakes are avoidable, which is why a basic manufacturability review pays for itself quickly. I would rather spend an extra hour in design than force the tooling team to engineer around a part that was never molded-friendly in the first place.
That brings me to the checklist I would use before releasing a part to tooling.
My pre-tooling checklist for a cleaner launch
- Does the part really need molded-in detail, or would thermoforming do the job more efficiently?
- Are draft, wall transitions, and ejection paths clean in every direction the mold has to move?
- Have I limited tight tolerances to the few dimensions that actually drive fit and performance?
- Is the resin locked to the application, compliance target, and surface finish I need?
- Does the expected volume justify the mold, or am I paying for capacity I will not use?
- Will texture, color, or secondary operations change the design rules I thought I could ignore?
When those answers line up, plastic injection molding is usually the strongest route for durable, repeatable production parts. When they do not, I would rather simplify the part or switch processes than pay for a tool that fights the design from day one.