What matters most before the first pour
- Pick the mold style based on the part’s geometry, not on whatever looks easiest to build.
- Finish and seal the master first, because silicone copies every scratch and pore.
- Platinum-cure silicone is usually the better choice for fine resin parts, but it is more sensitive to contamination.
- Vacuum helps remove air from silicone; pressure helps crush bubbles in the resin.
- Most resin casts do not need a release agent, but using one can extend mold life in the right setup.
- The first mold teaches you whether the part line, venting, and hardness are actually working.
Choose the mold style that matches the part
In a plastics workflow, I treat silicone mold making as a precision-casting tool, while thermoforming remains the better answer for thin sheet parts. If I need surface detail, undercuts, or repeatable small-batch casting, silicone wins; if I need fast formed panels or shells, I look elsewhere. That first decision matters more than brand names because the mold geometry determines how well the resin part will release and how long the mold will survive.| Mold style | Best for | Why I use it | Main limitation |
|---|---|---|---|
| Open-face block mold | Flat-backed parts, plaques, tiles, badges | Simple to build and fast to cast from | Does not handle undercuts well |
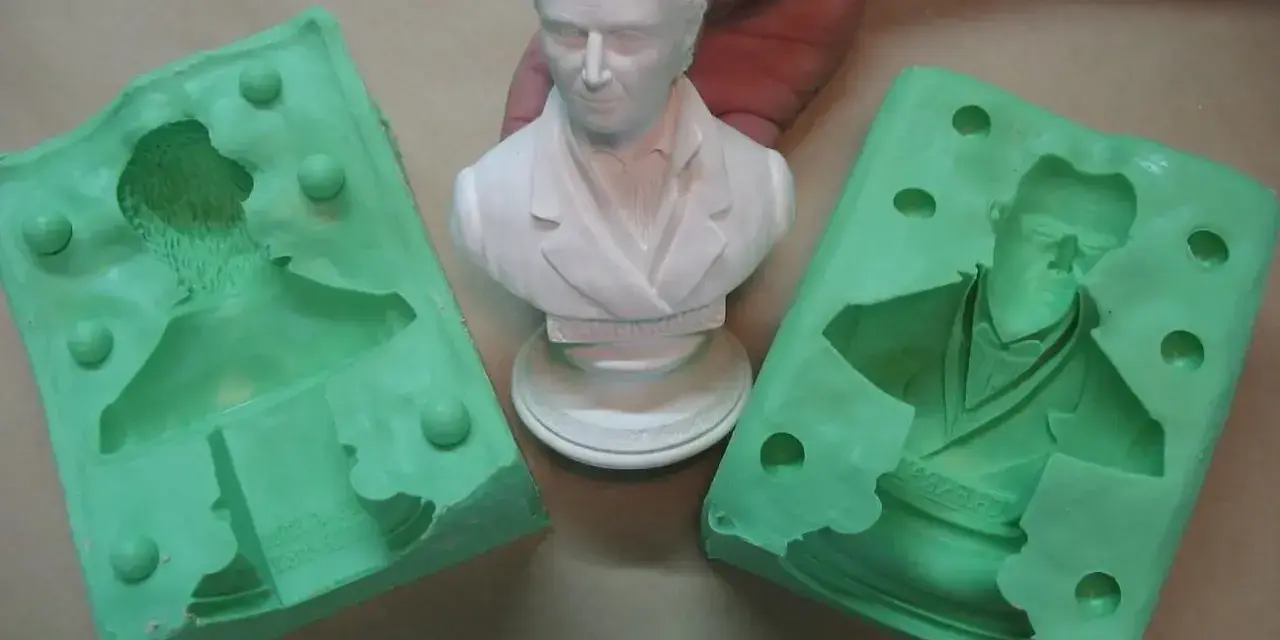
| Two-piece block mold | Bottles, figurines, small mechanical shapes, anything with wraparound detail | Captures full geometry and gives a predictable part line | Alignment and seam planning matter a lot |
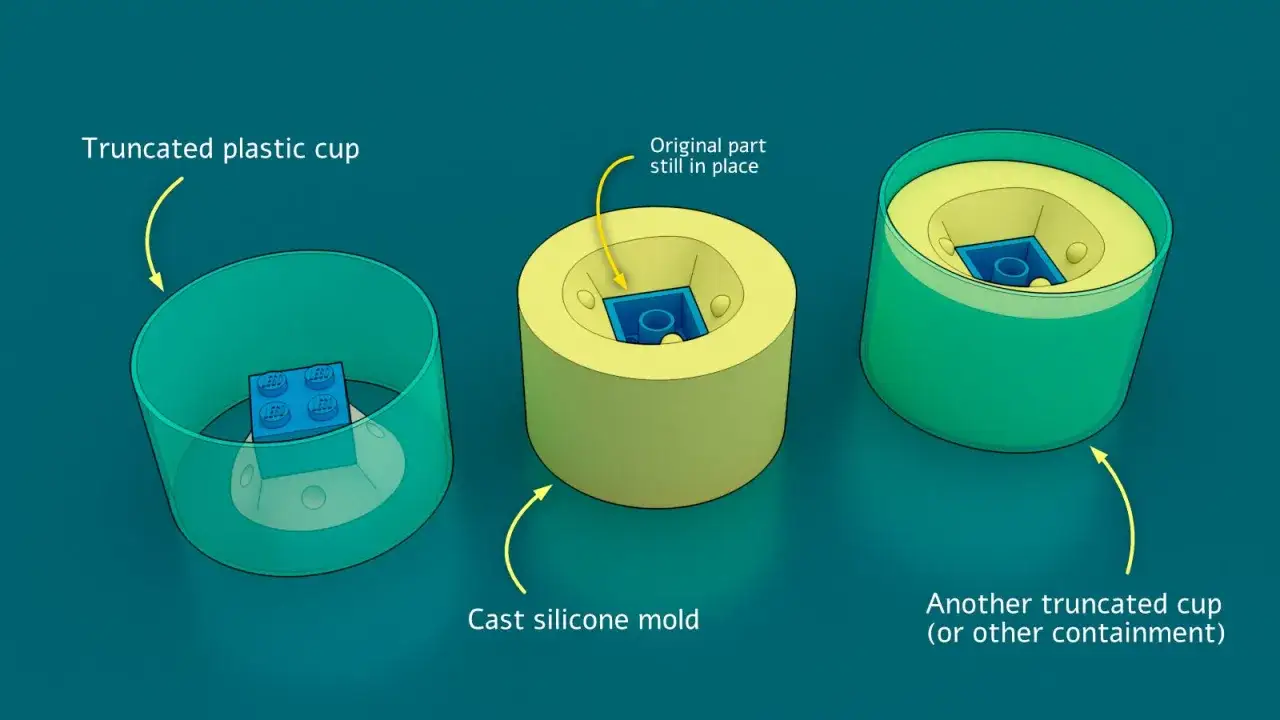
| Brush-on or blanket mold | Large originals, vertical surfaces, sculptures, irregular forms | Saves material and handles awkward shapes | Needs a support shell and more setup time |
When I am unsure, I ask one question: will the part come out without forcing the mold to stretch past its comfort zone? If the answer is no, I move to a two-piece or blanket mold before I waste silicone. Once the mold style is settled, the master itself becomes the next bottleneck.
Prepare the master and part line before the silicone ever touches it
The mold only reproduces what it sees, which is why the master has to be finished as if it were the final part. Every scratch, dust nib, fingerprint, and unsealed pore will show up in the casting. I always assume the master surface is guilty until I’ve inspected it under raking light and fixed the flaws that would be expensive to chase later.
- Finish the surface first. Sand, polish, fill, or prime until the master looks like the surface you want repeated.
- Seal porous materials. Wood, plaster, some 3D prints, and many clays need sealing so air and resin do not migrate into the silicone or the casting.
- Plan the part line around the widest geometry. A good part line reduces tear-out and hides seams where they are least visible.
- Add registration keys. These are the little alignment features that keep two mold halves from sliding out of position.
- Vent trapped air early. If the master traps pockets underneath, air will find a way into the mold face or into the finished cast.
For porous models, I seal from the start and I think about where air can migrate before I pour anything. That small amount of extra work is usually cheaper than repairing a mold with a weak surface or a casting full of tiny pinholes. Once the master is clean and the parting line makes sense, the next choice is the silicone itself.
Pick the silicone that suits resin casting
For resin work, the real choice is usually platinum-cure versus tin-cure silicone. I do not treat that as a purely budget decision. Platinum systems usually give me better detail, lower shrink, and a cleaner long-term mold, but they are less forgiving when the master or the workspace is contaminated. Tin-cure systems can be more tolerant and sometimes easier to use in messy shop conditions, but some resin systems and clear castings prefer platinum-cure molds.
| Silicone type | Strengths | Watch-outs | Best use |
|---|---|---|---|
| Platinum-cure | Excellent detail, strong repeatability, often longer mold life, good for fine resin parts | Sensitive to sulfur-based clay, amines, tin compounds, cured polyester, some paints, and some silicone rubbers | Precision molds, clear parts, fine textures, small-batch production |
| Tin-cure | More forgiving around contaminated masters, often straightforward for general mold work | Can be a poor match for some clear resin systems and may shrink more over time | Simple parts, rough-shop prototypes, less demanding casts |
I also pay attention to viscosity, hardness, and working time. Softer silicones release undercuts more easily, while firmer silicones hold shape better in flatter molds and thin walls. Many common systems used for resin casting offer working times somewhere in the 20 to 45 minute range and cure windows around 16 to 24 hours, but I still follow the product sheet because those numbers shift by formulation. That brings me to the part where most beginners lose quality before the mold even cures: mixing and pouring.
Mix and pour the silicone without trapping defects
My rule is simple: if the mix is sloppy, the mold will be sloppy. I measure accurately, scrape the sides and bottom of the cup, and mix slowly enough to avoid whipping in air. If the silicone is thick or the master has deep texture, I vacuum-degas the mix before pouring; a chamber that pulls around 29 inHg is enough to collapse most trapped air in a normal small-batch setup.
- Measure exactly. Use the manufacturer’s ratio by weight or by volume, not a rough estimate.
- Mix deliberately. Fold the material until the color and texture are fully uniform.
- Degas when the geometry needs it. Dense, detailed, or deep molds benefit most from vacuum.
- Pour in a thin stream. Let the silicone flow into one low corner so it rises over the master naturally.
- Use a detail coat for brush-on molds. The first coat should capture the surface, not build thickness.
- Tap and tilt the box. Small movements help trapped bubbles move out before cure begins.
Not every mold needs a vacuum chamber. Some low-viscosity systems are pourable enough that a careful pour is enough for simple parts, and many starter molds turn out fine without extra equipment. I still treat degassing and slow pouring as cheap insurance whenever the part has sharp textures, narrow undercuts, or a face that will show every flaw. Once the silicone is in place, the cure and demold stage decide whether the mold will stay accurate or distort before the first resin run.
Cure, demold, and condition the mold before the first cast
Rushing cure time is one of the fastest ways to ruin a good mold. Even if the surface feels solid, the interior may still be soft, especially in thicker sections. I wait for the full cure window on the technical sheet, then give the mold a careful demold rather than yanking the master out just because it seems ready.
- Let the mold finish curing fully. If the system says 16 to 24 hours, I do not assume the earliest number is always safe.
- Trim flash cleanly. Ragged edges and sharp protrusions become tear points later.
- Use a support shell when the mold needs it. Soft blanket molds need structure so they do not sag.
- Check the keys and seam alignment. The first closure should feel controlled, not forced.
- Store the mold flat and clean. Heat, UV exposure, and dust all shorten useful mold life.
I also like to inspect the very first cavity before any resin goes in. If the silicone surface has tiny tears, trapped debris, or a glossy patch where release chemistry is wrong, I fix that immediately. A clean demold is the sign that the mold is ready for the part you actually care about, which is the resin casting itself.
Cast resin in a way that protects detail and mold life
For most resin pours, I do not reach for release agent automatically. Silicone usually releases resin well on its own, and every extra coating can slightly reduce detail if overused. That said, a light compatible release can help when I want to extend mold life, reduce wear on fine texture, or make a tricky cast easier to remove. The exact decision depends on the resin chemistry and the finish I need.
Bubble control is the other major decision. Vacuum degassing is useful before the pour when the resin itself holds air, but pressure casting is often the more effective step once the mold is filled. A pressure pot around 60 PSI is common in resin work because it compresses bubbles small enough to disappear visually. If I’m working with a clear or highly detailed part, I treat pressure as part of the casting process, not as a luxury upgrade.
- Use low-viscosity resin for fine detail. Thin resin flows into textures more reliably than thick, syrupy blends.
- Fill from the lowest point. That keeps air from getting trapped in the cavity.
- Do not overfill the mold with heat-sensitive resin. Excess exotherm can shorten mold life or distort thin walls.
- If you pressure-cast, keep the process consistent. Sudden changes in pressure can deform a mold if it was not made for that condition.
The failures I plan for before they happen
Most bad resin casts come from a small handful of repeatable mistakes. I do not think of them as random bad luck; I think of them as signals that one of the earlier steps was skipped or rushed.
- Cure inhibition. If the silicone stays tacky near the master, contamination is the first thing I check, especially sulfur clay, amines, tin residue, or uncured coatings.
- Surface bubbles on the mold face. These usually mean the pour was too aggressive, the mix was not degassed, or the brush coat trapped air.
- Misaligned seams. The part line or registration keys were not planned tightly enough, so the halves slide under clamping pressure.
- Torn undercuts. The silicone is either too hard for the geometry or the part was pulled before it had enough flexibility.
- Warped molds. Thin walls without a support shell tend to sag or distort during storage and casting.
- Short mold life. Too much exotherm, no release where needed, or repeated rough demolding usually cuts longevity fast.
If I had to pick the three issues that cause the most waste, they would be cure inhibition, poor part-line planning, and bubbles that were never addressed before the resin went in. Those are the ones that keep repeating until the workflow changes, not just the material brand. Once those are under control, a small starter bench is usually enough to make clean, repeatable parts.
What I keep on a small starter bench
I prefer a lean setup that covers the actual process rather than a shelf full of specialty items I use twice a year. The essentials depend on the part, but the basic bench stays surprisingly small.
- Silicone rubber. Choose the cure system and hardness based on the part geometry and the resin you plan to cast.
- Accurate measuring tools. A scale or calibrated cups matter because bad ratios create bad molds.
- Mixing cups and stir sticks. Clean containers help reduce contamination and keep the mix uniform.
- Mold box material. Foam board, acrylic, melamine, or printed tooling can all work if they are sealed properly.
- Modeling clay and sealers. These help with part lines, gaps, and porous masters.
- Release agent. I keep it nearby even when I expect not to use it, because the resin or master may call for it.
- Pressure pot or vacuum chamber. Not mandatory for every project, but extremely useful when the part needs clean detail.
- Sharp trimming tools and nitrile gloves. Small cleanup details matter more than they look on day one.
If I were starting from scratch, I would rather own fewer tools and understand them well than buy every accessory in the catalog. Clean preparation and a repeatable pour do more for part quality than expensive extras used badly. That is also why I end every project by deciding whether the mold is good enough to repeat, or whether it still needs one more correction.
What makes a mold worth repeating
A production-ready mold is not just one that released the master once. I want three things before I call it reliable: it should release cleanly, capture the sharpest edge in the original, and keep the seam line predictable from cast to cast. If one of those is weak, I go back to the master, the part line, or the silicone choice before I commit to larger resin runs.
That is the part most people miss when they focus only on the pour. Good resin mold making is really a chain of small decisions that support each other: a finished master, the right mold geometry, a silicone that fits the job, and a casting method that respects the mold. When those pieces line up, the process stops feeling experimental and starts feeling like a controlled fabrication step.