Hollow parts are where this process earns its keep
- It starts with a heated tube or preform that is expanded against a mold with air.
- It is strongest on sealed, hollow shapes such as bottles, jugs, tanks, ducts, and containers.
- Tooling usually costs less than high-pressure injection molds because the process runs at far lower pressure.
- Thermoforming is better for open shapes like trays, panels, and clamshells, not fully enclosed cavities.
- The biggest production risks are wall-thickness variation, poor pinch-off, and cooling imbalance.
How the process works from resin to finished part
At a basic level, I see the sequence as simple: heat the plastic, create a tube or preform, trap it in a mold, and push air into it until it takes the cavity shape. Once the material cools enough to hold that shape, the part is ejected and trimmed. The mechanics are straightforward; the hard part is controlling how the material stretches, because that determines thickness, strength, and appearance.
- Material preparation - Thermoplastic pellets are dried or conditioned when the resin needs it, then melted into a usable state.
- Parison or preform creation - The process starts either with an extruded tube or with an injection-made preform, depending on the production route.
- Inflation in the mold - Air expands the hot plastic until it contacts the cavity walls and copies the tool geometry.
- Cooling and release - The part is cooled, opened, and removed before flash and trim waste are handled.
That sequence is why the method is so efficient for hollow products. It uses material only where the shell needs it, rather than filling an entire solid cavity. The trade-off is that wall distribution is never perfectly uniform, so process control matters more than many people expect. That material behavior is exactly why the next question is not just how the part is made, but how it compares with sheet-based forming and other molding routes.
Where it sits beside thermoforming and injection molding
When I compare this method with thermoforming, the easiest distinction is geometry. Thermoforming starts with a sheet and is excellent for trays, lids, panels, and interior liners; the vacuum draw is typically around 0.9 bar (14 psi), and only one side of the part is fully defined. The hollow-part route starts with a tube or preform and is built for enclosed cavities, so it wins whenever you need a sealed volume rather than an open shell.
| Factor | Hollow-part process | Thermoforming | Injection molding |
|---|---|---|---|
| Starting stock | Tube or preform | Heated sheet | Molten pellets |
| Best geometry | Closed hollow parts | Open shells, trays, panels | Detailed solid or semi-solid parts |
| Tooling cost | Moderate to low | Low | Highest |
| Wall control | Good, but stretch-sensitive | Thins at draw points | Most uniform |
| Part detail | Strong on the exterior, limited in hidden features | Good on one side | Best overall |
| Typical fit | Bottles, jugs, tanks, ducts | Clamshells, covers, liners | Housings, clips, complex functional parts |
If a design is open, flat, or only needs one visible side, thermoforming is usually the simpler answer. If the design must hold pressure or close around a cavity, this hollow-forming route becomes much more attractive. Once that geometry choice is clear, the next decision is which process variant actually fits the part and the production target.
The main process variants and when each one makes sense
There are three routes I see most often in production. They all rely on inflation, but they start from different forms and solve different problems.
Extrusion route
This is the workhorse for larger, simpler, and more forgiving hollow parts. A continuous tube is extruded, captured by the mold, and inflated quickly. I like it for detergent bottles, jerry cans, toys, and industrial containers because it handles complex body shapes well and keeps tooling relatively accessible.
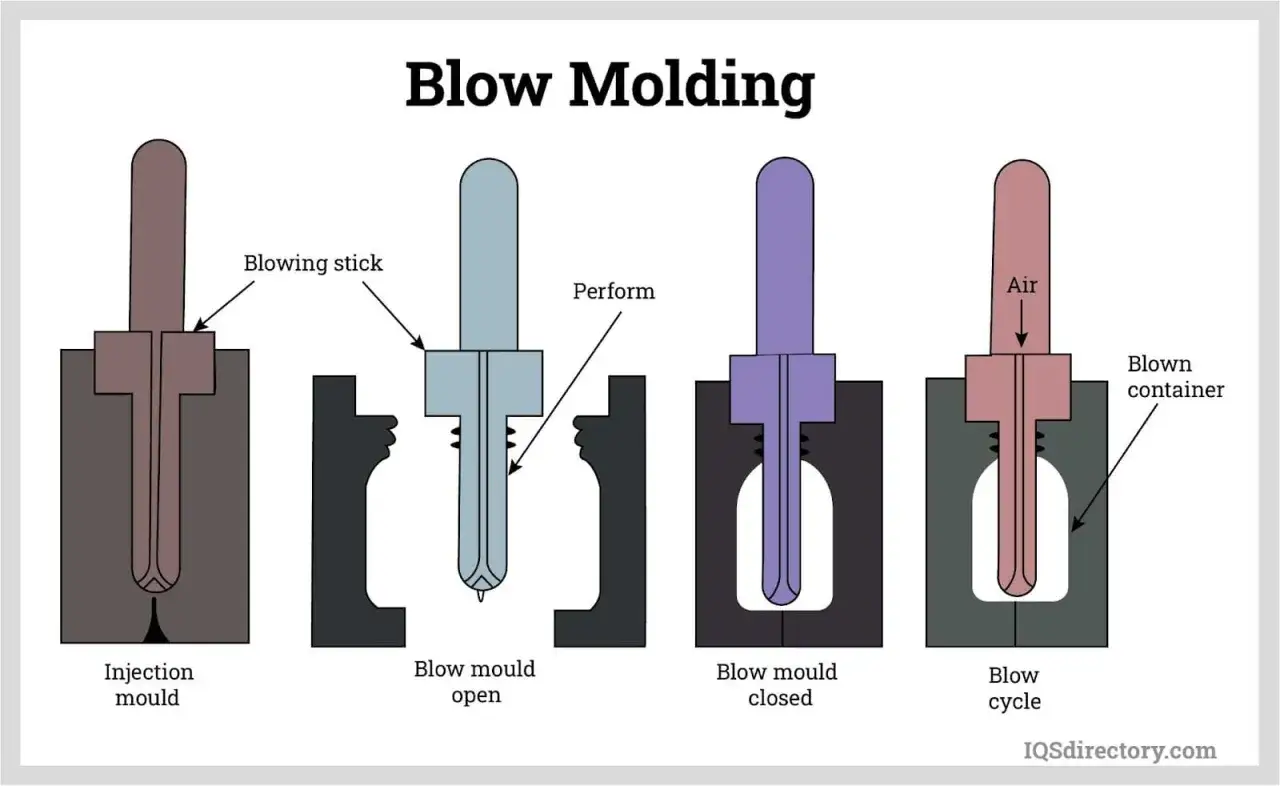
Injection route
This path creates a preform first, then blows it out into the final cavity. It is a strong choice when neck finish, thread quality, and dimensional consistency matter more than sheer flexibility. For smaller bottles and closures, it gives me better control around the opening and less risk of ugly trim or warped threads.
Read Also: Injection Molding - Design, Cost & When to Choose It
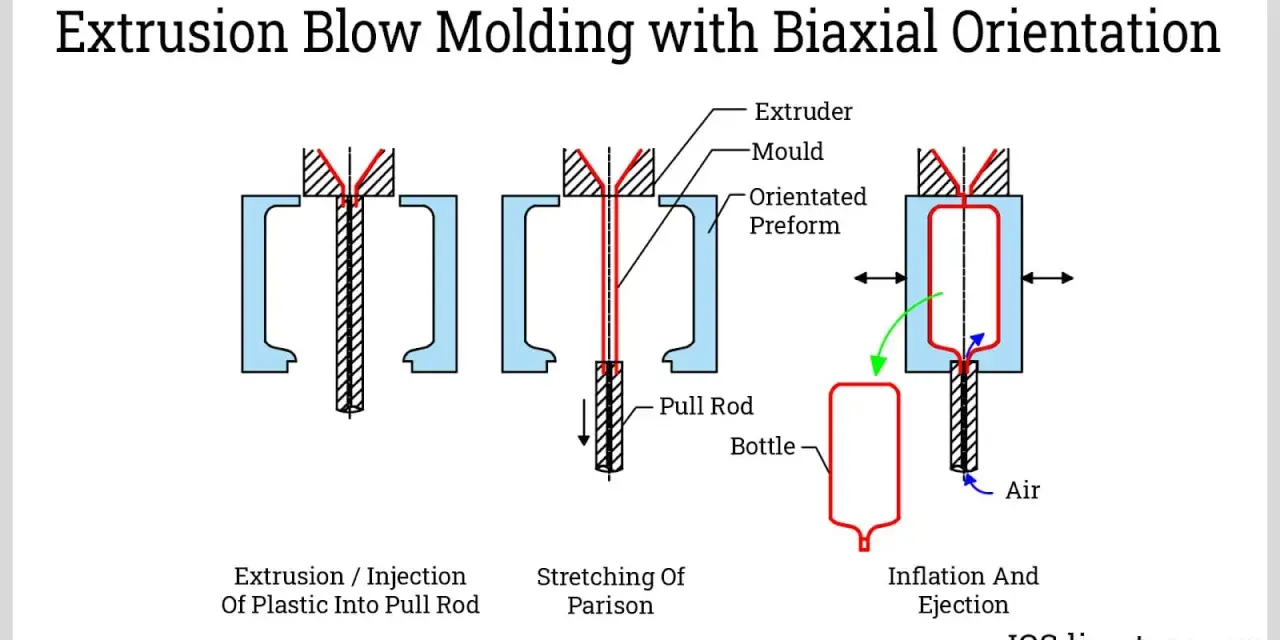
Stretch route
This adds axial stretching before or during inflation. I would choose it for clear PET beverage bottles because the stretch step improves clarity, stiffness, and barrier performance. It also tends to create a more polished consumer look, which matters when packaging itself is part of the product experience.
In practice, the best variant is not the one with the most capability on paper. It is the one that matches the part’s geometry, resin, finish requirements, and annual volume without overcomplicating the line. From there, design details become the difference between a part that runs smoothly and one that needs constant trimming and rework.
Design choices that keep parts strong and consistent
Most failures I see are not dramatic process failures. They are small design mismatches that compound once heat, pressure, and cooling start working on the part. If I were reviewing a new design, I would check these points first.
- Wall distribution - Thick and thin zones should be intentional, not accidental. The material stretches where the mold asks it to, so shoulders, corners, and deep sections need special attention.
- Gradual transitions - Sharp corners create thinning. Gentle radii help the resin flow and reduce stress points after cooling.
- Pinch-off design - This is where the mold seals and trims the parison. A weak pinch-off can leave excess flash, weak seams, or leaks.
- Draft and release - Even though the part is hollow, it still needs enough draft to release cleanly without scuffing or distortion.
- Material choice - HDPE, PP, PET, and related grades behave differently under heat and stretch. Clarity, barrier performance, stiffness, and chemical resistance all shift with resin selection.
- Ventilation and cooling - Air must escape where the cavity closes, and the mold has to pull heat out evenly. Uneven cooling is one of the fastest ways to create warp or ovality.
- Recycled content - Post-consumer or regrind content can work well, but it tightens the process window. I would validate stretch behavior early instead of assuming it will run like virgin resin.
I also pay attention to where the part will be handled. A container that only holds liquid is one thing; a tank, fuel component, or reusable shipping part sees different abuse, so the wall profile and resin choice need to reflect that reality. Those design choices show up quickly in defects, which is where the process stops being theoretical and starts becoming expensive.
Common defects and the fixes I would check first
When a hollow part looks wrong, the root cause is usually visible in the defect pattern. I prefer to read the part first, then adjust the process, because the symptom often points to the actual imbalance.
| Defect | Likely cause | First fix I would try |
|---|---|---|
| Thin shoulders or corners | Material stretches too far before contacting the mold | Rebalance parison or preform distribution and reduce draw in the weak zone |
| Heavy flash at the seam | Pinch-off is too loose, too hot, or poorly aligned | Check tooling alignment and pinch geometry before changing the resin |
| Warped or out-of-round parts | Cooling is uneven or the cavity closes inconsistently | Improve mold cooling and review cycle timing |
| Bubbles or splay | Moisture, contamination, or degraded material | Dry the resin correctly and inspect the melt path |
| Weak seam or leak point | Insufficient fusion at the pinch-off or bad trim | Refine the seal area and confirm the cut is clean |
| Cosmetic streaks | Uneven temperature, poor material mixing, or surface contamination | Stabilize melt temperature and verify resin quality |
The useful lesson here is that not every defect is a machine problem. Sometimes the mold layout is asking the material to do more than it can do gracefully. After that, choosing the right route becomes much easier because the failure mode usually points to the wrong process, not just the wrong setting.
A practical rule for choosing the right route on a new part
When I narrow the decision quickly, I use a simple filter:
- Choose the hollow-part route when the part must be sealed, lightweight, and hollow.
- Choose thermoforming when the part is open, shallow, or only one side needs to be accurately formed.
- Choose injection molding when fine detail, tight tolerances, and complex functional features matter most.
- Expect the economics to improve as volume moves into the thousands of parts, not just prototypes or very short runs.
- Budget time for trimming, leak checks, and thickness validation, because a good mold still needs process tuning.
My rule is simple: shape first, volume second, then surface and tolerance requirements. Once those three are clear, the right manufacturing path usually becomes obvious, and the design work stops fighting the process.