The short answer is yes, but the method matters more than the material
- Thin acrylic can often be scored and snapped cleanly on straight cuts.
- Thicker sheets usually cut better with a fine-tooth saw or an acrylic-specific blade.
- Heat is the main enemy; dull blades and fast feeds are what cause melting and chipping.
- Firm support close to the cut line reduces vibration and helps prevent cracks.
- A clean edge is easier to finish when the cut itself is controlled from the start.
What makes acrylic feel easy or difficult to cut
I judge acrylic by three things: thickness, internal stress, and heat control. Thin sheet cuts cleanly because there is less material to remove and less chance of deflection. Thicker sheet needs a saw because a scorer cannot penetrate far enough without wandering or splitting. If the sheet has been scratched, bent hard, or stored under tension, it becomes less forgiving no matter how good the tool is.
Cast acrylic usually feels a little more forgiving when I want a cleaner machined edge, while extruded sheet can still cut very well if I keep the process cooler and lighter. The difference is not dramatic for every project, but it matters when the edge will stay visible. That is why I treat the material itself as part of the cutting plan, not just the thing being cut.
| Factor | What it changes | Why it matters |
|---|---|---|
| Thickness | How much material the blade or scorer has to remove | Thin sheets are simpler to score; thicker sheets need sawing |
| Internal stress | How likely the sheet is to crack under pressure | Stress makes chips and hairline cracks more likely |
| Heat | Whether the cut stays crisp or turns gummy | Too much friction melts edges and clouds the finish |
| Support | How stable the sheet stays during the cut | Poor support leads to chatter, vibration, and breakage |
Once those variables are under control, the cutting method becomes much easier to choose, which is exactly where I go next.
How I choose the cutting method for the sheet
The fastest way to avoid trouble is to match the method to the thickness and the shape you need. Straight lines in thin sheet can be handled by scoring; thicker material wants a saw; curves and internal cutouts usually need a jigsaw, router, or laser. I do not force one tool to do everything, because that is usually how acrylic gets damaged.
| Sheet thickness | Best starting method | Good for | Watch out for |
|---|---|---|---|
| Up to about 3/16 in. (5 mm) | Score and snap | Straight cuts, small trims, simple shop work | Do not over-score or try to snap a curve |
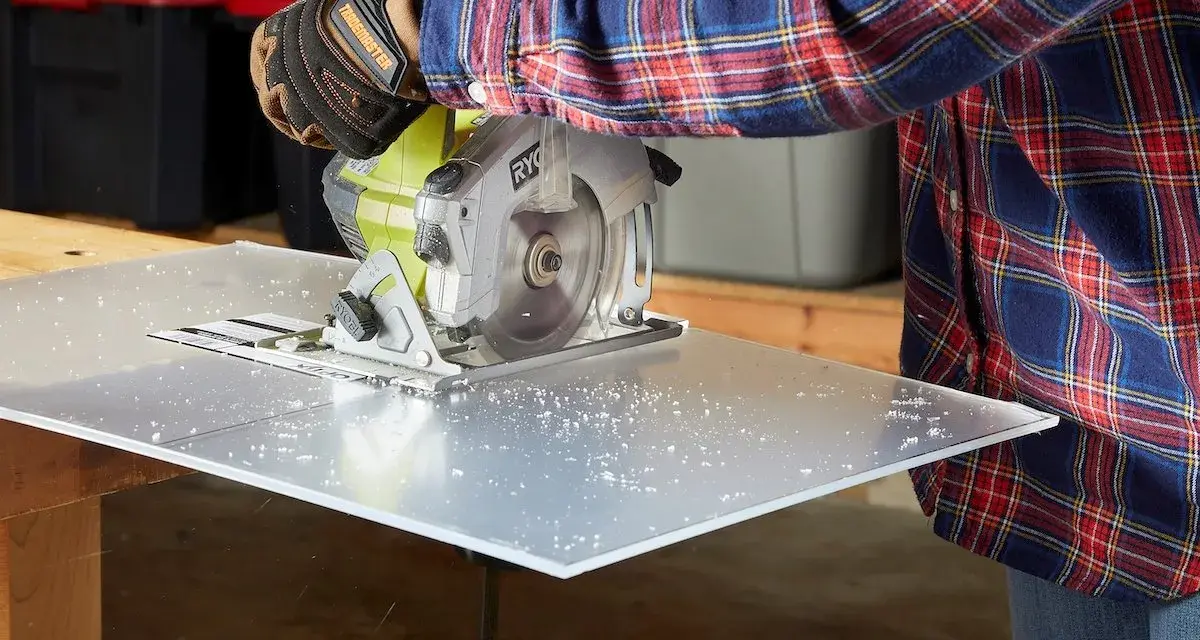
| 1/4 in. to 1/2 in. (6 to 12 mm) | Table saw or circular saw with a fine-tooth blade | Long straight cuts, panels, shelves, covers | Heat buildup and blade chatter |
| Curves and internal cutouts | Jigsaw, router, or CNC | Rounded shapes, openings, templates | Chipping at tight turns if the feed is too aggressive |
| Visible, high-precision parts | Laser cutting or outsourced fabrication | Signage, display parts, repeatable geometry | Heat stress and post-processing needs |
If I only need one or two shop pieces, I usually cut them myself. If the edge will be highly visible, the part is expensive, or the geometry is awkward, I stop trying to save time and use the method that is least likely to fail. That judgment call saves more material than any trick with the saw does.
Tools and blade settings that give the cleanest edges
The blade matters more than the saw body. A sharp, high-tooth-count carbide blade with a triple-chip style tooth pattern gives the most consistent straight cuts because it shears acrylic instead of tearing it. For jigsaws, I use a fine-tooth blade made for plastics or a dense fine-tooth metal-cutting blade; the goal is the same in both cases: less grabbing, less chatter, less heat.
| Tool | Best use | What I watch for |
|---|---|---|
| Score-and-snap knife | Thin, straight cuts in sheet under roughly 3/16 in. | Several controlled passes, not one deep gouge |
| Table saw or circular saw | Long straight cuts in thicker acrylic | Fine-tooth carbide blade, stable support, steady feed |
| Jigsaw | Curves, rounded corners, and internal openings | Fine-tooth blade, low vibration, slow turns |
| Router or CNC | Templates, exact profiles, polished production work | Heat, chip clearance, and bit selection |
On straight saw cuts, I prefer a blade in the 60 to 100 tooth range for many shop jobs, with the finer end making more sense as finish quality becomes more important. I also keep the work clamped close to the cut line and avoid letting a large offcut hang unsupported. Acrylic does not like vibration, and vibration is what makes a clean line turn into a ragged one.
That tool choice only works if the cut itself is handled in a controlled way, so the next section is the process I follow when I actually start cutting.
A practical cut sequence for straight lines and curves
Straight cuts
- Leave the protective film on the sheet until the cut is finished.
- Mark the cut line on the film or on masking tape so the surface stays clean.
- Support the sheet on both sides of the line with a flat, stable surface.
- Clamp a straightedge if I am not using a saw fence.
- Set the blade depth so it clears the sheet without exposing far more blade than necessary.
- Feed steadily and let the tool do the work instead of pushing hard.
- Sand the edge after the cut, starting with a coarser grit and moving finer if the part is visible.
Read Also: Acrylic vs. Glass - Why Acrylic Wins for Your Project
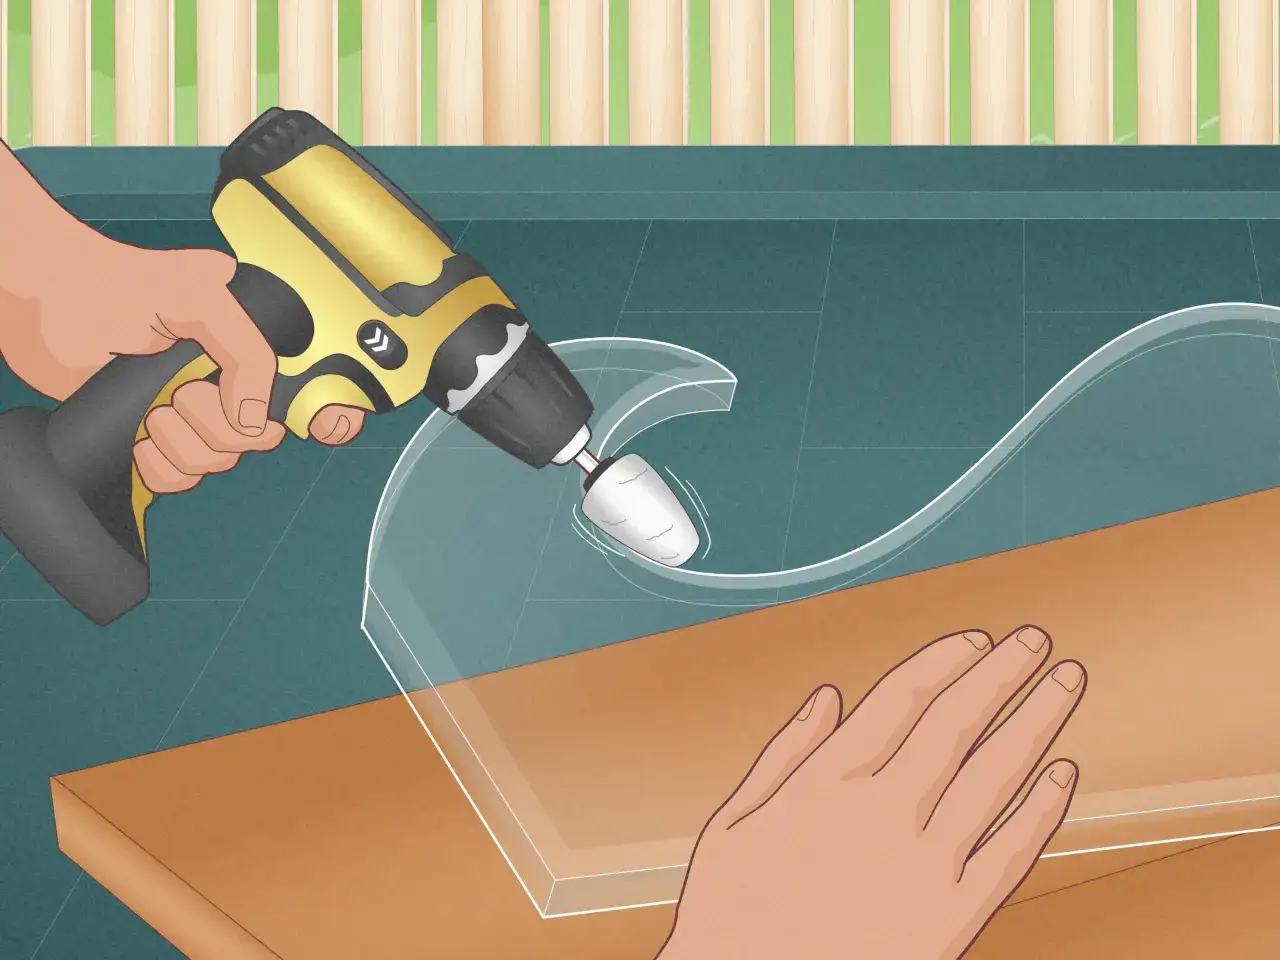
Curves and internal cutouts
For curves, I slow the cut down even more. A jigsaw works well when the blade is narrow and the turns are generous, but I do not expect it to handle tight radii perfectly. For internal cutouts, I drill the starter hole carefully, keep the sheet supported, and ease into the line instead of swinging the saw into the corner. If the shape is complex, I would rather route or laser-cut it than force a handheld blade to behave like a CNC machine.
A useful habit here is to make a test cut on scrap that matches the real material. That tells me whether the blade is too coarse, the feed is too fast, or the sheet is reacting badly before I ruin the actual part. It is a small step, but it prevents the most expensive mistakes.
Mistakes that create chips, cracks, and melted edges
Most bad acrylic cuts come from the same few errors, and they are easy to spot once you know what they look like. I treat them as warning signs, not random bad luck.
- Using a dull blade - it rubs more than it cuts, which heats the edge and leaves a rough finish.
- Letting the sheet flex - vibration is the fastest route to hairline cracks and chipped corners.
- Feeding too fast - the blade loses its clean bite and starts to chatter or melt the surface.
- Trying to score thick stock - once the sheet gets too thick, the snap is no longer predictable.
- Removing support too early - the offcut can break away suddenly as the cut finishes.
- Rushing the finish - a rough edge is often better recut than heavily sanded back into shape.
When I see a cut going wrong, I do not try to rescue it with more force. I stop, adjust the blade or support, and make a cleaner pass. Acrylic usually gives me one warning before it fails; the trick is paying attention early enough to use it.
When a laser or pre-cut panel is the smarter move
There are jobs where I would not bother hand-cutting acrylic at all. If the part has a complex outline, needs a polished edge, or must fit a repeatable dimension for production work, laser cutting or CNC routing is the cleaner answer. Laser cutting is especially strong for intricate shapes, though it can leave heat stress that may need post-processing if the part will live under load or in a demanding environment.
| Situation | Better choice | Why it wins |
|---|---|---|
| One straight trim cut on thin sheet | Score and snap | Fast, low cost, and easy to control |
| Long straight panels in thicker stock | Table saw or circular saw | Cleaner control and better edge consistency |
| Decorative shapes or logos | Laser cut | Best accuracy and best fit for detail |
| Repeated parts for a job run | CNC or shop-fabricated panels | Consistency matters more than speed here |
| Visible display pieces with zero room for error | Pre-cut sheet or outsourced fabrication | Less waste and fewer edge defects |
I also choose a pre-cut panel when the project cost is higher than the time saved by doing it myself. That is not being cautious for its own sake; it is just good fabrication discipline. The best cut is sometimes the one you never have to troubleshoot.
The rule I use before I start the cut
If the cut is straight, the sheet is not too thick, and I can clamp it properly, I cut acrylic myself without much hesitation. If the part is thick, visible, or expensive to replace, I switch to a better method or send it out. That simple check keeps acrylic in the category it belongs in: manageable, but only when I respect the material and the limits of the tool.