The best attachment method depends on load, movement, and how clean you want the finish to look
- Use VHB tape for clean, low-profile installs where you want the bond hidden and the surfaces are flat and sealed.
- Use silicone or polyurethane sealant when flexibility matters more than raw strength, especially on small panels or perimeter bonds.
- Use screws, washers, or standoffs when the panel must be removable or carry more load, but give the acrylic room to move.
- Seal bare wood first so adhesive does not soak into the fibers and fail unevenly.
- Avoid locking large sheets rigidly in place; acrylic moves more than wood, and restrained movement is where cracks start.
Choose the fastening method before you drill or glue
The biggest mistake I see is starting with a product instead of a mounting strategy. A small decorative panel, a cabinet insert, and a wall-mounted sign face do not need the same solution, so I choose the method based on the job, not the shelf label.
| Method | Best for | Strengths | Watch-outs |
|---|---|---|---|
| Double-sided VHB tape | Light to medium panels, hidden joints, clean interior work | Fast, neat, no visible hardware, spreads load well | Needs flat, sealed surfaces and patience while the bond develops |
| Silicone or polyurethane sealant | Perimeter bonds, small panels, areas that move a little | Flexible, weather-tolerant, good for sealing as well as bonding | Not ideal when you need a rigid structural joint |
| Screws with washers or standoffs | Removable panels, shop fixtures, framed mounts | Secure, serviceable, predictable | Hardware is visible unless you hide it, and drilling must be done carefully |
| Hybrid tape plus fasteners | Medium to larger panels where you want both support and a cleaner look | Reduces stress on the sheet and gives backup retention | More planning, more layout work, more opportunities to misalign the panel |
I rarely reach for acrylic cement here unless I am bonding acrylic to acrylic. For wood-to-acrylic work, the joint usually needs either a flexible adhesive system, a pressure-sensitive tape, or mechanical fastening. If the sheet is large, I also think about movement first. According to ACRYLITE, acrylic expands and contracts roughly three times more than metals and about eight times more than glass, which is enough movement to matter when the panel is restrained at multiple points.
That is why the attachment method matters more than the brand name on the tube. Once the mounting strategy is clear, the adhesive choice becomes much easier.
Adhesives and tapes that make sense on wood and acrylic
For a clean, hidden bond, I like acrylic foam tape when the surfaces are smooth, dry, and well prepared. It is especially useful on signage, trim pieces, display panels, and other jobs where I want the joint to disappear. 3M’s VHB guidance says the bond keeps building after application, reaching about 90% of ultimate strength after 24 hours and full strength after 72 hours, so I treat it as a clamp-and-wait method rather than an instant load-bearing fix.
For small to medium panels that need flexibility, I prefer silicone or polyurethane sealant. These products absorb a little movement instead of fighting it, which is useful on wood because wood itself expands and contracts with humidity. They are also easier to use when the acrylic sits against a slightly imperfect wood surface.
Here is the rule I follow in practice:
- Use tape when the surface is flat and appearance matters.
- Use sealant when the assembly needs some flex and the panel is not carrying much structural load.
- Use fasteners when the panel must be removable, aligned precisely, or supported against pull-out.
- Use tape plus fasteners when you want a cleaner face but do not want the acrylic carrying all the stress by itself.
I avoid generic super glue on exposed clear acrylic unless I have no better option. It can leave haze or bloom near the bond line, and once that happens, the clean look is gone. If the joint will be visible, I would rather use a flexible adhesive or a tape system that stays neat after cure. Once you know which family of attachment is right, the next step is making the sheet safe to drill or mount.
Drill and fasten the sheet without creating stress cracks
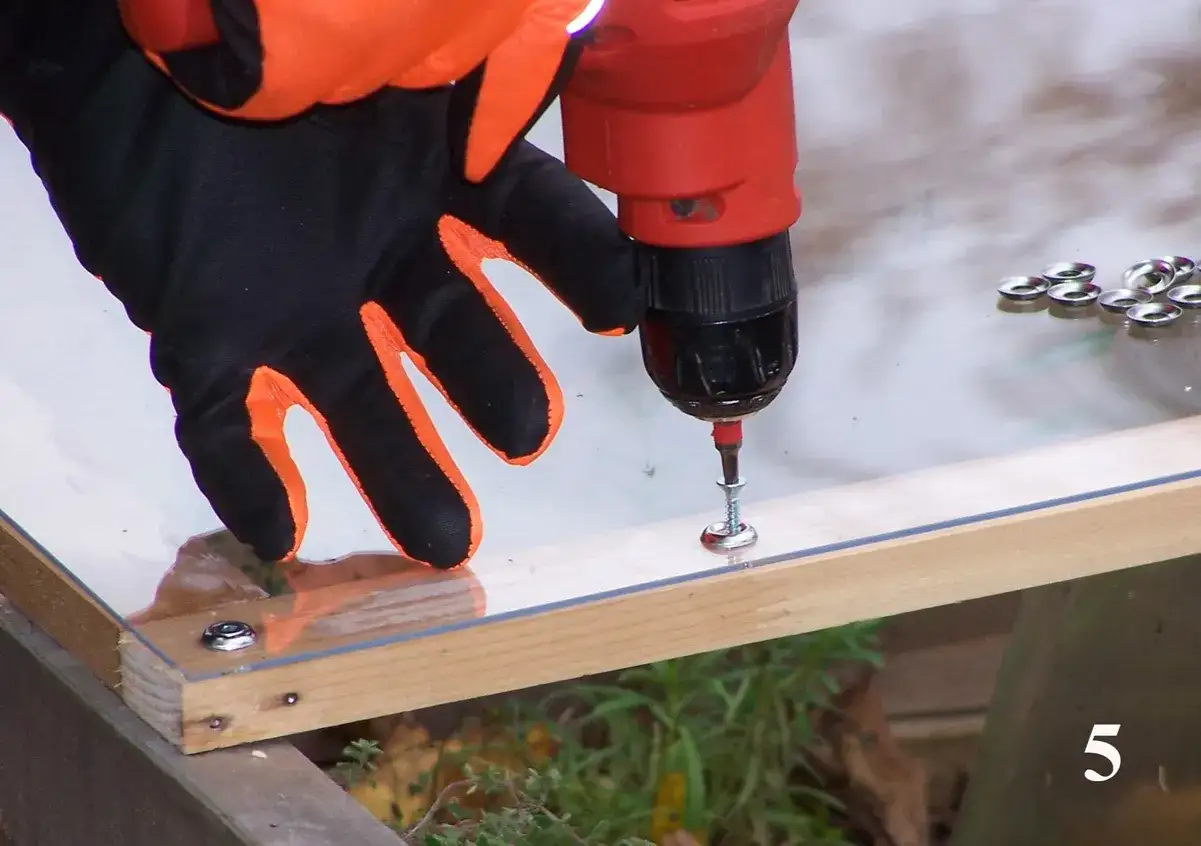
If the project needs screws, bolts, or standoffs, the drilling step is where most failures begin. I always keep the protective masking on the acrylic while I mark and drill it, then I support the sheet from underneath with scrap wood so the exit side does not chip or blow out.
For point fastening, acrylic fabrication guides recommend a hole diameter at least two times the bolt diameter, and the hole center should sit at least 1.5 times the hole diameter away from the edge. That leaves room for movement and reduces the chance of edge cracks. I also use rubber grommets or soft washers when the panel needs to sit on hardware, because hard contact points concentrate stress.
My drilling rules are simple:
- Use a sharp bit and keep the speed low.
- Back up the sheet with wood so the drill exits cleanly.
- Deburr the hole so the hardware does not bite into the acrylic.
- Do not overtighten screws; compress the washer, not the sheet.
- Leave enough clearance for the panel to move with temperature changes.
If the panel is only decorative, a few well-placed standoffs can look cleaner than a full perimeter of screws. If it is large, though, I would rather distribute the load with a frame or a hybrid mount than let a handful of fasteners carry everything. Good hole prep is only half the job, though; the wood side needs equal attention.
Prepare the wood and the acrylic before you commit
I consider surface prep part of the fastening method, not a separate chore. A perfect adhesive on a dusty, damp, or rough substrate is still a weak bond. On the acrylic side, I clean with mild soap and water or isopropyl alcohol, then dry the sheet completely. On the wood side, I make sure the face is flat, clean, and fully dry before anything touches it.
Raw wood, MDF, and particleboard are particularly unforgiving because they soak up adhesive unevenly. For those surfaces, I usually seal the wood first with paint, primer, clear sealer, or another finish that gives the adhesive a more stable face to grab. Bare wood can work, but it is rarely the best bonding surface if the finish will be exposed or the panel needs to last.
The prep sequence I use most often is:
- Dry-fit the acrylic to check size, alignment, and edge clearances.
- Sand or smooth any rough cut edges on the sheet.
- Remove dust from the wood and let it dry fully.
- Seal raw wood if the project will be permanent or exposed to humidity.
- Clean the final bonding zones immediately before applying tape or adhesive.
That prep work takes longer than the actual attachment, but it is the part that keeps the joint from failing later. Once both surfaces are ready, the installation itself is straightforward.
A practical step-by-step workflow for a clean install
For most indoor projects, I like a straightforward process that keeps the bond neat and avoids last-minute adjustments. If I am using tape, I cut the strips first and test the layout before removing any liners. If I am using adhesive, I stage the clamps and spacers so I am not hunting for tools while the bead is already open.
- Mark the final position on the wood with painter’s tape or a light pencil line.
- Dry-fit the acrylic and confirm that edges, corners, and any screw holes line up.
- Clean both bonding surfaces again right before assembly.
- Apply the tape in continuous strips or lay the adhesive bead in the planned path.
- Set the acrylic in place using spacers if you need a controlled gap.
- Press evenly across the full bond area so the joint makes full contact.
- Clamp only if the product calls for it, and avoid point pressure on the acrylic face.
- Let the assembly cure or dwell for the full recommended time before loading it.
For tape, firm pressure matters more than people expect. For sealants, the squeeze-out should be light and even, not a sign that the joint is being forced out of shape. If I am combining fasteners with adhesive, I install the fasteners only after the bond is positioned correctly, not as a way to drag the panel into place. The method is simple enough; what usually defeats it are a few predictable mistakes.
The mistakes that cause cloudy edges, loose corners, and cracks
Most failed acrylic-to-wood mounts do not fail because the material was wrong. They fail because the joint was stressed, contaminated, or asked to do too much. I see the same problems repeatedly:
- Overtightening screws until the acrylic becomes a rigid, stressed plate.
- Drilling too close to the edge and leaving no room for expansion.
- Bonding to raw, dusty, or damp wood that never gave the adhesive a stable surface.
- Using a brittle glue where a flexible adhesive or tape would have handled movement better.
- Skipping the cure time and loading the joint before it has developed enough strength.
- Ignoring edge finish on the acrylic, which leaves small stress risers that grow into cracks.
Cloudy edges are usually a chemistry or handling problem, while cracks are usually a stress problem. Those are not the same failure, and fixing them requires different thinking. If the joint will live outdoors or the panel is large, I become even more conservative about movement and support.
What changes when the panel is outdoors or oversized
Outdoor installs are where I stop thinking like a hobbyist and start thinking like a fabricator. Sun, rain, freeze-thaw cycles, and humidity all push the materials in different directions, so a joint that looks fine on day one can become unhappy by the first seasonal change. For larger sheets, I prefer a framed or perimeter-supported design over hard point-fastening through the middle of the panel.
That is not just caution for its own sake. Acrylic moves enough with temperature that a fully rigid mount can build internal stress quickly, especially on wide panels. If the wood structure is outdoors, I seal all exposed faces and cut edges before installation, then leave the acrylic enough clearance to expand and contract without binding against the fasteners.
For bigger jobs, my checklist is short but strict:
- Use a frame or perimeter support instead of relying on a few center fasteners.
- Choose a flexible adhesive or tape if movement is unavoidable.
- Seal the wood thoroughly so moisture does not change the bond line.
- Leave expansion space at the edges and around the holes.
For most indoor DIY work, the cleanest solution is usually tape or a flexible adhesive on a sealed wood surface. For removable or load-bearing panels, use properly sized fasteners with clearance and soft washers. If I had to give one practical rule to remember, it would be this: let the acrylic move a little, keep the wood dry and stable, and choose a bond that matches the job instead of forcing one method to do everything.