Mirrored acrylic behaves differently from glass: it is lighter, easier to machine, and far less forgiving if you force the wrong tool through it. The practical answer to how to cut acrylic mirror is to match the method to the thickness, the cut shape, and the edge quality you actually need. In this guide, I break down the hand-cutting and saw-cutting methods that work, plus the prep, finishing, and mistake-avoidance steps that keep a sheet from chipping, melting, or cracking at the last second.
The right method depends on thickness, shape, and finish
- Thin, straight cuts are usually best handled with score-and-snap, especially on small parts.
- Longer cuts, curves, and thicker sheet are better done with a saw, router, or CNC setup.
- A sharp, dedicated blade matters more than brute force or speed.
- Keep the protective film on until fabrication is complete.
- Heat is the enemy of mirrored acrylic edges, so feed rate and blade choice matter.
- Flame polishing is usually the wrong finish for mirror-backed sheet.
Choose the method that matches the job
I start by separating the job into two questions: is the cut straight or curved, and is the sheet thin enough to score cleanly? That simple split removes most of the guesswork. If I only need one straight strip from thin stock, I reach for a scorer. If the part has corners, radii, cutouts, or anything thicker than a light hand-cutting job, I switch to a saw or router.
| Method | Best for | Typical use | Main strength | Main limitation |
|---|---|---|---|---|
| Score and snap | Straight cuts in thin sheet | Best on about 1/8 in (3 mm); some plain acrylic grades can go thicker, but I keep mirrored stock conservative | Fast, inexpensive, clean when done well | Only works for straight lines and short, controlled breaks |
| Table saw or circular saw | Long straight cuts and panel trimming | 1/8 in to 1/2 in and beyond with the right blade | Repeatable and accurate | Needs the right blade, support, and feed rate |
| Jigsaw or bandsaw | Curves, inside openings, letters | Useful for shape cutting when a saw line must change direction | Flexible and practical for custom parts | More vibration, more cleanup |
| Router or CNC | Templates, production parts, precise profiles | Best when repeatability matters | Clean control and consistent results | Requires machine setup or outsourcing |
If I am cutting a visible part for signage, decor, or a finished panel, I prefer the method that gives me the least vibration and the most control, even if it is slower. That is usually where the real quality difference comes from. Once the method is clear, the next variable is prep, and that is where a lot of damaged parts start.
Prepare the sheet before cutting
Most bad cuts begin before the blade or knife ever touches the material. I keep the protective film on, mark on the film, and support the sheet so it cannot flex or chatter. If the sheet is lying half off a bench or bouncing on a weak sawhorse setup, the mirror backing will punish you for it.
- Leave the factory film or masking on until the part is fully cut.
- Mark cut lines on the protective film with a fine marker or tape.
- Use a rigid straightedge for scoring and a solid fence or guide for saw work.
- Clamp close to the line, but do not trap the tool path.
- Support both sides of the cut so the offcut cannot drop and tear the edge.
- Make a test cut on an offcut first if the blade, saw, or feed rate is new to you.
I also decide which side will be least exposed to blade exit or handling damage before I start. That is not a glamorous step, but it is the difference between a clean visible face and one that needs to be hidden later. With prep done, thin straight cuts are the easiest part of the job.
Saw thicker sheet and curves with the right blade
For saw cutting, I want a blade that is sharp, dedicated to plastics, and matched to the thickness of the sheet. A triple-chip carbide blade is my default on a table saw or circular saw because it gives a cleaner cut and resists heat buildup better than a random wood blade. If a blade has already seen a lot of wood or aluminum, I do not trust it on mirrored acrylic.
| Tool | Starting point | What I watch most |
|---|---|---|
| Table saw or circular saw | Triple-chip carbide blade; for a 10-inch blade, 60 to 80 teeth is a solid all-purpose range | Blade support, steady feed, and keeping the blade just high enough above the sheet |
| Jigsaw | Fine blade with enough teeth for the thickness; around 8 to 13 tpi is a practical range, with finer teeth for thinner stock | Vibration control and a sharp blade that has not been used on other materials |
| Bandsaw | Fine, sharp blade that can stay cool under a steady feed | Consistent speed and support under the workpiece |
| Router or CNC | Sharp bit, shallow passes, firm clamping | Chip control and repeatability |
For straight saw cuts, I prefer a steady feed over a cautious crawl. Feed too slowly and the edge heats up and softens; push too hard and you chip the cut or make the blade wander. On jigsaws and bandsaws, the same rule applies in a different form: the blade should keep moving cleanly without bouncing the sheet.
When the cut has to turn, a jigsaw or bandsaw is usually the practical choice, but I keep the shape simple and the feed steady. For more exact profiles, I would rather use a router or CNC machine than ask a hand-held blade to behave like a template cutter. That choice is slower to set up, but it usually saves time on the back end.
Keep the mirrored face safe from heat and vibration
The two problems that ruin mirrored acrylic most often are heat and vibration. Heat softens the plastic and leaves a gummy edge. Vibration makes the cut chip, craze, or wander. If I control those two things, the material is usually cooperative.
- Clamp the sheet firmly and support it as close to the cut line as possible.
- Use a blade with the right tooth count for the thickness instead of forcing a universal setup.
- Keep the blade sharp and dedicated to plastic work if possible.
- Do not let the feed rate drift too slow, or the edge can start to melt.
- Do not let the sheet chatter, because vibration is what turns a small cut into a cracked one.
- If the setup allows it, use air to clear chips and keep the cut cooler.
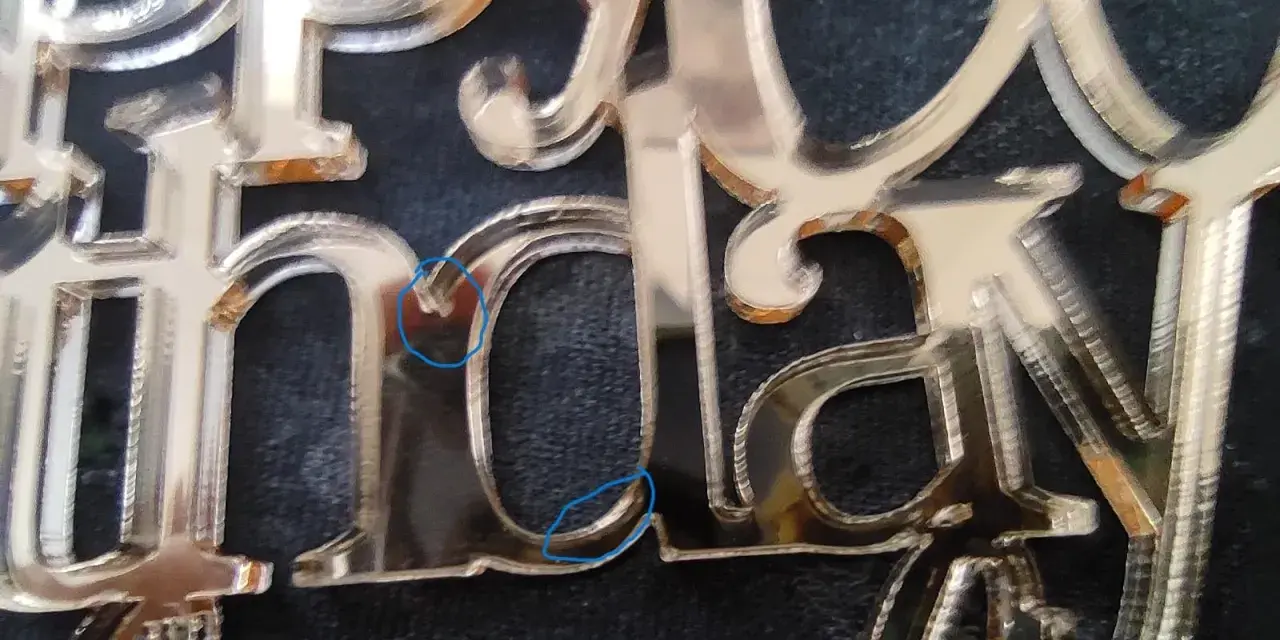
I also watch the first few inches of the cut carefully. If I see white chipping, I look at blade sharpness and vibration. If I see soft, glossy smear marks, I know I am building too much heat. That early feedback matters more than trying to rescue a bad cut after the fact. Once the cut path is stable and cool, the last decision is how much finishing the edge actually needs.
Finish the edge without wrecking the mirror face
A clean cut is better than a heavily polished one on mirror-backed sheet. If the edge will be hidden in a frame, a neat saw edge plus a light scrape or sanding pass is usually enough. If the edge will be visible, I finish it carefully and stop as soon as it looks clean, not as soon as it looks glossy.
- Remove burrs or sharp corners with scraping or light sanding first.
- Use wet sanding if you need to reduce saw marks without building heat.
- Buff only when the design really needs a more refined edge.
- Skip flame polishing on mirrored acrylic unless you have a very specific reason and know the material can tolerate it.
- Test any adhesive or solvent-heavy finishing product on scrap first, because the backcoat can react differently than clear acrylic.
That last point matters more than people expect. Mirrored acrylic is not just clear sheet with a shiny look on top; the backing is part of the material behavior, and aggressive finishing can damage it. In practice, I would rather leave a good saw edge alone than turn it into a stressed, cloudy edge with too much heat or polishing. That leads into the workflow I trust most when a cut has to come out right the first time.
A cut workflow that keeps the mirrored face intact
My default workflow is simple. I choose score-and-snap only for short straight cuts in thin sheet, and I use saws or routers for everything else. I keep the film on, support the sheet fully, use a plastic-friendly blade, and stop the moment the cut starts to melt or chatter. That is the boring version, but boring is usually what produces a clean mirrored part.
If the part is expensive, highly visible, or awkward to replace, I make one sacrificial test cut first. That tells me more about feed rate, support, and blade behavior than any guesswork can. For one-off work, that small extra step is cheap insurance. For repeat jobs, it is the difference between a usable fabrication process and a pile of scratched offcuts.
When I plan a mirrored acrylic cut this way, I end up with fewer surprises, cleaner edges, and a part that is ready for installation instead of repair.