Injection molded parts are a staple of modern plastic manufacturing because they combine repeatability, detail, and production speed once the tool is in place. This article explains what that means in practice, how the process works, when it beats thermoforming, and which design choices have the biggest impact on cost, lead time, and final quality.
What matters most when you choose a molding process
- Injection molding is strongest when a part needs fine detail, repeatable dimensions, and built-in features like bosses, ribs, or snap fits.
- Thermoforming usually wins on simpler, larger parts with shallower geometry and lower tooling cost.
- Tooling complexity drives most of the cost, not just the plastic itself.
- Uniform wall thickness, draft, and sensible rib design make the biggest difference in whether a tool runs cleanly.
- Surface finish, gate location, and tolerance expectations should be decided early, not after the tool is cut.
What injection-molded parts really are
At the simplest level, these are plastic components formed by forcing molten resin into a shaped cavity and letting it cool into a solid part. The key advantage is not just that the shape is repeatable; it is that the process can produce parts with consistent geometry, good surface quality, and features that would be awkward or expensive to make by other methods.
I usually think of this process as the right answer when a product needs more than a shell. If the part needs snap hooks, threaded bosses, thin ribs, decorative surfaces, or tight repeatability across thousands of cycles, molding starts to look very strong. Once that difference is clear, the process itself becomes easier to evaluate.
How the molding cycle turns resin into a part
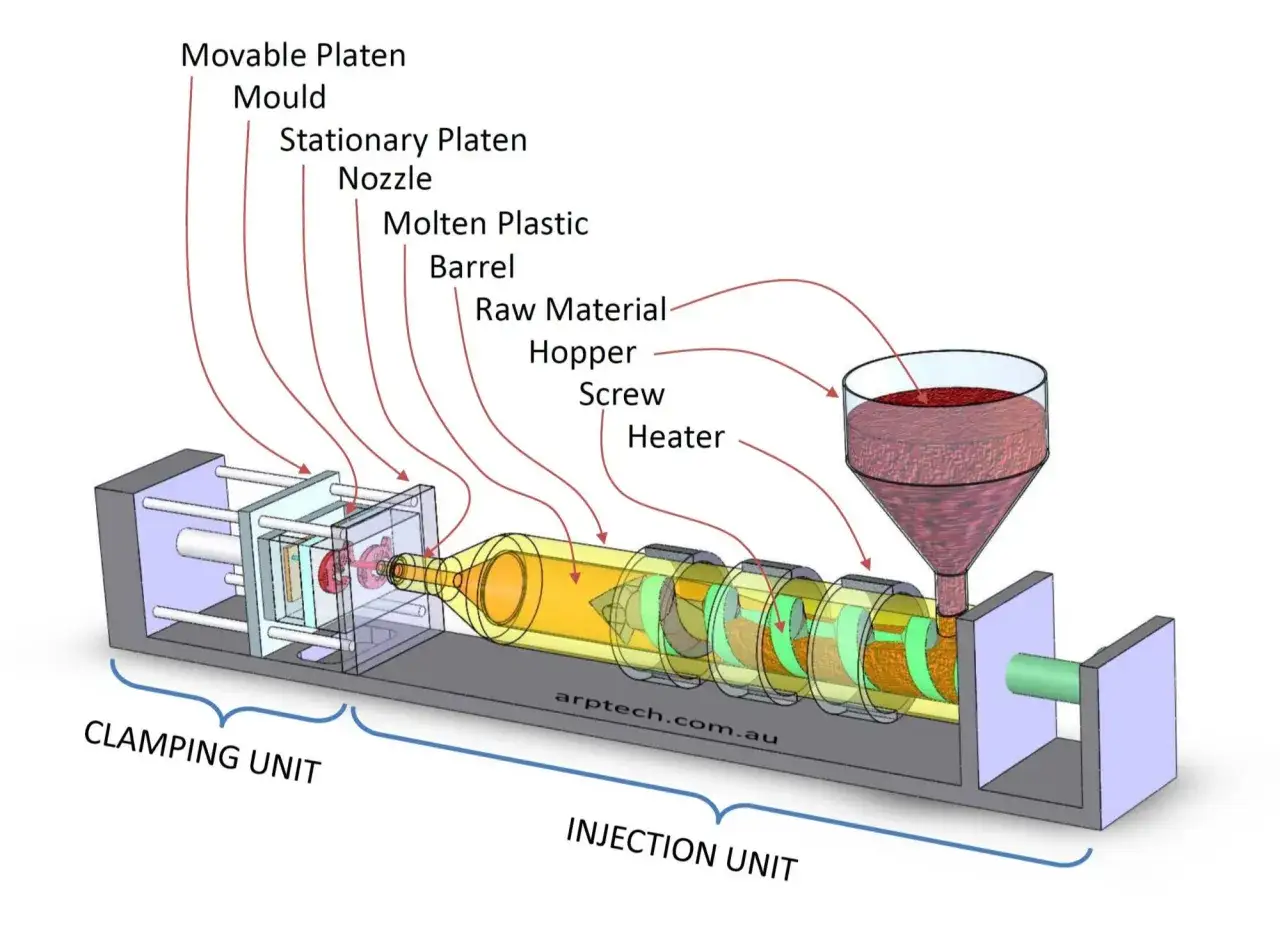
The cycle is straightforward, but each step matters. Plastic pellets are heated until they melt, the melt is injected under pressure into a mold cavity, the resin cools and solidifies, and the mold opens so the finished part can be ejected. A full cycle usually includes filling, packing, cooling, mold opening, and ejection.
That sequence explains why molded parts can be so precise. The cavity is the negative of the final part, so the mold controls the geometry rather than a sheet being stretched into shape. It also explains the process limits: if a design traps material, cools unevenly, or needs the tool to move around too many hidden features, the cost and complexity rise quickly.
The practical takeaway is simple: molding rewards parts that are engineered for the tool, not just drawn to look good on a screen. That leads directly to the comparison with thermoforming, where the geometry and economics are very different.
Where molding beats thermoforming and where it does not
Thermoforming starts with a heated plastic sheet that is drawn or pressed over a mold, so it is naturally better suited to larger, shallower shapes. Injection molding, by contrast, starts with raw resin and can build more complex geometry into the part itself. That difference drives most of the decision-making.| Factor | Injection molding | Thermoforming |
|---|---|---|
| Starting material | Plastic pellets or resin | Plastic sheet |
| Best geometry | Detailed parts, enclosed forms, functional features | Large, shallow, mostly one-sided shapes |
| Tooling cost | Higher up front | Usually lower |
| Per-part cost at scale | Very low once volume rises | Competitive for simpler parts and lower volumes |
| Detail and tolerance | Excellent | Moderate, depending on part depth and draw |
| Typical examples | Housings, caps, clips, medical components, connectors | Trays, panels, enclosures, packaging, liners |
For me, the deciding question is rarely “Which process is better?” It is usually “What does the part actually need to do?” If the answer is structural detail, precision features, or high-volume consistency, molding tends to win. If the answer is a broad form with simpler edges and lower tooling investment, thermoforming often makes more sense. That tradeoff naturally leads to cost and timing.
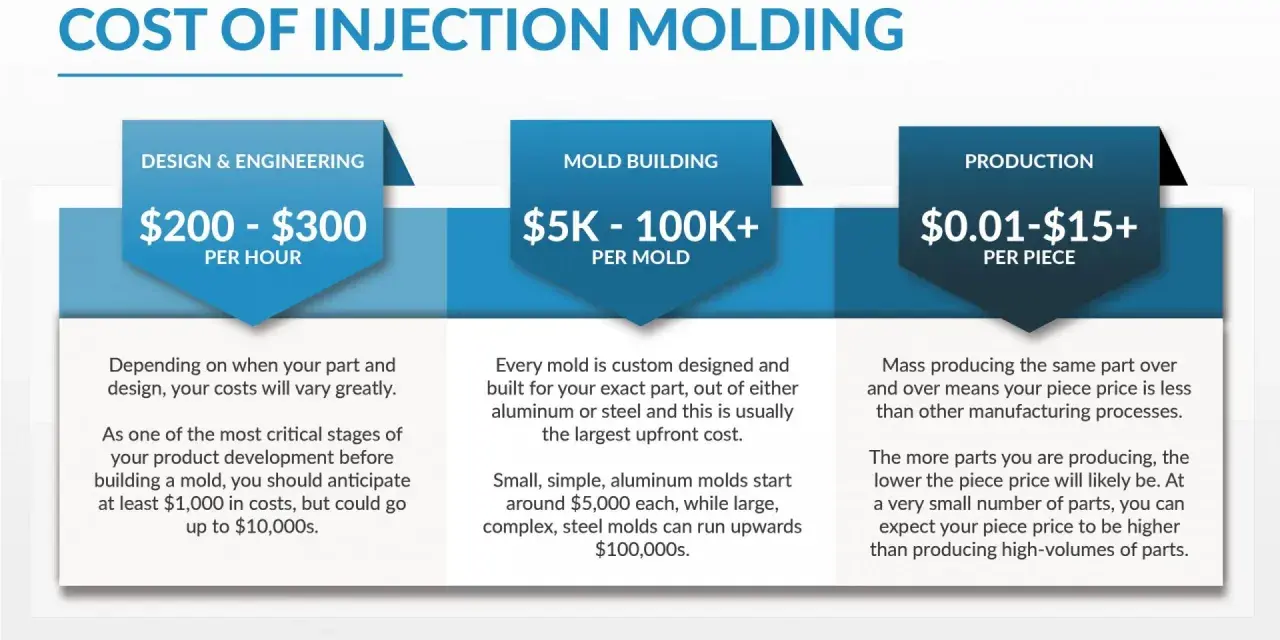
What drives cost and lead time in production
Most of the money in molding is tied up in tooling, not resin. The part itself may be inexpensive, but the mold, setup, finishing, and any moving elements in the tool can add up quickly. A rough rule of thumb is that injection tooling can cost two to three times more than tooling for thermoforming or vacuum forming when the part footprint is similar.
Lead time follows the same pattern. Aluminum tooling can often be produced in a few weeks, while steel tooling usually takes longer and is chosen when durability and very high volume matter more. In many programs, the fastest route is rapid tooling for validation, then a harder production tool once the design is frozen.These are the main cost drivers I look at first:
- Part size and projected surface area.
- Number of cavities in the tool.
- Undercuts, slides, and other moving tool elements.
- Finish requirements, especially polished or textured surfaces.
- Tolerance demands and inspection burden.
- Material choice, especially high-performance resins.
If a team asks why one quote is far above another, the answer is usually hidden in one of those six factors. Once those are under control, the design work becomes much easier and a lot less expensive.
Design rules that keep the tool simple
When I review a plastic part for molding, I start with geometry before I think about material. A good resin cannot rescue a bad shape. The mold wants uniform thickness, clean release, and a part that cools without fighting itself.
Keep walls consistent
Uneven wall thickness creates sinks, warpage, and longer cooling time. A typical target is about 1 to 4 mm for many thermoplastic parts, but the real goal is consistency rather than a magic number. Thick sections should usually be replaced with ribs or local reinforcement instead of being built solid.
Use draft generously
Draft is the slight taper on a vertical wall that helps the part release from the mold. In practice, 1 to 2 degrees is common for polished surfaces, while textured surfaces often need 3 to 5 degrees. Without draft, ejection gets harder and cosmetic damage becomes more likely.Design ribs and bosses with restraint
Ribs help stiffen a part without adding too much material, but oversized ribs can create sink marks on the visible side. Bosses are useful for screws, inserts, and assembly points, yet they need careful support so the surrounding wall does not distort.
Read Also: What is the Strongest Adhesive Glue? Find the Best for Your Project
Avoid undercuts unless they are worth it
Undercuts force the tool to use side actions, lifters, or other moving features. Those details are sometimes unavoidable, but they raise cost and increase the chance of maintenance headaches. If the part can be redesigned to release cleanly, that is often the better move.
The best molded parts usually look almost boring on paper because the hard work is in the discipline of the shape. That discipline matters even more once appearance enters the picture.
Finish, tolerance, and appearance choices that matter
A molded part is never just a shape. It is also a surface, a fit, and a set of visible decisions that the end user will notice immediately. Small choices at the tool stage tend to show up loudly in production.
| Detail | Why it matters | Practical note |
|---|---|---|
| Gate location | Affects flow marks, strength, and visible vestige | Put the gate where the scar is least important |
| Parting line | Determines where the tool splits and where a seam will appear | Plan it early so it does not land on a cosmetic face |
| Ejector marks | Can leave visible evidence on finished surfaces | Hide them on non-cosmetic areas when possible |
| Surface texture | Changes the look, feel, and sometimes the required draft | Texture improves grip and hides wear, but it is not free |
| Tolerance target | Sets inspection effort and tooling precision | Only tighten tolerances where the part truly needs it |
The mistake I see most often is treating appearance as a finishing step instead of a design requirement. If a face must look clean, the tool needs to be planned around that from the start. That is especially true when a part is going into consumer products, electronics, or any application where the molded surface is the product.
How I would choose the process for a new plastic part
If the part is large, shallow, and mostly one-sided, I would look hard at thermoforming first. If it needs precise geometry, repeated assembly features, or a premium finish, I would move toward molded construction instead. That is the most practical way to think about the decision.
For U.S. product teams, the cleanest workflow is often to prototype fast, confirm the geometry, and then choose the process that matches the final volume and feature set. A short-run tool can bridge early testing, while a production tool makes sense only once the design is stable enough to justify it.
My rule of thumb is this: use the simplest process that can still make the part correctly. That keeps cost under control, shortens the iteration loop, and avoids paying for tooling complexity that the product does not actually need.