Thermoforming turns a flat thermoplastic sheet into a usable part by heating it, shaping it over a mold, and cooling it into form. The process sits in a useful middle ground: lower tooling cost than injection molding, faster iteration than many heavy tooling methods, and enough flexibility to cover trays, enclosures, panels, and protective covers. Choosing the right material for a thermoforming plastic part starts with the part’s actual job: heat, impact, appearance, and how far the sheet has to stretch.
What matters most when planning a thermoformed part
- Thermoforming heats a sheet, forms it against a mold, cools it, then trims it to final shape.
- The biggest quality drivers are material choice, draw depth, draft angle, and mold venting.
- More stretch means more thinning, so part depth and corner radius matter from the first sketch.
- Vacuum forming suits simpler parts, pressure forming adds detail, plug-assist helps manage thickness, and twin-sheet makes hollow parts.
- Common sheet choices include ABS, HIPS, PETG, polycarbonate, PVC-based blends, HDPE, and polypropylene.
What thermoforming is good at
I think of thermoforming as a controlled stretching process, not just a heating step. You soften a thermoplastic, pull it against a male or female tool with vacuum, air pressure, or both, then lock in the shape by cooling. Because the tooling is simpler than a full injection mold, it is often attractive for large parts, prototype runs, and mid-volume production where cost control matters more than microscopic repeatability.
SME’s training guide places thermoforming across packaging, medical, appliance, signage, and automotive work, which matches what I see in real projects: trim panels, kiosk shells, machine guards, trays, liners, and interior covers. The process is also forgiving when the part needs branding, texture, or a surface finish that is good enough straight off the mold.
The tradeoff is straightforward: the sheet stretches, so the thickness is never perfectly uniform. That is not a problem by itself, but it means design decisions shape the final part more than many teams expect. That is why the next step is understanding the forming cycle itself.
How the forming cycle works
The cycle is simple on paper and very sensitive in practice. The sheet has to be clamped securely, heated evenly, moved to forming temperature, drawn onto the tool, cooled with enough control to hold shape, and trimmed without distorting the part.
- Clamp and heat the sheet so it softens evenly. SME’s training guide puts the usual heating range at roughly 250 to 700°F (120 to 370°C), but the exact window always depends on the resin.
- Form the shape with vacuum, pressure, or a mechanical assist. Air must be evacuated from the tool side so the sheet fully contacts the surface.
- Cool in a controlled way. Cooling rate affects shrinkage, thickness variation, and how much residual stress remains in the part.
- Trim and finish the perimeter, cut-outs, and holes. CNC trimming, router trimming, punch-and-die setups, and steel-rule dies are all common depending on volume and edge quality.
One detail I always stress: thermoforming is a single-sided process. You control the mold side directly, but the non-tool side follows the stretch of the sheet. That is why surface detail, wall thickness, and final dimensions should all be planned around the tool, not just the CAD shape.
Choosing the right sheet material
Material choice usually decides whether a part feels easy or stubborn. I look first at clarity, impact resistance, heat load, chemical exposure, and how much the sheet needs to stretch without whitening or tearing.
| Material | Why it is chosen | Watch-outs | Common uses |
|---|---|---|---|
| ABS | Strong, tough, and widely available | Less heat resistance than some engineering plastics | Equipment covers, enclosures, interior panels |
| HIPS | Low cost and easy to form | More brittle and less heat tolerant | Trays, light-duty packaging, display parts |
| PETG | Clear, tough, and relatively forgiving during forming | Typically costs more than commodity sheet | Medical guards, signage, display windows |
| Polycarbonate | High impact resistance and good clarity | Higher cost and tighter process control | Protective covers, machine guards, windows |
| PVC-based alloys | Useful where stiffness, appearance, or flame performance matter | Formulation matters a lot, so supplier selection is important | Kiosks, transport interiors, industrial covers |
| HDPE and polypropylene | Good chemical resistance and utility performance | Can be more demanding to form cleanly | Linings, tanks, totes, functional utility parts |
In practice, the right answer is rarely “the most popular material.” It is the one that matches heat, finish, and service life without forcing the mold to fight the sheet. That becomes even more important once the mold geometry starts stretching the part in multiple directions.
Mold details that make or break the part
This is the section that most teams underestimate. A good thermoformed part is usually the result of a good tool, not just a good sheet.
- Choose the mold style intentionally. Male tools are convex; female tools are cavity-style. A female tool usually gives you easier release and a cleaner inside surface, while a male tool exposes the outside surface more directly.
- Leave enough draft. Productive Plastics’ design guide recommends at least 3 degrees of draft on male tools, and about 1 degree on smooth surfaces. Textured surfaces and deeper draws usually need more.
- Use generous radii. Sharp corners pull the sheet thin. Bigger radii improve wall thickness uniformity and reduce weak spots.
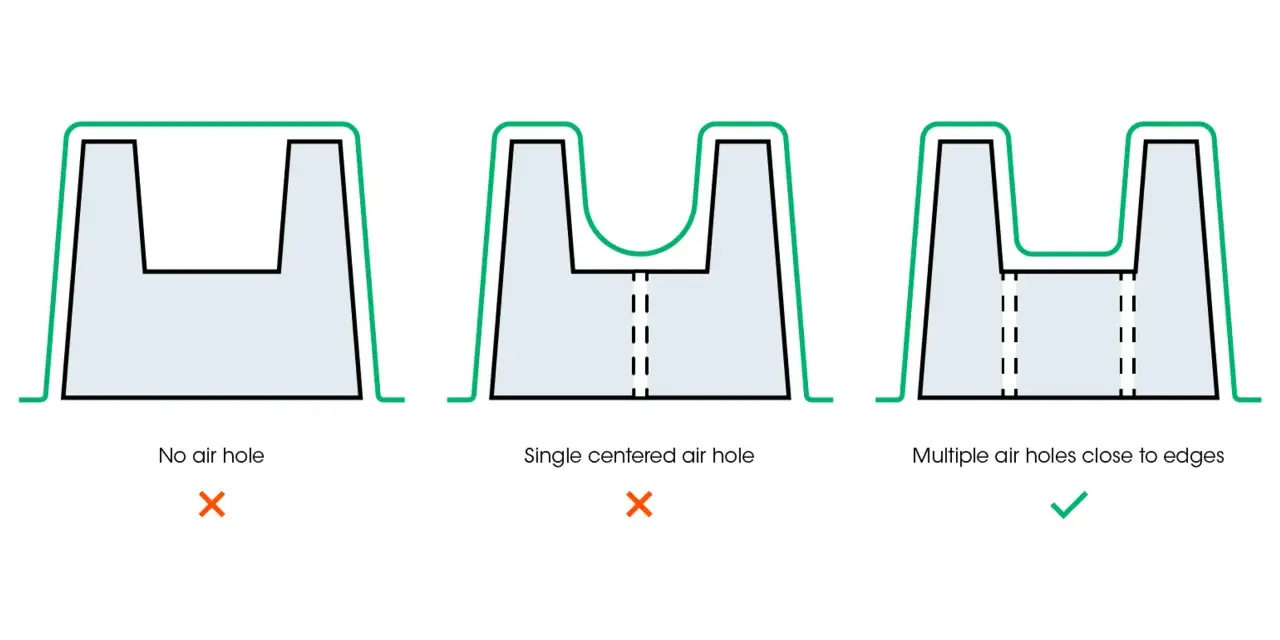
- Plan for venting. Small vacuum holes or vent paths let trapped air escape so the sheet can seat fully against the mold.
- Respect undercuts. They are possible, but they often require core-pull or articulating tooling, which adds complexity. I treat every undercut as a tooling decision, not a design flourish.
- Match tool material to volume. Prototypes can use wood, epoxy, or other low-cost tooling, while production parts usually move to aluminum for durability and temperature control.
The pattern is consistent: the more detail you want, the more carefully the mold has to manage release, airflow, and shrinkage. That naturally leads to the question of which forming method is the best fit.
Picking between vacuum, pressure, plug-assist, and twin-sheet
These methods sit under the same umbrella, but they behave differently enough that the wrong choice can waste money or flatten the part detail you were trying to preserve.
| Method | Best when | Main advantage | Main tradeoff |
|---|---|---|---|
| Vacuum forming | The part is relatively simple or large and cost pressure is high | Simple, economical tooling and broad use cases | Less detail than pressure forming and more sensitivity to draw depth |
| Pressure forming | You need sharper detail, texture, or a more injection-molded look | Better surface fidelity and fine features | Requires stronger tooling and usually costs more than vacuum forming |
| Plug-assist forming | Wall thickness consistency matters across a deeper draw | Helps distribute material before vacuum completes the form | More setup and process tuning |
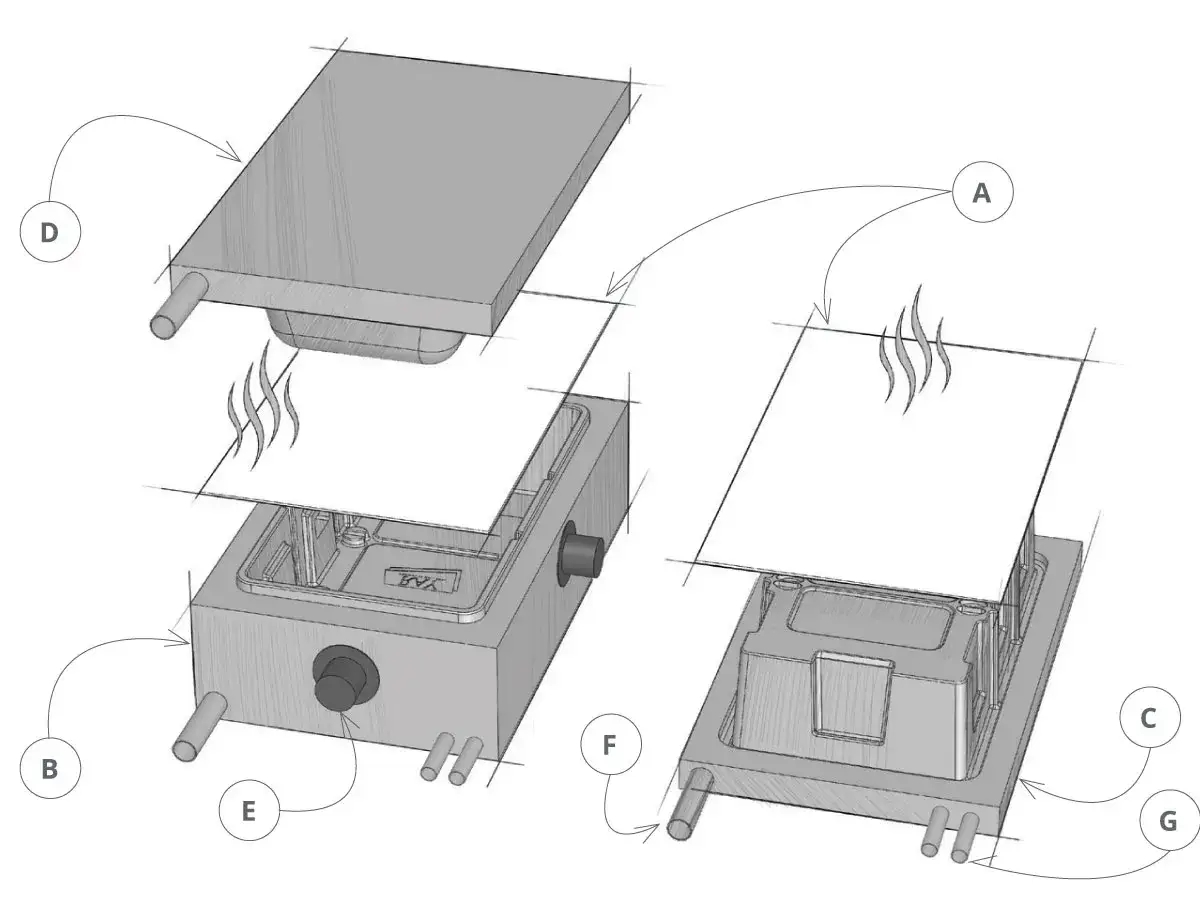
| Twin-sheet forming | You need a hollow part with two formed skins | Creates enclosed, structural shapes | More tooling and assembly complexity |
SME describes plug-assist forming as especially useful when fast cycles and more uniform wall thickness are priorities, while twin-sheet forming is the practical route when the part itself has to be hollow. I usually read that as a decision tree: detail points you toward pressure forming, thickness control points you toward plug assist, and enclosure geometry points you toward twin sheet.
When thermoforming beats injection molding and where it does not
For many U.S. projects, thermoforming wins when the part is relatively large, the annual volume is low to moderate, and the business case depends on keeping tooling investment controlled. That is why it shows up so often in kiosks, vehicle interiors, medical covers, signage, and equipment housings.
It also helps that the process can move quickly from concept to sample. When the geometry is right, thermoforming gives you a large part with reasonable tooling cost and enough surface quality to skip a lot of secondary work. In that sense, it is one of the best compromises in plastics manufacturing.
That said, injection molding still wins when the design needs very high repeatability, ultra-tight geometry on both sides of the part, or integrated features that would be awkward in a single-sided process. I would also choose injection molding when the part is small enough that a large sheet and trimming waste start to feel inefficient.
- Choose thermoforming when the part is large, shallow to moderately deep, and the tool cost needs to stay reasonable.
- Choose pressure forming if the visual surface is important and the geometry needs more detail.
- Choose injection molding if the design depends on high-volume automation, intricate 3D detail on both sides, or very tight repeatable tolerances.
- Choose another process if the part is so deep that material thinning becomes unacceptable without major redesign.
That is the point where design work stops being theoretical and becomes a checklist.
A practical checklist before you release the design
Before I release a thermoformed part, I run through five questions. If any one of them is fuzzy, the tooling cost usually exposes it later.
- What is the real service environment, including heat, UV, chemicals, and impact?
- How deep is the draw, and where will the sheet thin the most?
- Does the part need vacuum, pressure, plug assist, or twin-sheet geometry?
- Are draft, radii, trim lines, and venting defined for the mold builder?
- Have I allowed for shrinkage, trimming, and secondary finishing?
If I had to reduce the whole process to one rule, it would be this: the mold should help the sheet move, not force it. When the tool, material, and draw depth are aligned, thermoforming is fast, cost-effective, and surprisingly versatile. When they are not, the part still forms, but the compromises show up in thickness variation, release problems, and extra finishing work.