The practical answer to how to make acrylic molds begins with one clarification: the mold itself, the master, and the formed sheet each solve a different problem. In this article, I walk through the practical side of acrylic mold making and tooling for formed parts, including how to choose the mold style, build the form, heat the sheet, and avoid the failures that show up after cooling. The details matter here: a clean, well-vented mold can save you hours of rework, while a rushed setup usually shows up as stress, distortion, or surface marks.
What has to be right before the first sheet goes on the mold
- Choose male, female, or plug-assist tooling based on draw depth and the cosmetic face you need to protect.
- Allow for roughly 1% thermal shrinkage when the formed acrylic cools back to room temperature.
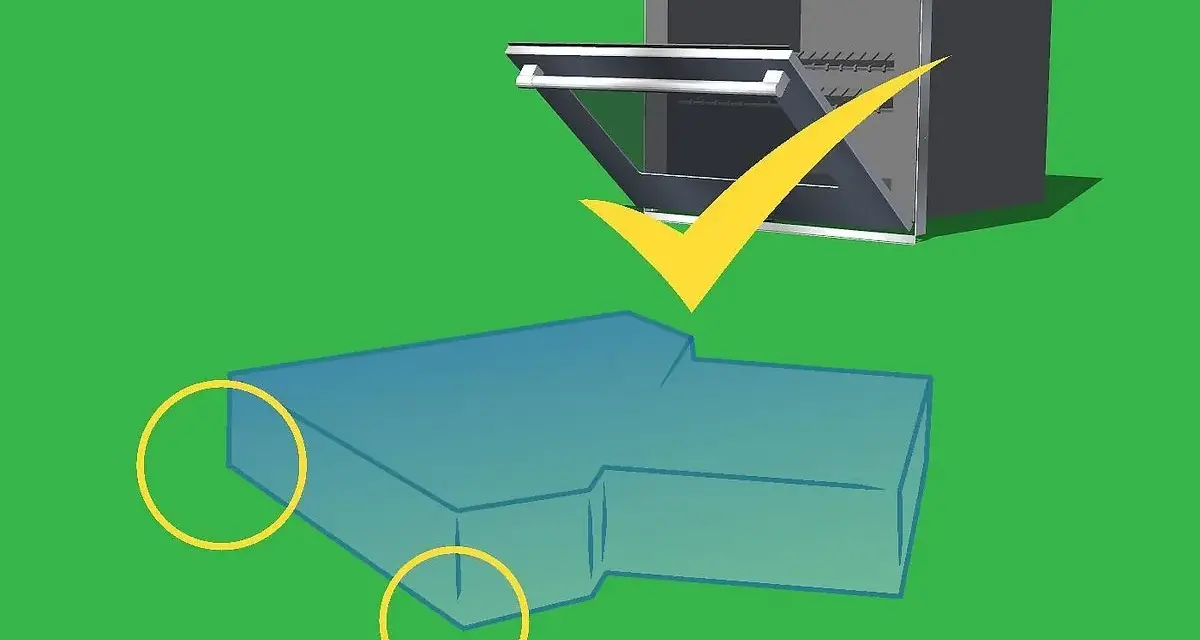
- Use at least 3° of draft, plus venting in deep recesses, so the part releases cleanly.
- Heat the sheet uniformly and form it before it drops below about 275-280°F.
- Cool slowly on the mold; forced air cooling creates stress and raises the risk of crazing.
- For short runs, wood or other simple tooling can work; for repeatability, aluminum is the stronger choice.
What this process really means in a plastics shop
The first thing I clarify is that acrylic mold work is not one single process. In a shop, it usually means one of two things: building a mold or master that shapes a heated acrylic sheet, or creating a temporary pattern that will later be used to make a more durable tool. I treat those as separate jobs, because they solve different problems.
If the goal is a clean formed part, the mold must do three things well: support the sheet while it softens, let air escape where the sheet reaches deepest, and release the finished part without scarring it. That is why surface quality, venting, and draft matter as much as the overall shape. For most projects, the real question is not "can I make the mold?" but "which mold geometry will give me the part I actually need?"
That leads straight into the first design decision: whether the sheet should wrap over a male form, pull into a female cavity, or use a plug to control stretch before vacuum or pressure finishes the shape.
Choose the mold style that matches the part
For acrylic thermoforming, I usually start by asking what surface must look best and how deep the draw really is. That answer tells me whether a male mold, a female mold, or a plug-assist setup makes sense.
| Mold style | Best use | Strengths | Limits |
|---|---|---|---|
| Male mold | Parts where the outer surface is less critical or the shape is fairly open | Easier to build, lower cost, and often better for deeper draws | The side in contact with the tool takes the mold texture, and rim areas can thin |
| Female mold | Parts where the best optical face or a pre-decorated surface must stay protected | Good cosmetic control on the face that does not touch the mold | Usually not the best choice for very deep draws; air traps matter more |
| Plug-assist female mold | Deeper parts that need better thickness control and sharper definition | Pre-stretches the sheet so the wall thickness is more balanced | More setup, more variables, and more sensitivity to plug temperature and timing |
The practical rule I use is simple: pick the simplest tool that still protects the surface you care about. If a part is shallow and cosmetic on one side, a straightforward male or female mold is often enough. If the draw is deeper, I start thinking about plug assist before I assume the sheet will stretch itself evenly.
One detail that matters more than beginners expect is where the best optical surface has to live. With a female mold, the best face can stay on the side that does not touch the tool. That is useful when the visible face must stay glossy, clean, or pre-printed. The tradeoff is that deep female draws are harder to control, so I would not force that layout just because it looks neat on paper.
Once the mold style is chosen, the next job is building the body so it can survive heat, release, and repeated use.
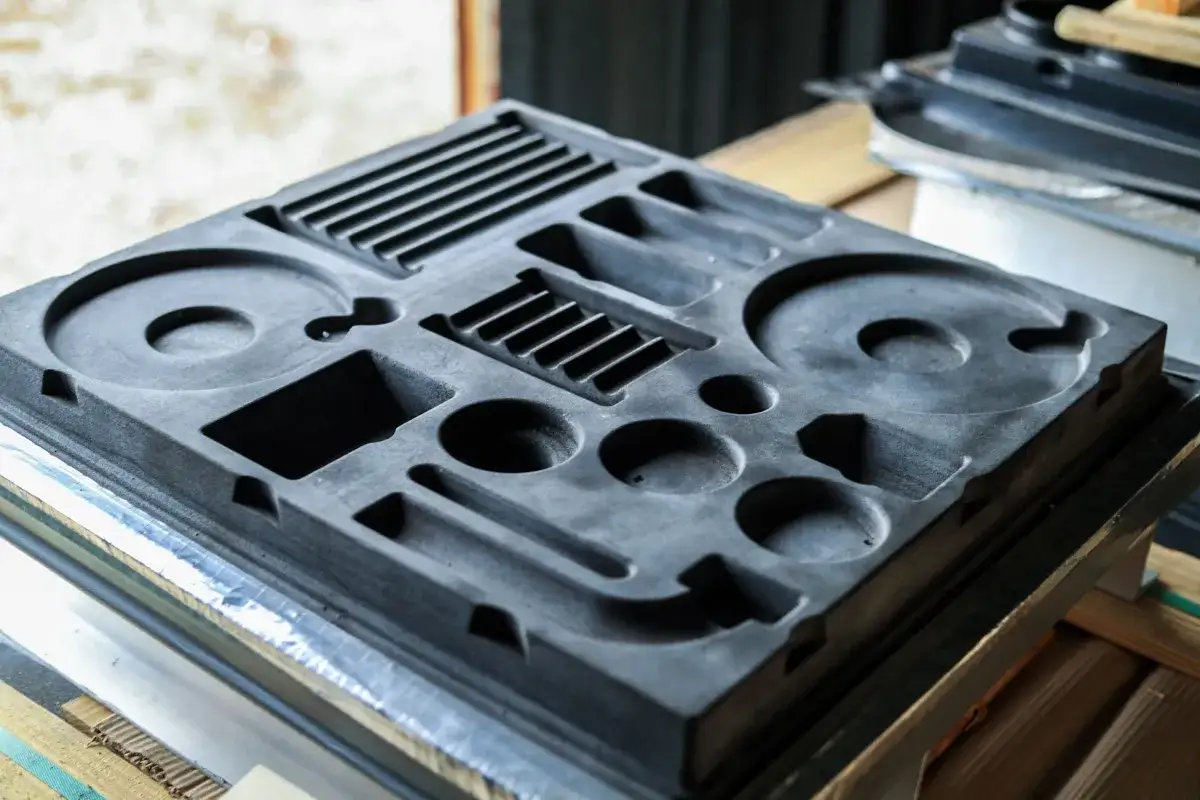
Build the mold body with the right material
Lucite and other acrylic guides point to a wide range of mold materials, including wood, plaster, plastic, and metal. In practice, I choose by run length and surface demand. For a one-off prototype, a sealed wood tool can be enough. For a repeatable production setup, metal - especially cast aluminum - is usually a better long-term decision because it moves heat faster and holds shape better.
When I build a mold body, I care about five things before anything else:
- Dimensional stability so the mold does not move with humidity or heat.
- Draft so the formed part can come off without scuffing or locking.
- Venting so trapped air does not leave voids or soft spots.
- Thermal control so the tool does not create hot and cold zones in the sheet.
- Surface finish so the part comes out with the texture or gloss level I actually want.
If I need tighter temperature control, I do not rely on the shell of the mold alone. Cored tooling with water or oil circulation gives much better control on larger parts, and that is one of the places where aluminum earns its keep. For wooden tools, I seal the surface so humidity does not change the dimensions; hard woods that are properly dried and sealed are far more reliable than raw stock. I also avoid sharp corners and perfectly flat spans when I can help it, because both tend to show stress or rippling in the finished part.
That brings us to the part everyone wants to rush: heating the sheet and getting it onto the mold before the window closes.
Heat and form the sheet with control, not speed
This is where acrylic work either becomes predictable or turns into guesswork. The sheet has to be heated uniformly, moved quickly, and formed before it drops below its minimum forming window. For many acrylic grades, the forming range lands roughly around 290-350°F, although the exact target depends on sheet family and thickness. In Lucite's guidance, the sheet should be fully formed before it falls below about 275-280°F, and the oven temperature is typically held 20-40°F above the nominal sheet temperature so the core can catch up to the surface.
Here is the sequence I prefer on a small shop setup:
- Clean the sheet and the mold thoroughly. Dust and debris will show up in the finish.
- Heat the sheet evenly. For sheets 0.125 inch and thicker, two-sided heating is safer because the core warms more slowly than the surface.
- Move the sheet to the mold without hesitation. Vacuum or pressure should come on gradually but steadily so the stretch stays uniform.
- Use the right forming method for the geometry. A female cavity works well for a protected cosmetic face, a male form is often easier for deep draw parts, and a plug can pre-stretch the sheet before the final pull.
- Let the part cool slowly on the mold. Do not use forced air cooling if you care about stress level or long-term clarity.
- Remove the part only after it has cooled far enough to handle. A practical rule is to wait until it is below about 165°F before demolding.
I also keep one simple habit in the shop: I do not trust a heating cycle until I have watched how the sheet sags, not just how long it has been in the oven. Acrylic is good at looking ready before the center actually is. A flat, uniformly warmed sheet behaves very differently from a sheet that is soft on the skin and stiff in the core.
When the part comes off cleanly, the next challenge is usually not the shape itself, but the subtle defects that turn a good part into a reject.
Avoid the defects that ruin acrylic parts
The failures I see most often are usually not dramatic. They are the little things that make a part look acceptable at first glance and disappointing under light. The table below is the shorthand I use when troubleshooting acrylic forming jobs.
| Problem | What usually caused it | What I would change first |
|---|---|---|
| Thin rim or thin last-drawn area | Too much draw, poor thickness control, or no plug assist | Change mold side, reduce draw depth, or add plug-assist pre-stretching |
| Air marks, pits, or bubbles | Poor venting, dusty tool, or trapped air in the deepest recesses | Add vents, clean the mold, and check deep recesses first |
| Stress lines or crazing | Cooling too fast, handling the part hot, or exposure to harsh solvents | Cool slowly and keep alcohols, acetone, and similar solvents away from the finished part |
| Sticking on release | Not enough draft, undercuts, or the wrong surface texture | Add draft, reduce undercuts, and rethink the mold finish |
| Ripples on large flat areas | Flat tooling with uneven stretch or hot spots in the sheet | Introduce a slight dome or dish and improve heating uniformity |
Two design choices prevent a surprising number of these problems. First, avoid sharp corners. Acrylic prefers radiused edges and fillets because they lower stress concentration. Second, do not ignore air management. If air cannot escape from the deepest part of the mold, the sheet will always find a weaker path and leave you with marks, webbing, or inconsistent walls.
Surface finish also deserves a deliberate choice. A very smooth mold gives a cleaner gloss, while light texture or carefully selected coverings can reduce mark-off. I only use those soft coverings when the release surface matters more than absolute sharpness, because they can slightly soften the final detail.
Once you know how to avoid the obvious defects, the next question is more strategic: when should you stop trying to force acrylic tooling to do a job that belongs to a different material?
Know when acrylic stops being the right tooling choice
In my experience, acrylic is often better as a master pattern, transparent fixture, or short-run form than as a hard-wearing production mold. That is especially true when the tool will see repeated heat, tight tolerances, or a lot of surface contact. Acrylic scratches, it can trap stress, and it is not the most forgiving material if the part needs a lot of cycles.
Here is how I usually frame the decision:
- Use acrylic or acrylic-like tooling pieces when you need visibility, a fast prototype, or a pattern that is easy to inspect.
- Use wood or sealed hardwood when you want a practical, lower-cost shop tool for a limited run.
- Use aluminum when the part count is rising, the draw is deeper, or thermal control starts affecting quality.
- Use a different mold process altogether when you are really making a casting mold for resin or another material, not thermoforming a sheet.
That last point is the one that saves the most time. If the job is actually resin casting, a bare acrylic cavity is often not the best final mold surface. I would usually treat acrylic as the master or the mold box component, then choose the real mold material based on release, detail, and the chemistry of the casting material. Acrylic is useful there, but it is not automatically the best final cavity.
So the question is not whether acrylic can help in the mold-making workflow. It can. The better question is where it belongs in the stack: master, forming tool, inspection aid, or finished mold.
A shop-ready first run for a cleaner part
If I were starting from scratch, I would keep the first run very simple and focus on the pieces that move the result the most. The quickest path to a usable part is usually not a fancy tool; it is a disciplined one.
- Build the mold with enough draft and radius to release without forcing it.
- Oversize critical dimensions by about 1% to account for cooling shrinkage.
- Vent the deep areas before you think about cosmetic polish.
- Heat the sheet uniformly and respect the forming window for the sheet grade you are using.
- Form quickly, but do not slam the vacuum or pressure so hard that the sheet draws unevenly.
- Cool slowly on the tool and remove the part only after it has dropped below the safe handling range.
- Inspect the first part under bright light before you commit to a batch.
If the first pull is close but not quite right, I would change geometry before I change machines. In acrylic work, the biggest gains usually come from better draft, better venting, and better heat uniformity, not from trying to overpower the material. That is the part of the process that separates a part that merely forms from a part that actually holds up.