Printed tooling has moved from a prototyping trick to a practical way to validate plastic parts faster. In thermoforming and injection work, the real advantage is not novelty; it is the ability to test form, fit, texture, and release behavior before you commit to expensive metal tooling. In this article I focus on where 3d printed molds make sense, how I would design them, which materials hold up, and the failure modes that matter most in production.
Quick take on when printed tooling earns its place
- Use it when speed matters more than long tool life, especially for prototypes and low-volume runs.
- Thermoforming is usually the easier starting point because the tool sees less stress than in injection molding.
- Draft angles, venting, radii, and surface finish decide whether the tool releases cleanly.
- Material choice is a trade between heat resistance, stiffness, surface quality, and brittleness.
- Move to aluminum or steel when the design stabilizes and the run volume starts paying back the tooling cost.
Where printed tooling earns its place
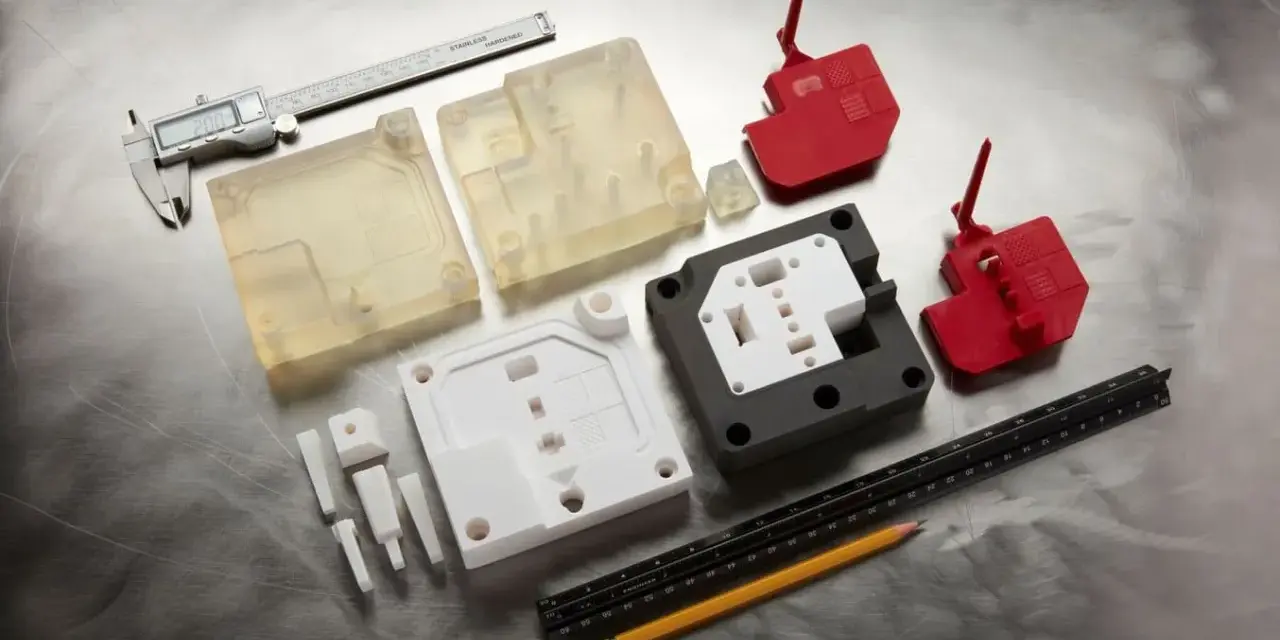
I reach for printed tooling when the part is still moving, the schedule is tight, or I need to learn something before I spend real money on hard tooling. That is usually true in early product development, packaging validation, custom trays, trim components, and short production runs where the geometry may still change.
The biggest advantage is not just cost. It is iteration speed. A printed tool can turn a CAD revision into a physical test in a day or two, which is often the difference between guessing and knowing. For a team trying to validate fit, finish, and assembly early, that speed is worth more than a perfectly durable tool that arrives too late.
I also like printed tools when the shape is hard to machine cleanly. Fine text, small logos, localized textures, and unusual cavities are often easier to produce additively than by hand or CNC, especially if the tool only needs to survive a limited number of cycles. That said, printed tooling is still a bridge, not a universal substitute. Once the part becomes a stable production item, the economics start favoring metal. That distinction is why the next question is not material choice, but process choice.
Thermoforming and injection molding are not the same problem
The first mistake I see is treating all printed tooling as if it lives under the same load. Thermoforming and injection molding stress a tool in very different ways, so the same printed material can be excellent in one process and weak in the other. Thermoforming loads the mold with heat and vacuum; injection molding adds much more pressure, faster thermal cycling, and higher risk of wear around gates and thin sections.
| Process | What the tool has to handle | Where printed tooling fits best | Main limitation |
|---|---|---|---|
| Thermoforming | Heat from the sheet, vacuum pull, and sheet stretch | Prototypes, packaging, trays, panels, and short runs with frequent design changes | Deep draws and poor venting can cause webbing, sticking, or thin walls |
| Injection molding | Heat, clamp pressure, melt flow, and repeated cycle stress | Small parts, low-volume production, and mold validation before metal | Tool wear, cracking, and dimensional drift show up much faster than in thermoforming |
| Hybrid tooling | Support from a metal frame with printed inserts or cavities | When alignment and stiffness matter more than a fully printed tool | More assembly work, but often a better balance of speed and durability |
For thermoforming, I think in terms of release and sheet behavior. For injection molding, I think in terms of heat, pressure, and cycle count. 3D Systems reports that traditional thermoforming tools can take as long as 16 weeks, while printed tooling can be ready in hours or days depending on size, which explains why additive tooling is so attractive for validation and short-run work. Once you see that difference, the geometry rules become much easier to apply.
How I would design the tool for release, airflow, and surface quality
I design these tools around release first, cosmetics second, and durability third. If the part does not come off cleanly, the rest of the model does not matter. In practice, that means I start with draft, venting, and radii before I obsess over print settings or surface polish.
Draft and draw depth
Formlabs notes that male vacuum-forming tools generally want about 4 to 5 degrees of draft, while female tools can work in the 1.5 to 3 degree range. I tend to add a little more if the part is deep, textured, or meant to release repeatedly without drama. A draft angle is the slight taper that helps the formed plastic slide off the mold instead of locking onto it.
I also pay attention to draw ratio, which is the formed surface area divided by the footprint of the part. In plain language, it tells me how far the sheet has to stretch over the tool. For most vacuum-forming jobs, a 3:1 draw ratio is about the practical ceiling, and pushing much beyond that usually means more wall thinning, more risk of webbing, and more trial-and-error.
Venting and corner treatment
Venting is easy to ignore and expensive to ignore badly. Internal pockets need a way for air to escape, or the softened sheet will bridge over the detail instead of pulling down into it. I put vent holes where trapped air would otherwise create soft corners, incomplete definition, or ugly pull marks. Sharp edges get chamfers or radii because hard corners raise stress and tear the sheet more easily.
Read Also: Injection Molding Guide - Design for Success & Cost
Orientation and finishing
Layer lines matter more than most people expect. On a resin tool, I want the print orientation to reduce visible stepping on cosmetic faces and to avoid weak directions where the load is highest. After printing, I post-cure, clean, and finish the surface before I ever try a forming cycle. If the part needs a clean gloss or a consistent matte texture, the tool surface has to earn that result first.
That is the part people skip when they are in a hurry. A printed mold can be fast, but only if the geometry is built for release and the surface is treated like a real tool, not a rough prototype. After geometry, the next lever is the material itself.
Material choice is really a trade between heat, stiffness, and finish
No single material wins every time. I choose based on what is most likely to fail first: heat, flex, abrasion, or poor surface quality. Some of the better high-temperature resins now reach heat deflection temperatures around 218 to 238°C, which is enough for many thermoforming and short-run molding jobs, but that does not mean they are interchangeable with steel. Heat resistance is only one piece of the puzzle.| Material type | Best use | Strengths | Watchouts |
|---|---|---|---|
| High-temperature SLA resin | Fine-detail thermoforming tools and small injection inserts | Smooth surface, fast turnaround, good detail capture | Can be brittle if the tool sees repeated abuse or poor cooling |
| Rigid filled resin | Small injection molds and stiff insert work | High stiffness, stable geometry, better resistance to pressure | Still not forgiving if the design has thin sections or sharp stress points |
| Glass-filled PC, ABS, or nylon | Larger thermoforming tools and medium to heavy gauge sheet | Tougher structure, better for bigger tools, more tolerant of size | Surface finish is usually rougher and may need sanding or machining |
| Printed tool with a metal frame or insert support | When stiffness, alignment, or heat transfer need help | Better load handling and less flex than a fully unsupported print | More assembly work, but often the most practical middle ground |
My rule is simple. If surface quality is the priority, I start with a finer resin process. If stiffness and size matter more, I move toward filled polymers or a hybrid build. If the run is getting long or the temperature and pressure are climbing, I stop trying to make plastic behave like metal. That is where most failures start, which leads directly to the mistakes that shorten tool life.
The mistakes that shorten tool life fast
The failures I see most often are not exotic. They are basic geometry and process mistakes that compound quickly under heat and repetition.
- Too little draft. Parts stick, tear, or mark the tool because there is not enough taper for release.
- Ignoring venting. Air gets trapped in pockets and the sheet never fully conforms to the detail.
- Using a brittle material for repeated cycles. A material that looks fine on day one can crack quickly once heat and pressure start stacking up.
- Skipping post-processing. Layer lines, porosity, and rough spots print straight into the part unless the tool is finished properly.
- Making the draw too deep. A deep form stretches the sheet harder, which increases thinning and makes release less predictable.
- Under-supporting the tool. Flex leads to dimensional drift, flash, and uneven forming, especially on larger parts.
One practical lesson I keep relearning is that the tool surface is copied with annoying honesty. If I want a crisp logo, a clean edge, or a glossy face, the tool has to be prepared like the final part depends on it. In most cases, it does. Once those errors are off the table, the final choice becomes whether printed tooling should stay in the project or hand off to metal.
When I would keep printing and when I would move to aluminum
I keep printed tooling when the part is still changing, the run is short, or the economics are built around speed. I move to aluminum when the geometry is stable and I need more consistent cycle times, better thermal control, and a tool that can take more abuse. If the production plan starts to look like a real product launch rather than a validation run, metal usually wins.| Decision point | I would keep printing if... | I would move to metal if... |
|---|---|---|
| Design maturity | The CAD is still changing or the team is still learning from each pull | The geometry is locked and revision speed is no longer the main concern |
| Volume | The run is still in the prototype or low-volume range | The project needs repeatable production output over a much longer run |
| Part size and stress | The part is modest in size and the tool load is manageable | The part is large, the draw is deep, or the cycle loads are becoming aggressive |
| Surface and tolerance | A good functional result matters more than a polished, production-grade surface | The part needs tighter repeatability, better cosmetics, or a more durable finish |
| Budget and lead time | Waiting weeks for a machined tool would slow the project too much | The extra tool cost is justified by the amount of production it will support |
In the low-volume range, printed injection tools can still be useful, but I treat them as short-run assets rather than permanent fixtures. A simple resin mold may start around the low hundreds of dollars, while aluminum and steel quickly move into the low thousands or much higher once complexity and life expectancy increase. That is why the real decision is not whether printing is cheaper on day one; it is whether speed now is more valuable than durability later.
The decision I would make before printing anything
Before I send a tool to the printer, I check five things: can the part release, can the tool breathe, can the material survive the heat, can the support structure keep it stable, and is the expected run short enough to justify the approach. If any of those answers is weak, I either redesign the tool or switch to a more durable path.
That is the practical advantage of additively made tooling. It gives me a fast way to learn, not just a faster way to manufacture. For a US shop trying to compress development cycles, that usually means fewer delays, fewer handoffs, and a much cleaner path from concept to production. The best result is not a printed tool that pretends to be metal; it is a printed tool that helps you reach the right final decision sooner.