A practical mold starts with one decision: are you making a flexible cavity for casting, or a rigid tool for forming plastic sheets? In most DIY work, a DIY resin mold is really a resin master, plug, or tooling surface that helps you produce the part you actually want. I’m going to break down the material choices, the build sequence, and the design details that matter when you want clean results instead of a one-off experiment.
Key points to know before you mix anything
- For most resin-casting projects, silicone is the mold material; resin is better as the master or rigid tool.
- A rigid resin buck makes more sense when the part needs heat resistance, cleaner edges, or thermoforming support.
- Surface finish matters more than most beginners expect, because every scratch transfers into the final part.
- A light, compatible release agent and full cure time solve more failures than expensive gear.
- Shallow shapes are easier to start with than deep forms, undercuts, or thin walls.
- A small U.S. project usually lands around $60 to $150 in materials before optional vacuum or pressure equipment.
What a resin mold really means in practice
When people say “resin mold,” they often mean three different things, and mixing them up causes most beginner mistakes. A resin master is the original positive shape you finish, seal, and use to make another mold. A rigid resin mold is a tool you can actually form against or cast into when the geometry is simple. A thermoforming buck is the positive form that plastic sheet gets pulled over, which means it behaves more like tooling than like a craft mold.
That distinction matters. If you want to pour epoxy jewelry, keycaps, or coasters, I would usually make a silicone cavity from a polished resin master. If you want a tray, cover, insert, or low-volume plastic shell, I would think about a resin buck or a split tool instead. Resin is often the pattern, not the final cavity. Once you separate those roles, choosing the right material gets much easier.
Choose the right mold strategy for the part
The right workflow depends on geometry, release, and how many parts you need. I usually start by asking one question: does the part need flexibility to come out cleanly, or does the tool need stiffness to survive heat and repeated use?
| Strategy | Best for | Why it works | Tradeoff |
|---|---|---|---|
| Silicone mold made from a resin master | Repeated resin casting, jewelry, decor, shallow forms | Flexible release, strong detail capture, easy demolding | Not ideal for heat, soft edges can wear with heavy use |
| Rigid resin mold | Simple shapes, low-volume tooling, hard-cast parts | Stable, sandable, easier to machine and refinish | Undercuts are difficult, release planning matters more |
| Split resin mold | Deeper geometry, enclosed forms, production-like parts | Handles more complex shapes than a single-piece tool | Parting lines and alignment become part of the work |
| Thermoforming buck | Trays, covers, housings, packaging inserts | Fast iteration, low tooling cost, good for small runs | Needs draft, heat tolerance, and a clean surface |
If I’m choosing between these options, I keep the geometry as simple as I can tolerate. The more complicated the part, the more important the release path becomes. That decision leads straight into the materials and tools that make the difference.
Materials and tools that actually earn their place
You do not need a crowded bench, but you do need the right basics. I would rather spend a little more on finishing and release than burn through extra resin because the surface was wrong from the start.
| Item | What it does | Typical U.S. DIY cost |
|---|---|---|
| Epoxy or urethane master resin | Creates a hard, sandable master or plug | $20 to $60 |
| Platinum-cure silicone | Makes flexible molds for repeated casting | $25 to $80 |
| Release agent | Helps parts separate cleanly and protects the surface | $10 to $20 |
| Mold box materials | Contain the pour and define the outer shape | $5 to $25 |
| Sandpaper, filler, primer | Levels print lines, seams, and pinholes | $10 to $30 |
| Gloves, eye protection, mixing cups | Basic handling and safety | $15 to $40 |
| Vacuum chamber or pressure pot | Reduces bubbles in silicone or resin | $150 to $500+ |
For the resin itself, I prefer a low-shrinkage epoxy or tooling resin when the surface needs to stay true. Generic craft resin is fine for small decorative work, but it is not where I would start if the mold has to survive heat, repeated pulls, or close tolerances. The finish you start with is the finish you usually get back. With the materials in place, the build process becomes a sequence instead of a guess.
How I build a custom mold from a resin master
There are two paths here: making a silicone mold from a finished resin master, or turning that master into a rigid buck for forming. The early prep is similar in both cases, and it is the part most people rush.
- Shape the master first. I start with the final geometry, not the mold. If the part has sharp corners, I soften them now because sharp edges make demolding harder and can create stress points later.
- Sand and seal the surface. I remove print lines, mold seams, and tiny defects before anything touches the surface. A sealed master gives you a cleaner mold and a cleaner final part.
- Plan the parting line. If the shape cannot release in one piece, I split it intentionally. A good parting line is invisible when the project is done; a bad one looks like an apology.
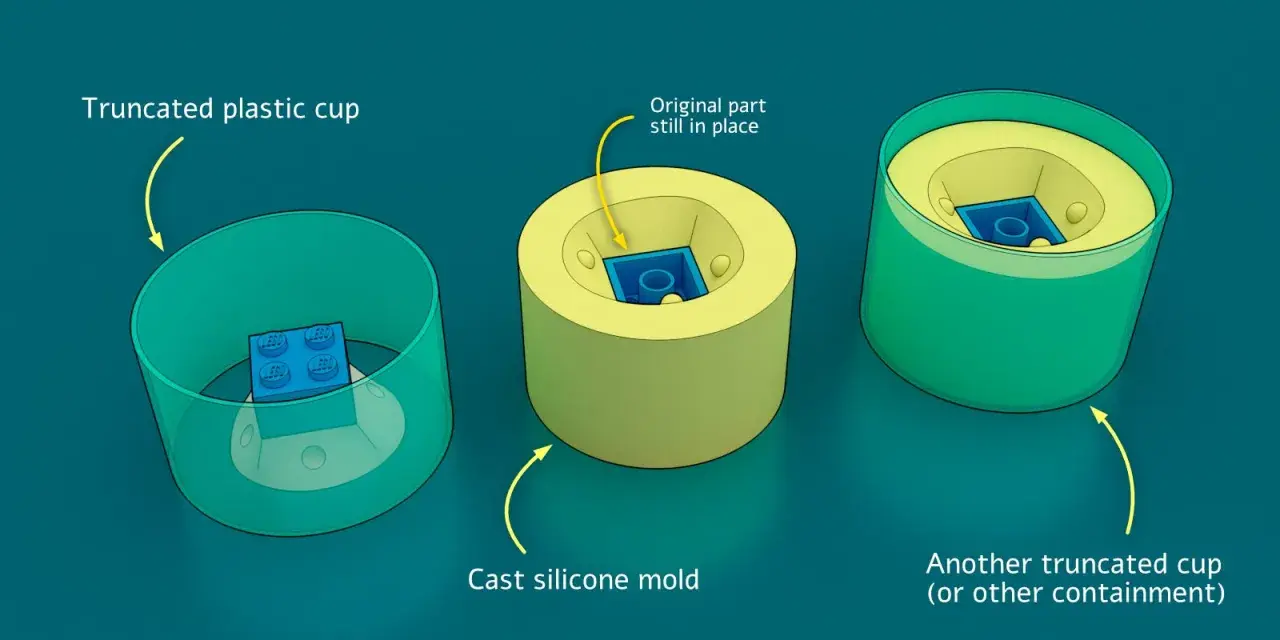
- Build a tight mold box. The box only needs enough room for material thickness and a little margin. Too much empty space wastes resin and makes the mold harder to support.
- Apply release agent where needed. I use release any time I’m not absolutely sure the materials are compatible. It is cheaper than tearing out a cured part.
- Pour or brush the mold material slowly. Slow mixing and a thin first layer reduce trapped air. If the shape is detailed, I work the material into corners before filling the rest.
- Let it cure fully. Early demolding is a false economy. If the part is still soft, you can distort the cavity or leave a permanent witness mark.
- Test once before you commit. I always do a small test cast or test pull before a full run. It is the fastest way to spot a vent, draft, or surface problem.
If I’m making a thermoforming buck instead of a silicone mold, the process changes after step two. I seal the resin harder, pay more attention to heat resistance, and test the form with a small sheet before I trust it. That shift matters because thermoforming punishes sloppy geometry much faster than casting does.
What changes when the mold is for thermoforming
Thermoforming is less forgiving than it looks. Heated plastic sheet copies the form, but it also copies every flaw, every edge break, and every sanding scratch. A buck that works for a cast part can fail immediately when it meets heat and vacuum.
| Design rule | Practical target | Why it matters |
|---|---|---|
| Draft | About 2 to 5 degrees minimum | Helps the formed sheet release instead of locking on |
| Corner treatment | Use generous radii, not knife edges | Reduces thinning, webbing, and stress concentration |
| Surface finish | Sand smooth before sealing | Plastic telegraphs scratches and tool marks |
| Heat tolerance | Use a resin with published heat data | Generic hobby resins can soften or warp under forming heat |
| Venting | Add small vents where air can trap | Improves draw and helps the sheet settle cleanly |
Here is the rule I trust: if the formed part needs a crisp edge, the buck needs a crisp but not sharp edge; if the part needs depth, the buck needs even more draft than you think. A thermoforming tool is not just a shape, it is a release strategy. That is why a polished resin master can be perfect for casting but still not be ready for forming.
The mistakes that cost the most material
Most mold failures are boring. They are not mysterious chemistry problems; they are usually release, cure, or geometry problems that were obvious in hindsight.
- Skipping the release agent. This is the fastest way to tear a surface or trap a part in a mold that should have worked.
- Ignoring undercuts. If the shape hooks inward, it needs a split mold, a flexible mold, or a different design.
- Demolding too early. A part that looks cured on the outside may still be soft enough to distort.
- Leaving print lines or sanding scratches. Every surface flaw gets copied into the final cast or the formed sheet.
- Mixing too aggressively. Fast stirring adds bubbles, and bubbles always show up where you least want them.
- Using the wrong resin for the job. A brittle decorative resin is not the same thing as a tooling resin.
- Building the box too tight. Thin margins make cleanup harder and can leave you with a mold that is awkward to support.
When I see repeated failures, the fix is usually not a more expensive product. It is a better parting line, a cleaner finish, a smarter release choice, or a more patient cure cycle. That is the version of the process I trust when I want a mold I can use more than once.
The small decisions that make the mold worth keeping
If I had to reduce the whole process to a few shop-floor rules, they would be these: keep the geometry simple, finish the master carefully, and choose the mold material for the release problem you actually have. A flexible silicone cavity is still the best answer for most resin casting. A rigid resin buck is the better answer when heat, repeatability, or a cleaner formed shape matters more than flexibility.
- Use silicone when you need easy release and repeated casting.
- Use a resin master when you need precision and a surface you can sand to perfection.
- Use a thermoforming buck when the end goal is a plastic shell, tray, or cover.
- Budget for sanding, sealing, and release before you budget for extra resin.
The best results come from treating mold making like tooling, not decoration. Once the surface is right and the release path is clear, the rest of the project becomes much more predictable.