Vapor smoothing is the term most shops use for a solvent-vapor finishing step that softens the outer skin of a printed part and blends away the grainy, stair-stepped texture. I focus here on what it changes in practice, which materials and geometries benefit most, what it costs, and where I would not use it. For production parts, that matters because a glossy surface is only useful if the part still fits, seals, and performs the way it should.
The practical questions that decide whether this finish is worth it
- It works best on powder-bed nylon parts that need a smoother, more sealed surface and a molded-looking appearance.
- In published SLS testing, surface roughness dropped by roughly 72% to 81%, while core mechanical properties stayed close to the original part.
- Geometry matters as much as material: mixed wall thickness, cup-like pockets, and missing rack points are the usual trouble spots.
- In-house systems are a serious investment, with typical machine prices starting around $100,000; outsourcing is often the smarter entry point.
- The finish can improve feel, cleaning, and leak resistance, but it will not rescue a bad print or a weak design.
What the process actually changes on a printed part
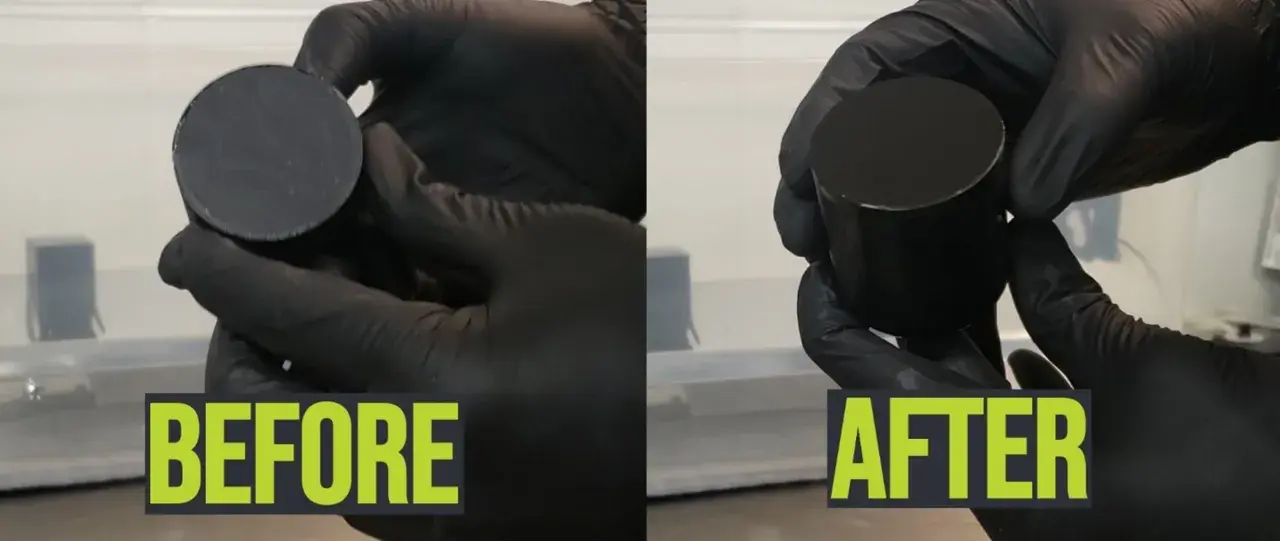
What I like about this method is that it acts on the outer skin, not the whole part. A controlled solvent vapor softens the surface layer just enough for the material to reflow, which closes tiny pores and blends the layer texture without melting the core. That is why the result can look close to an injection-molded part while the inside of the part remains functionally intact.
That surface change is not just cosmetic. A tighter skin can reduce moisture uptake, improve cleanability, and make internal channels less porous. In Formlabs' testing of nylon-based SLS powders, Ra dropped by roughly 72% to 81%, which is a meaningful shift rather than a minor polish. Ra, or roughness average, is simply a standard way to quantify how textured a surface is.
I also treat the finish as a usability step, not just a beauty step. If a part needs to feel better in the hand, wipe down more easily, or present a more finished brand surface, this process can do real work. That is the bridge to the next question: where does it pay off enough to justify the extra step?
Where it pays off in real products
My strongest use cases are the parts that have to look finished and still behave like production plastic. End-use enclosures, wearables, orthotic devices, eyewear frames, and fluid-handling components all benefit for slightly different reasons, but the common thread is the same: the surface matters to both perception and performance.
| Part type | Why it benefits | When I would hesitate |
|---|---|---|
| Consumer enclosures and housings | Cleaner look, less visible grain, more molded appearance | If snap fits, bosses, or precise interfaces are already tight |
| Orthotics and eyewear | Smoother skin contact and easier cleaning | If the geometry has delicate flex zones that need a pilot run |
| Ducts and fluid-handling parts | Less porosity and better resistance to moisture or oils | If cup-like pockets or deep recesses can trap solvent |
| High-end prototypes | Better presentation for reviews, sales, and launch sign-off | If the design is still changing and every revision needs a cheaper finish |
There is also a practical detail I keep in mind: this is a non-line-of-sight process, so hidden faces and internal surfaces get attention that spray coatings often miss. That is exactly why it is so useful on complex parts, and it is also why the chamber workflow needs careful setup.

The workflow I would follow in production
I would not treat the chamber as a magic box. The process still depends on preparation, rack placement, the right chemistry for the material, and a profile that matches the part geometry. In the systems I reviewed, the cycle itself is typically around two hours start to finish, and the timing is stable enough that batch runs scale well. In practice, that means the chamber time is often close to fixed whether I load one part or a full rack.
- Clean and depowder the parts first so the surface is not fighting loose powder.
- Add a rack point, through-hole, or sacrificial tab if the part needs to be hung securely.
- Group parts with similar wall thicknesses so one batch does not contain wildly different thermal or surface behavior.
- Run the chamber with the correct material profile, because temperature and pressure settings are not interchangeable across every polymer.
- Inspect the result for pooling, bubbles, or uneven gloss before you approve the lot.
With a well-chosen rack point, witness marks are usually minimal, but I still inspect them rather than assuming they will disappear on their own. That last step matters more than people expect, because a good run should look even and controlled while still measuring the way the drawing says it should. Once that workflow is clear, the design rules become much easier to manage.
How I would design the part so the finish stays even
Geometry is where most of the headaches live. If I know a part will go through this finish, I design for drainage, racking, and consistent surface behavior before I ever think about polish.
| Design factor | What I do | Why it matters |
|---|---|---|
| Wall thickness | Keep thickness more uniform across the part or split mixed sections into separate batches | Parts with thin and thick regions together can smooth unevenly or bubble |
| Cup-shaped features | Point them downward or redesign them so they drain cleanly | Solvent can pool in recesses and create blotchy surfaces |
| Racking geometry | Add a small hole or breakaway tab early in the CAD stage | It reduces setup friction and prevents last-minute fixture compromises |
| Flexible materials | Validate orientation and do not assume the same response as rigid nylon | More flexible parts tend to behave less consistently in the chamber |
| Mixed batches | Keep very different geometries out of the same run | One bad mix can ruin consistency across the lot |
I treat a few millimeters of wall thickness as a planning breakpoint, not a universal law. Thin sections and thick sections do not always want the same settings, and if a part combines both, I would rather test it than guess. I also keep an eye on fine text and sharp edges, because the more aggressive the finish cycle, the more likely those details are to soften. That brings the economics into view, because testing, tooling, and volume all influence whether I own the process or buy it as a service.
Costs, equipment, and when outsourcing makes more sense
This is the section where the decision usually becomes real. In-house chambers are not small-ticket items: current market pricing typically starts around $100,000, and even compact systems need proper floor space, ventilation planning, and operator training. One vendor's site-prep guidance puts footprint requirements at as little as 2.2 meters by 3.2 meters, which is compact for industrial equipment but still very much a production asset.
That is why outsourcing makes sense for a lot of teams. In one Formlabs example using a Colorado service bureau, the smoothing line item came in at $0.49 to $0.98 per part for specific nylon and TPU jobs at production quantity, while the printed part cost remained separate. For small batches, that kind of pricing is easier to absorb than capital equipment plus maintenance, chemistry, and QA.
| Path | Best when | Tradeoff |
|---|---|---|
| In-house chamber | High repeat volume, strict turnaround, and a stable part family | Large upfront cost, training overhead, and ongoing process control |
| Service bureau | Prototype work, irregular demand, or low monthly volume | Less direct control, plus lead time and shipping considerations |
| Do nothing | The part is hidden, low-touch, or already good enough as printed | You keep the rough texture and porosity you already have |
My rule of thumb is simple: if the surface finish is part of the product promise, not just a nice extra, the process becomes easier to justify. From there, it helps to compare it with the other post-processing options you might already use.
How it compares with blasting, tumbling, and coating
I rarely judge finishing methods in isolation. I compare them by what problem they solve, how much they cost to run, and what they do to the part underneath. That view usually makes the right answer obvious.
| Method | Best outcome | Strength | Limit |
|---|---|---|---|
| Solvent-vapor finishing | Smoother, semi-gloss to glossy surface with reduced porosity | Works on hidden surfaces and complex geometry | Higher cost and more process sensitivity |
| Media blasting | Clean, consistent matte surface | Fast depowdering and low friction setup | It does not seal the surface |
| Vibratory tumbling | Satiny to semi-gloss texture | Low-cost batch finishing | Can soften edges and needs longer cycle times |
| Paint or coating | Color, branding, and extra barrier properties | Flexible appearance control | Adds thickness and can hide, not fix, poor surface quality |
If I need a part to look more molded and also behave more like a sealed plastic component, the chamber process is the strongest of the group. If I only need to remove powder or reduce the raw texture, blasting or tumbling is usually cheaper and enough. That comparison makes the common mistakes easier to spot.
Common mistakes that cause uneven results
The most expensive mistakes here are usually not dramatic. They are small design or process choices that compound inside the chamber.
- Using the finish to hide a weak print instead of fixing the print itself.
- Batching together parts with very different wall thicknesses and expecting identical results.
- Forgetting to build in rack points, which turns setup into a workaround.
- Ignoring cup-like pockets that can trap solvent and produce bubbles.
- Assuming every nylon, filled nylon, or flexible material will respond the same way.
- Skipping dimensional checks after the run, especially on parts with tight fits or critical sealing surfaces.
- Assuming performance claims such as food-contact suitability without formal validation from the equipment maker or the material supplier.
When I see a poor result, it is often because the part was never designed for the process in the first place. The finish itself is capable, but it still rewards good engineering discipline. The final decision, then, is not whether the surface can be improved, but whether the part and the production plan are ready for it.
What I would check before approving a production run
Before I sign off on this finish, I ask three questions: does the geometry behave, does the volume justify the equipment or service cost, and does the product actually need a sealed, more polished surface? If the answer is yes to all three, the process usually earns its place in the workflow.
- Measure the critical dimensions before and after the run, not just the visible faces.
- Inspect hidden cavities and deep recesses for pooling, bubbles, or trapped powder.
- Confirm any downstream dyeing, coating, or assembly step still works with the finished surface.
I would still run a pilot lot, because one sample tells me far more than a glossy photo ever will. When the pilot confirms the fit, finish, and cost target, the process stops being an experiment and starts being a repeatable manufacturing step.