A high resolution 3d printer is not just a machine with a small layer height. The real difference shows up in the way it handles tiny text, curved surfaces, sharp corners, and the clean-up work after the print comes off the bed. In this article, I break down what resolution actually means, which printing process gives the finest detail, and how to choose a machine that fits product design, fabrication, and plastic prototyping without paying for spec-sheet noise.
What matters most before you buy a detail-focused printer
- Resolution is two things: vertical layer height and horizontal feature size, and they do not behave the same way.
- Resin usually wins on detail and surface finish, while FDM wins on size, toughness, and simplicity.
- XY resolution matters more than layer height when you care about tiny logos, embossed text, and fine edges.
- A 0.2 mm nozzle helps a lot on FDM, but only if the machine profile, speed, and cooling are tuned properly.
- Supports, orientation, and post-processing can improve or ruin a detailed print just as much as the printer itself.
What resolution actually means in 3D printing
Most buyers start by looking at a single number, and that is where the confusion begins. In 3D printing, resolution is not one metric; it is at least two: the vertical layer height on the Z axis and the smallest fine feature the printer can reproduce in the XY plane.
Layer height controls how visible the staircase effect looks on slopes and curved surfaces. XY resolution controls how cleanly the machine can draw small details such as lettering, holes, fillets, and sharp edges. Formlabs describes XY resolution as the precision of the resin curing in the horizontal plane, which is why optics matter so much in resin systems. That is also why a printer can advertise a very small layer height and still produce mediocre detail if the horizontal control is weak.
I also separate resolution from accuracy. Resolution is about how fine the printer can draw; accuracy is about how close the final part lands to the model dimensions. A machine can make visually smooth parts and still be slightly undersized, oversized, or warped if the material, calibration, or support strategy is off.
Once you stop treating resolution as a single magic number, the buying decision becomes clearer, because the next question is not “which printer is smallest?” but “which process actually delivers the detail I need?”
Resin or filament, which one gives finer detail
For crisp cosmetic parts, tiny branding, and smooth curves, resin is usually the stronger choice. For larger functional parts, brackets, jigs, and enclosures, FDM is often the better tool even when the layer lines are more visible. The right answer depends on whether you care more about surface finish or part size and durability.
| Process | Where it shines | Typical detail range | Main tradeoff | Best fit |
|---|---|---|---|---|
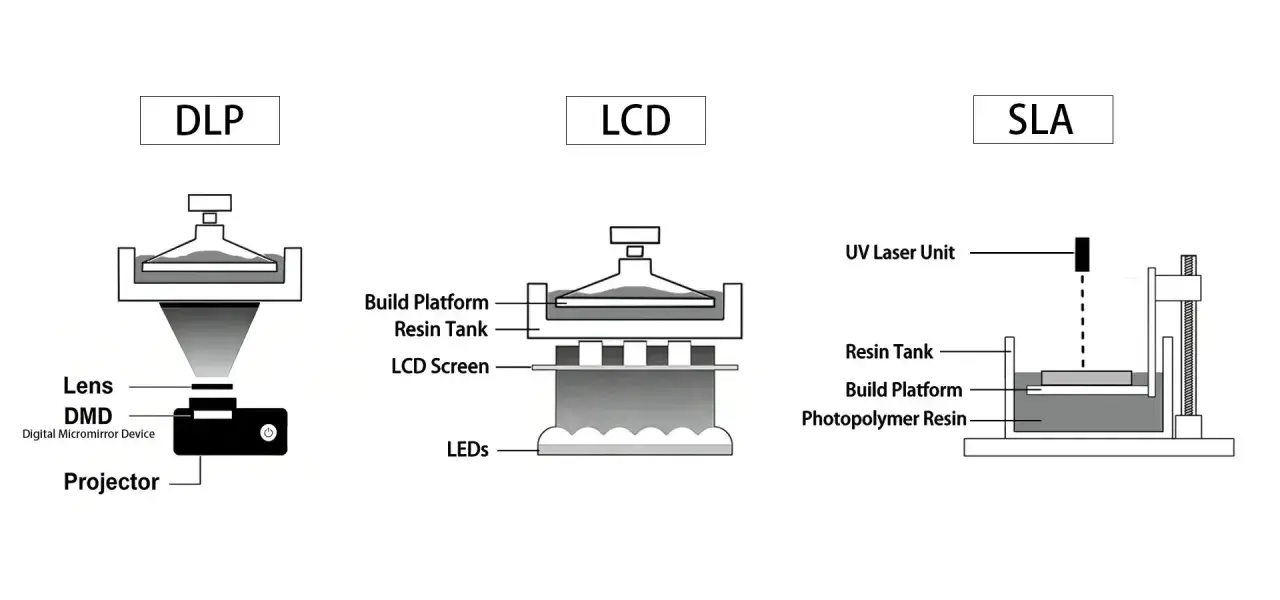
| Resin SLA / MSLA / DLP | Fine text, smooth curves, tiny surface features | 25 to 100 micron layers, with very small XY features on well-tuned machines | Wash, cure, resin handling, and more cleanup | Cosmetic prototypes, master patterns, miniatures, dental and jewelry parts |
| FDM with a fine nozzle | Functional parts, larger parts, quick iteration | About 0.05 to 0.30 mm layer heights depending on the printer and nozzle | Visible layer lines and support scars | Enclosures, fixtures, brackets, fit checks, production aids |
| Hybrid workflow | Bulk parts on FDM, detail-critical faces on resin | Depends on which machine handles which feature | More workflow complexity | Product design teams that need both appearance and function |
That gap is not theoretical. Prusa’s SL1S resin printer supports 0.025 to 0.1 mm layer heights and can go as low as 0.01 mm, while its MK4S filament printer lists a 0.05 to 0.30 mm layer-height range. Those are two very different tools for two very different jobs, and I would not judge them by the same standard.
My rule is simple: if the part lives or dies by tiny lettering, sharp cosmetic edges, or smooth surfaces, I lean resin. If the part needs to be strong, larger, or fast to iterate, I lean FDM and spend my energy on calibration and profile quality instead of chasing the smallest possible number on a spec sheet.
That leads straight into the specs that actually deserve your attention before you buy.
Specs I compare before I call a printer high detail
The marketing language around 3D printers can be noisy, so I focus on a short list of specs that connect directly to print quality. The goal is not to find the smallest number everywhere; it is to find the machine whose design matches the type of detail you actually need.
| Spec | What to look for | Why it matters |
|---|---|---|
| Layer height | Resin: typically 25 to 100 microns. FDM: fine work often starts around 0.08 to 0.16 mm in practice. | Controls visible stepping on curves and sloped surfaces. |
| XY resolution or pixel size | Smaller pixel size, better optics, and stable motion control | Determines how well the printer handles text, holes, embossed logos, and sharp edges. |
| Nozzle diameter on FDM | 0.2 mm for fine detail, 0.4 mm for general use, larger nozzles for speed | Sets the ceiling for line width and corner fidelity. |
| Calibration and motion stability | Good bed leveling, rigid frame, tuned extrusion, and stable exposure or motion profiles | Reduces ringing, banding, and dimensional drift. |
| Material behavior | Low-warp filament, dimensionally stable resin, and validated profiles | Material shrinkage can undo the benefits of a fine-resolution machine. |
| Support strategy | Clean automatic supports plus manual control where needed | Support marks are one of the fastest ways to lose surface quality. |
On filament machines, I keep one rule in mind that both Prusa and UltiMaker echo in their guidance: layer height should stay well below nozzle diameter, usually somewhere around 25% to 80% of it. On a 0.4 mm nozzle, that means the ceiling is not the same as the sweet spot. You can print thicker, but that is a speed choice, not a detail choice.
I also care about software support more than many buyers do. Variable layer height, for example, can let me print the top of a curved part more finely while keeping the rest faster. PrusaSlicer’s variable layer height tool is a good example of how modern slicers can improve detail without making every print painfully slow.
Specs only tell part of the story, though. The quality of the final part still depends on how you prepare the model and how you run the print.
How I tune a printer for cleaner detail
When I want a print to look sharp, I treat the machine, the slicer, and the model as one system. Small changes in setup often matter more than squeezing out another tiny improvement in advertised resolution.
- Use thinner layers only where they matter. Variable layer height is ideal on rounded or sloped surfaces.
- Slow down the outer walls. Detail is usually lost at speed, not in the infill.
- Choose the smallest practical nozzle. A 0.2 mm nozzle is a real advantage for small text and fine contours on FDM.
- Orient the part to protect visible faces. Put supports on hidden or easy-to-clean surfaces whenever possible.
- Validate the first layer and calibration. A slightly off first layer can distort the whole part, especially on narrow features.
- Control post-processing. Resin needs a consistent wash and cure routine; filament often benefits from light sanding, but aggressive finishing can erase detail.
A good example is a cosmetic enclosure with an embossed logo. I would rather slow the outer perimeters, improve orientation, and fine-tune supports than simply chase the thinnest possible layer height. The same goes for resin: a well-placed support structure and clean post-cure often do more for the final look than a tiny change in nominal Z resolution.
This is also where the reality of print time shows up. Halving layer height roughly doubles the number of layers, which is why detail printing is always a tradeoff. You can buy your way toward finer output, but you cannot buy your way out of physics.
Even with good hardware and clean settings, a few common mistakes will still make a detailed printer look ordinary.
The mistakes that make a detailed printer look average
I see the same errors repeated again and again, especially when someone buys a machine for its headline specs and expects the slicer to do the rest. The problem is usually not the printer itself; it is the assumptions around it.
- Buying by headline resolution alone. A bigger screen number or smaller advertised layer height does not guarantee better parts.
- Expecting resin-like detail from a coarse FDM setup. A 0.4 mm nozzle can do good work, but it is not a magic miniature printer.
- Printing too fast. Speed is one of the first things that eats away at outer-surface quality.
- Putting supports on visible faces. Support scars are often more noticeable than layer lines.
- Ignoring material shrinkage or warping. A beautiful surface is still a failed part if the dimensions are off.
- Over-sanding or over-curing. Both can flatten crisp edges and remove the very detail you bought the printer for.
The biggest mistake, in my view, is confusing smooth-looking marketing samples with repeatable production quality. A printer can produce one impressive demo part and still be the wrong tool for your geometry, your tolerances, or your production rhythm. That is especially true in plastics work, where the part often needs to fit another part, not just look good in a photo.
Once you avoid those traps, the real decision becomes much more practical: what kind of parts are you actually making?
What I would choose for plastic design and prototyping
For the kind of work that fits Ermax-design’s audience, I would make the decision based on the part’s job, not the printer’s badge. A machine is only “high resolution” if that extra detail helps the prototype, the master, or the finished part do its job better.
| Use case | Best fit | Why |
|---|---|---|
| Cosmetic concept model | Resin | Smooth surfaces, crisp branding, and cleaner curves matter more than raw speed. |
| Snap-fit or enclosure validation | FDM | Functional testing, size, and toughness usually matter more than a glassy finish. |
| Master pattern for silicone molding or vacuum forming | Resin | Surface quality transfers directly into the mold or formed part. |
| Large housing or fixture | FDM | Build volume and material efficiency are more valuable than micro-detail. |
| Tiny mechanical details or product photography parts | Resin | Fine features, lettering, and edges stay much cleaner. |
In practice, I often split the workflow. I use FDM for the big geometry, the fit check, and the fast iteration cycle. Then I switch to resin when the part becomes a visual asset, a master, or a face that the customer will actually inspect closely. That hybrid approach is usually cheaper than forcing one machine to do everything badly.
For US buyers, I would also look hard at consumables, service, and profile quality. A machine with slightly lower headline resolution but better support, stable materials, and predictable settings often delivers better real-world results than a spec-heavy printer with a messy workflow.
That brings me to the part most people should pay for in 2026: not the biggest number, but the highest useful detail per hour of work.
What is worth paying for in 2026
If I had to narrow the decision down to a few budget priorities, I would spend on the things that improve consistency first and raw detail second. A printer that is easy to tune and repeat is usually more valuable than one that only looks impressive on paper.
- Validated profiles and stable calibration, because repeatability is what turns resolution into usable output.
- Better optics or a finer nozzle size, but only when your smallest features really need it.
- A workflow you will actually use, including wash and cure for resin or reliable slicing and cooling for FDM.
- Material options that fit the part, especially if you need toughness, heat resistance, or clean cosmetic surfaces.
- Enough build volume for your real parts, because detail is less useful if you have to split a model into awkward sections.
My short version is this: choose resin when appearance and micro-detail are the product, and choose fine-tuned FDM when size, strength, and cost per part matter more. The right printer is not the one with the flashiest resolution number; it is the one whose optics, nozzle, materials, and workflow match the geometry you make most often. If you start there, you will usually end up with better parts and fewer regrets.