Stereolithography 3D printing is one of the most useful resin processes when a part needs fine detail, smooth surfaces, and predictable geometry after curing. It matters because resin printing is not just “print and done”; the real result depends on light exposure, support strategy, washing, and post-curing. In this article I break down how the process works, which parts it suits best, what materials change the outcome, and the mistakes that waste time.
Key takeaways for choosing resin printing
- SLA cures liquid resin with UV light, then still needs washing and post-curing before the part reaches its final properties.
- It usually wins on surface finish, fine features, and watertight or cosmetic parts.
- Material choice matters as much as the printer: standard, tough, clear, high-temp, castable, and biocompatible resins behave very differently.
- Layer heights around 25 to 100 microns are common on professional systems, with some materials going finer or thicker depending on speed and detail needs.
- Support placement, hollowing, and drain holes often decide whether a print is clean or frustrating.
- For high-volume, low-detail, or low-cost parts, another process may be a better fit.
How SLA turns liquid resin into a usable part
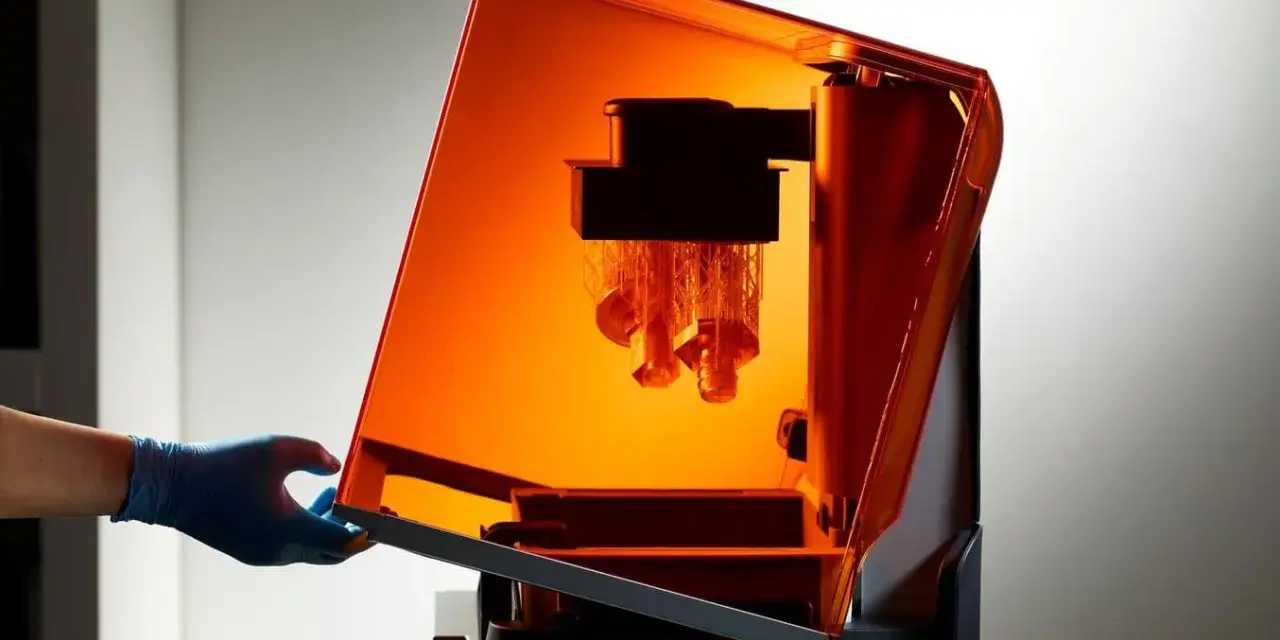
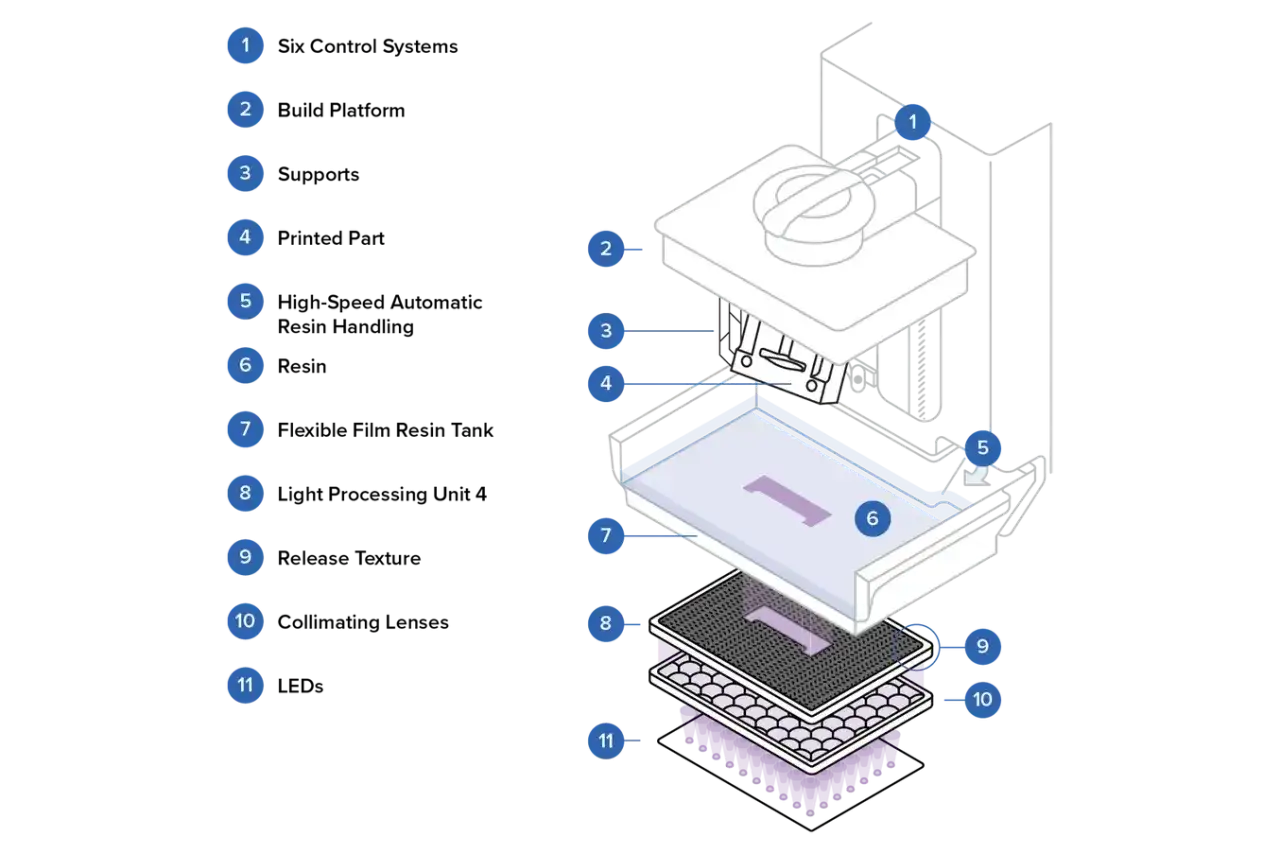
SLA starts with a vat of liquid photopolymer resin. A UV light source selectively cures each slice of the model, the build platform moves, a fresh layer of resin flows into place, and the cycle repeats until the part is complete. Autodesk describes the classic version of the process as an ultraviolet laser curing liquid resin one layer at a time, and newer resin systems keep the same core idea even when the light engine changes.
The part is not really finished when the printer stops. It usually still needs washing to remove uncured resin, support removal, and a final post-cure so the polymer network reaches its intended strength and stability. That last stage is where many first-time users underestimate the process.
- Prepare the CAD model and slice it.
- Orient the part to reduce suction and support marks.
- Expose each layer with UV light.
- Lift the part, let fresh resin flow in, and repeat.
- Wash the print and remove supports.
- Post-cure it so the material reaches its final properties.
Once that sequence is clear, the next question is not just how the machine works, but what kind of part quality you can expect from it.
Why resin parts look so clean compared with filament prints
I usually treat resin printing as a finishing-first process. The reason is simple: SLA tends to produce crisp edges, very fine text, and a surface that needs far less sanding than FDM. On current professional systems, layer heights around 25 to 100 microns are common, and some materials go finer or thicker depending on whether you want more detail or more throughput.| Feature | What it means in practice |
|---|---|
| Smooth surface | Less sanding, better cosmetic parts, and fewer visible layer lines |
| Fine feature control | Thin ribs, logos, text, and small geometry reproduce more cleanly |
| Watertight results | Useful for enclosures, fluid paths, and master patterns |
| Low visible stepping | Presentation models look closer to molded plastic than printed plastic |
The catch is that a smooth surface does not automatically mean a tough part. Many standard resins are more brittle than engineering thermoplastics, and geometry, wall thickness, and post-cure all change the result. That is why I do not judge SLA by appearance alone; I judge it by whether the finished part will survive handling, assembly, and the real environment it will live in.
That balance between appearance and function is where material choice matters most.Which resins make the most sense for real jobs
Resin choice is not a detail to leave until the end. Standard, tough, clear, high-temperature, castable, and biocompatible resins behave differently enough that the wrong one can make a good design feel broken. For plastic design teams, the most useful jobs are often cosmetic prototypes, mold masters, casting patterns, jigs, and small fixtures.
| Resin family | Best for | Main tradeoff |
|---|---|---|
| Standard | Concept models, cosmetic samples, visual validation | Often too brittle for snap-fits or repeated stress |
| Tough or engineering | Jigs, clips, housings, functional prototypes | Usually costs more and may need more careful post-curing |
| Clear | Lenses, fluid paths, covers, transparent prototypes | Needs finishing to become truly optical; raw prints look cloudy |
| High-temperature | Heat-exposed fixtures, molds, test tools | Can be less forgiving and slower to dial in |
| Castable | Investment casting patterns | Not intended as a final structural material |
| Biocompatible | Dental and regulated medical workflows | Requires the right resin, process, and compliance controls |
For plastic design teams, the practical question is usually simple: is this part for appearance, fit, or repeated use? If it is mostly appearance, standard resin is often enough. If it has to click, flex, seal, or survive heat, I move toward an engineering resin and check the post-cure schedule before I promise anything.
That decision becomes clearer when you compare SLA with the other common 3D printing options.
Where SLA fits against DLP, LCD, and FDM
SLA is not the answer to every print job. It is the right answer when finish, detail, and dimensional cleanliness matter more than the lowest possible cost per part. For a tray of small, polished-looking parts, DLP or LCD can sometimes win on throughput; for a single highly refined model, SLA still has a strong place.
| Process | Strengths | Tradeoffs | Best fit |
|---|---|---|---|
| SLA | Excellent surface finish and detail | Supports and resin handling add work | Cosmetic prototypes, masters, accurate small parts |
| DLP | Fast full-layer exposure | Build-area limits and light-field artifacts can matter | Small batches, dental, repeatable detail parts |
| LCD or MSLA | Low entry cost and strong speed | Panel wear and process consistency depend on the machine | Budget-friendly resin workflows |
| FDM | Lower material cost and tougher thermoplastics | Visible layers and less fine detail | Rough prototypes, large fixtures, utility parts |
The real takeaway is not that one process is “better.” It is that each process creates a different kind of geometry, surface, and workflow burden. If a part will be seen, touched, and checked against an assembly, resin often earns its keep quickly. If it only needs to exist cheaply, filament printing may be the smarter call.
That comparison only helps if the model is designed for the process, which is where most failed prints start.
Design rules that save time and resin
The best SLA prints usually look obvious only after someone else gets them wrong. The design details that matter most are boring ones: orientation, wall thickness, drainage, and where the supports touch the part. Formlabs' design guidance puts the minimum unsupported wall thickness at 0.2 mm, which is a useful reminder that “printable” and “durable enough to handle” are not the same thing.
- Orient broad faces so you do not create large suction cups on the build plate.
- Hollow thick sections when possible, then add drain holes so trapped resin can escape.
- Place support marks on hidden or sandable areas, not on cosmetic show faces.
- Keep very thin unsupported walls out of the design unless they are truly noncritical.
- Assume small embossed or engraved details may survive on the printer but still disappear during washing, sanding, or coating.
- Round sharp internal corners when the part needs to tolerate stress after cure.
Formlabs’ guidance also shows embossed detail down to about 0.1 mm and engraved detail around 0.15 mm on some current systems, but the usable result still depends on cleaning, orientation, and finishing. I have found that a design that survives handling with no special care is usually more valuable than one that only looks good in the slicer.
After the design is right, the remaining problems usually come from workflow mistakes rather than the printer itself.
The mistakes that usually ruin a good print
Most bad resin prints are not mysterious. They come from skipping one of three things: proper orientation, proper cleaning, or proper curing. The part may come off the machine looking acceptable, but the real failure shows up later as warping, brittleness, residue, or a surface that never quite feels finished.
- Skipping post-cure and treating the raw print as final.
- Using a brittle standard resin for a clip, latch, or load-bearing bracket.
- Leaving hollow parts without drain paths.
- Placing supports on the most visible surface of the part.
- Expecting a clear resin part to look optical without sanding and polishing.
- Ignoring the chemistry of the wash solution, which can leave a greasy surface or weak detail.
The most expensive mistake is usually not the failed print itself. It is the lost time: removing supports from the wrong place, reprinting because the resin choice was wrong, or discovering too late that the part was designed for the screen rather than for real handling. That is why the last section is less about the machine and more about the decision-making around it.
What I would check before choosing a resin workflow
When I look at a part for resin printing, I ask three questions in order: does it need a clean surface, does it need predictable fit, and will it be handled or loaded after cure? If the answer is yes to at least two of those, SLA is often the right candidate. If the answer is mostly about speed at the lowest cost, another process may be better.
- Choose SLA when appearance and detail are part of the product requirement, not just a bonus.
- Choose a tougher resin when the part has clips, threads, thin walls, or repeated assembly cycles.
- Choose a clear or specialty resin only when the finish or thermal behavior justifies the extra workflow.
- Choose a different process when the part is large, rough, disposable, or purely structural and does not need fine detail.
- Choose resin printing when the part may later become a mold master, casting pattern, or cosmetic prototype for client approval.
For plastic design work, that is the useful lens: not “Can it print?” but “Will the printed part still be good after curing, handling, and assembly?” If you keep that standard in mind, resin printing becomes a precise tool instead of a trial-and-error exercise.