DLP printing is best understood as a resin process built for crisp detail, fast layer exposure, and compact parts that need clean surfaces. In this article I break down how the projector-based process works, where it beats other resin methods, what its limits are, and how I would evaluate a machine before spending money on it. If you are comparing resin technologies for prototyping or small-batch production, the differences are practical, not academic.
The essentials you need before choosing a resin printer
- It cures one full layer at a time. That is why it can be fast on small and medium parts.
- Typical layer heights sit around 25 to 100 microns. Surface quality is usually excellent, but accuracy still depends on calibration and resin behavior.
- It is strongest on detailed parts. Dental models, jewelry masters, small prototypes, and fixtures are its natural fit.
- Build size is the main constraint. Larger parts raise support, peel, and throughput challenges quickly.
- Post-processing is not optional. Washing, support removal, and UV curing are part of the process, not an afterthought.
How the projector-based process works
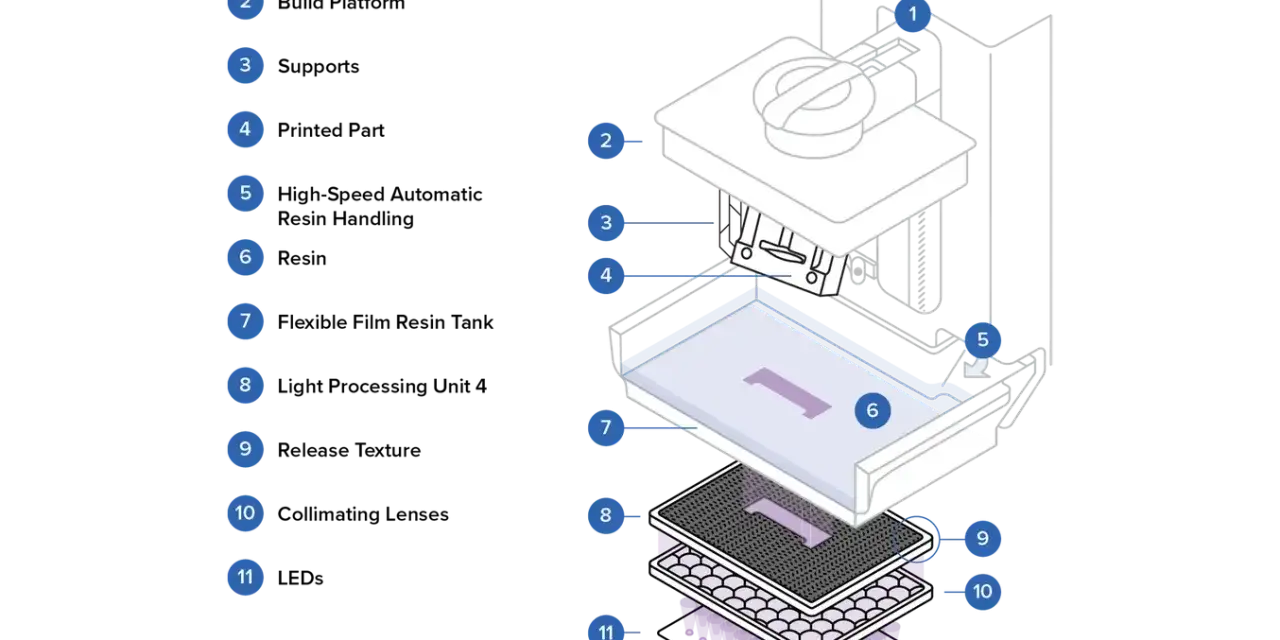
DLP is a vat photopolymerization process: liquid resin sits in a tank, a build platform lowers into the vat, and a light engine exposes each slice of the model so it hardens layer by layer. The key part is the digital micromirror device, or DMD, which uses thousands of tiny mirrors to shape the projected image. Instead of tracing a shape point by point, the projector flashes the whole layer at once.
That matters because it changes the way speed is built into the system. A print is usually defined more by its height and number of layers than by the amount of empty space inside a slice. In practice, I see common layer settings in the 25 to 100 micron range, with 50 microns often used as a balanced setting for prototypes and small production parts. After each layer cures, the platform lifts, resin flows back into place, and the cycle repeats.
Once the part comes off the build plate, it is still only partially finished. The surface carries uncured resin, supports still have to come off, and the part usually needs a UV post-cure before it reaches its final properties. That is why the process is fast on the printer but still very workflow-dependent off the printer. From here, the real question is where that combination actually pays off in a shop or lab.
Where it earns its keep
I would not choose a projector-based resin system for every plastic part, but I would absolutely choose it when geometry matters more than brute size. The process shines when you need detail, repeatability, and a smooth finish without heavy sanding or machining.
| Use case | Why it fits | What to watch |
|---|---|---|
| Dental models and guides | Fine features, smooth surfaces, and repeatable small parts support accurate clinical workflows. | Use validated resins and follow the full wash and cure procedure. |
| Jewelry masters and castable patterns | Sharp edges and clean details help with casting and visual inspection. | Support marks and burnout behavior matter as much as geometry. |
| Functional prototypes | Good for housings, covers, connectors, and parts where fit and finish are more important than impact strength. | Check heat resistance and long-term stability before treating the part as final. |
| Jigs and fixtures | Small, custom tooling can be made quickly and changed often. | Choose tougher resins when clamps, screws, or repeated handling are involved. |
The common thread is simple: these are parts where I want clean edges, controlled dimensions, and short turnaround times more than I want large volume. Once the part gets bigger or more structural, the limits become easier to see, and that is where many buyers misread the technology.
The limits that are easy to underestimate
The biggest trap is assuming that a sharper image automatically means a better part. It does not. Resolution is not the same thing as accuracy. A system can project tiny pixels and still drift if the optics, resin, temperature, or calibration are off. For real manufacturing work, repeatability matters more than headline resolution.
The next constraint is build size. DLP systems are usually strongest on small to medium parts because the projected image has to cover the full layer at once. As parts get larger, you fight more peel force, more support load, and more print time pressure. If the geometry is broad and flat, I usually expect support scars, suction issues, or surface cleanup to become more visible.
Resin workflow is another place where expectations need to stay grounded. Parts need washing, support removal, and UV curing, and the exact time depends on the resin and the part geometry. A simple model may only need a short wash and cure, while a dense or hollow part needs more care. I also treat uncured resin as a real handling hazard, not a nuisance, so gloves, ventilation, and clean disposal habits are part of the job.
That leads to the most useful comparison of all: not whether one resin process is “best,” but which one fits the size, speed, and cost target you actually have.
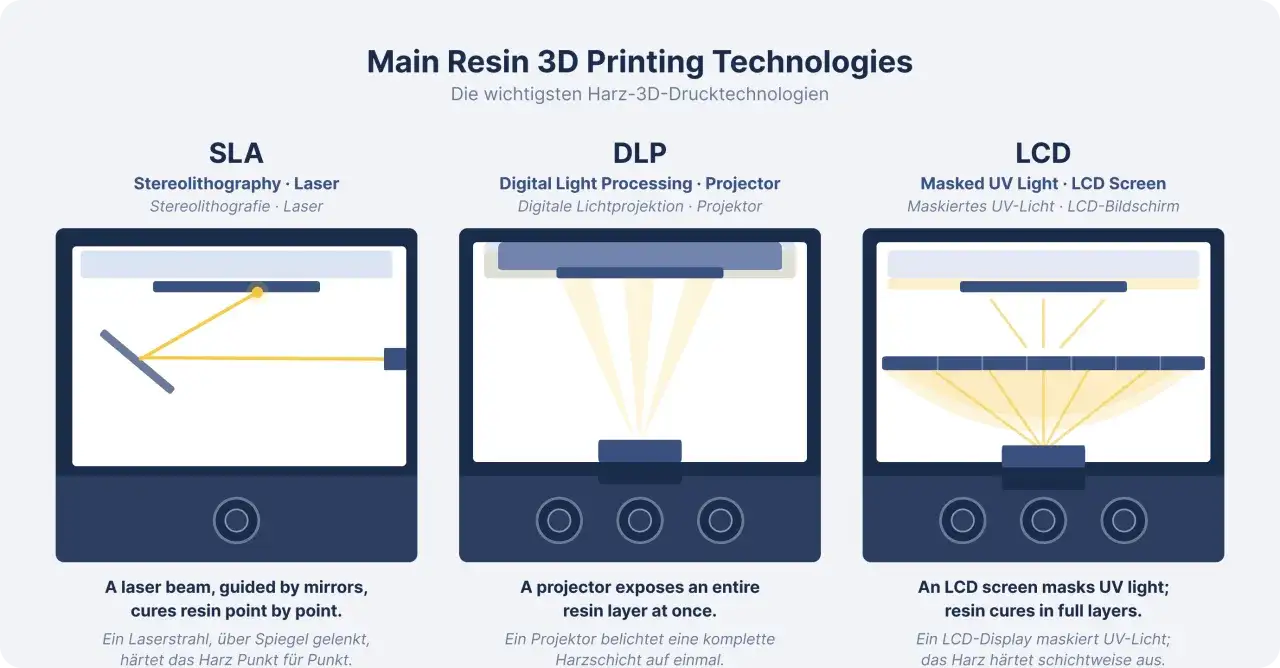
How it compares with SLA and LCD
Compared with other resin processes, DLP printing usually wins on throughput for small parts and on crisp edges that hold up well in repeated production runs. The trade-off is that projector optics and build area define the usable envelope, so the process is not the most flexible answer for larger parts or low-budget experimentation.
| Technology | Light engine | Strengths | Trade-offs | Best fit |
|---|---|---|---|---|
| DLP | Digital projector with a DMD chip | Fast layer exposure, strong detail, good repeatability | Build area is limited, and supports still matter a lot | Small detailed parts, dental work, jewelry, short-run production |
| SLA | Scanning laser | Very strong surface quality and a mature industrial ecosystem | Exposure is traced rather than flashed, so throughput depends on the scan path | Larger precision parts, prototyping, production systems with broad material support |
| LCD | UV LEDs masked through an LCD screen | Lower entry cost and broad hobby access | Screen wear and machine-to-machine consistency can be weaker | Entry-level resin printing, miniatures, cost-sensitive labs |
My practical takeaway is this: if you want the best balance of speed and detail for compact parts, DLP is often the cleaner production choice. If you want a cheaper entry point, LCD is hard to ignore. If you need a broader industrial resin platform with a more established service model, SLA is often worth the extra planning. The right answer usually comes from the part, not the logo on the machine.
What to budget and evaluate before buying
If I were buying a machine in the U.S. market today, I would budget for the entire workflow, not just the printer. That means the machine, wash and cure tools, resin, consumables, and a little room for trial-and-error. A cheap printer with expensive downtime is not cheap for long.
| Budget band | Typical planning range | What it usually buys you | Hidden costs to expect |
|---|---|---|---|
| Entry desktop | $300-$3,000 | Basic resin printing for small models and learning the workflow | Wash/cure gear, replacement vat parts, calibration time |
| Professional bench | $3,000-$15,000 | Better optics, stronger repeatability, and more suitable support for lab or office use | Validated resins, software, service, and operator training |
| Industrial production | $15,000-$80,000+ | Repeatable output, process control, and better fit for small-batch manufacturing | Maintenance plans, QA, floor space, and higher uptime expectations |
Beyond price, I would check five things before I buy: build volume that matches the real part, resin availability in the U.S., post-cure requirements, service access, and whether the software makes support placement and nesting easy. The last point is underrated. If the software is clumsy, your operator time goes up and the printer becomes less attractive very quickly.
One more point matters in a fabrication context: the final cost per part is rarely driven by resin alone. Failed builds, support cleanup, and inspection time often cost more than the liquid material. That is why a stable workflow usually beats an aggressive low-price machine in the long run.
The shop-floor details that matter more than the spec sheet
When a resin process works well, it is usually because the operator is disciplined, not because the brochure is clever. I would keep the workflow boring on purpose: keep resin mixed, print within the maker’s recommended temperature range, orient parts so supports land in less visible areas, and do not rush the wash or cure stages.
- Use part orientation to reduce suction and improve drainage. Flat, sealed, or cup-like shapes often need a tilt or escape path.
- Place supports where cleanup is acceptable. A slightly longer setup step is cheaper than sanding a visible face later.
- Follow the resin’s cure profile. Over-curing can make parts brittle, and under-curing can leave them weak or tacky.
- Match the resin to the job. Standard resin is fine for visual prototypes, but tough or biocompatible formulations are the better answer when the part has a real function.
For plastic design and fabrication work, that is the part I care about most: not whether the process sounds advanced, but whether it gives me predictable geometry, clean surfaces, and a workflow I can repeat without chasing surprises. If the part is small, detailed, and production-friendly, this technology is easy to recommend; if the part needs scale, impact resistance, or simpler handling, I would look at another process before I commit.