Buying or specifying a 3D printer is less about one impressive number and more about how several numbers work together. The best machines for plastic prototyping, fixtures, and end-use parts are the ones whose build volume, layer control, speed, and material limits match the job you actually need to run. In this guide, I break down the specs that are easy to misread, and the trade-offs that separate a useful machine from a glossy brochure.
The fastest way to read a printer spec sheet
- Start with the part you need to make, not the biggest number on the page.
- Build volume tells you what fits; enclosure and clearance tell you what fits reliably.
- Layer height affects vertical detail, but nozzle size, extrusion width, and flow rate decide whether the printer can keep up.
- Speed claims are only useful when they are paired with volumetric flow, material, and real part geometry.
- For functional plastics, temperature control and repeatability often matter more than headline resolution.
- Production-ready systems are easier to trust when they publish both typical and maximum performance, not just a best-case number.
What matters first in a printer spec sheet
The first mistake I see is treating every number as equally important. In practice, I group 3d printer specifications into five questions: what size part fits, how fine the printer can actually print, how fast it can sustain that quality, which materials it can control, and how repeatable it is from job to job. If those five answers are weak, a lower price rarely saves the project.
For a plastic design workflow, this matters because the machine is not just making a shape; it is creating a part with walls, corners, overhangs, thermal stress, and post-processing in mind. I want to know whether a printer is tuned for presentation models, engineering prototypes, or production-grade parts before I look at anything else. Once you separate those uses, the rest of the spec sheet becomes easier to read.That question of fit leads directly to the first hard limit: size, because a printer that cannot physically hold the part is irrelevant no matter how sharp its advertised resolution looks.
Build volume, footprint, and usable part space
Build volume is the maximum envelope the printer can create, usually written as width, depth, and height. For desktop FDM machines, a common range is roughly 220 x 220 x 250 mm, with larger prosumer units moving into the 300 mm class on one or more axes. Resin systems often describe capacity in centimeters or liters instead of just linear dimensions, because the real question is how many detailed parts can fit into the vat and how much support structure they need.
What I care about is usable volume, not just theoretical volume. Supports, raft settings, part orientation, and clearance for removing finished parts can reduce the practical envelope. A tall part may also force a slower print strategy, and some resin machines require extra handling room when the build chamber opens. In other words, the spec sheet may say the model fits, but the workflow may still be awkward.
The other half of the size story is the machine footprint. A compact build volume can still sit inside a bulky frame, especially once you add an enclosure, filtration, or a dry filament cabinet. If your shop or lab is tight on space, I would check bench clearance, door swing, and post-processing room before I check one more marketing render. With size understood, the next question is whether the machine can turn that space into real detail.
Resolution, layer height, and nozzle diameter
Layer height is one of the most misunderstood numbers in 3D printing. It affects vertical detail and print time, but it does not automatically determine overall accuracy or surface quality. A 0.10 mm layer often gives a cleaner result than 0.20 mm, but dropping to 0.05 or 0.07 mm rarely doubles the visible benefit the way people expect. On many FDM printers, the practical sweet spot for general work sits around 0.15 to 0.25 mm.
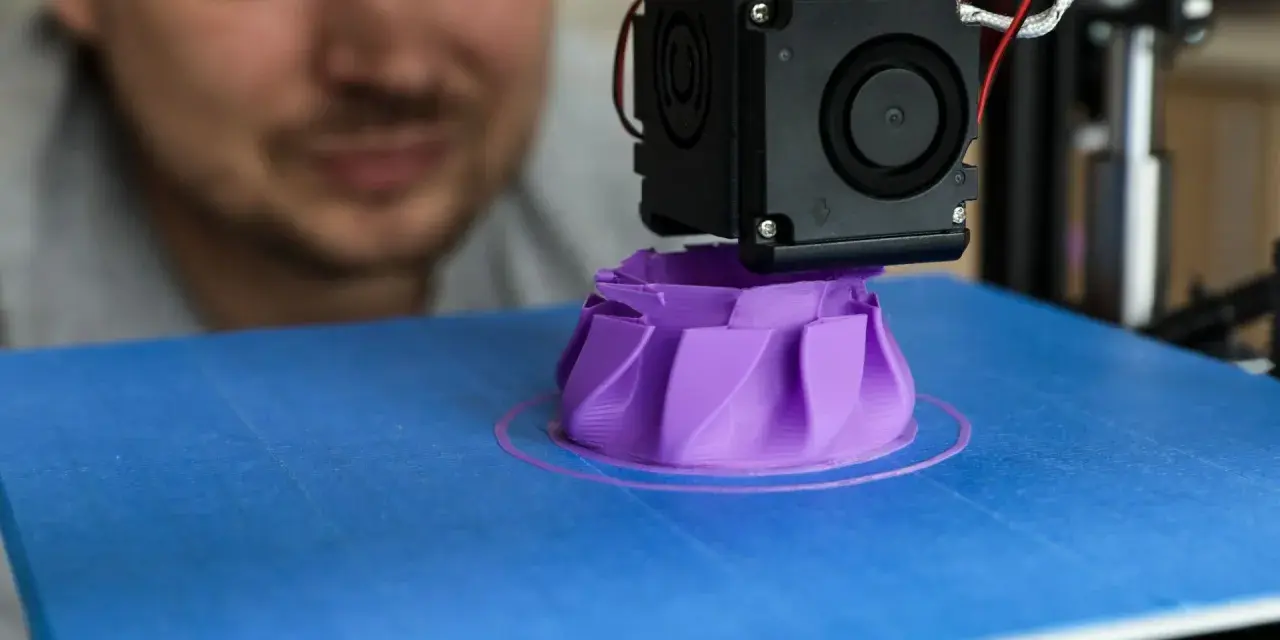
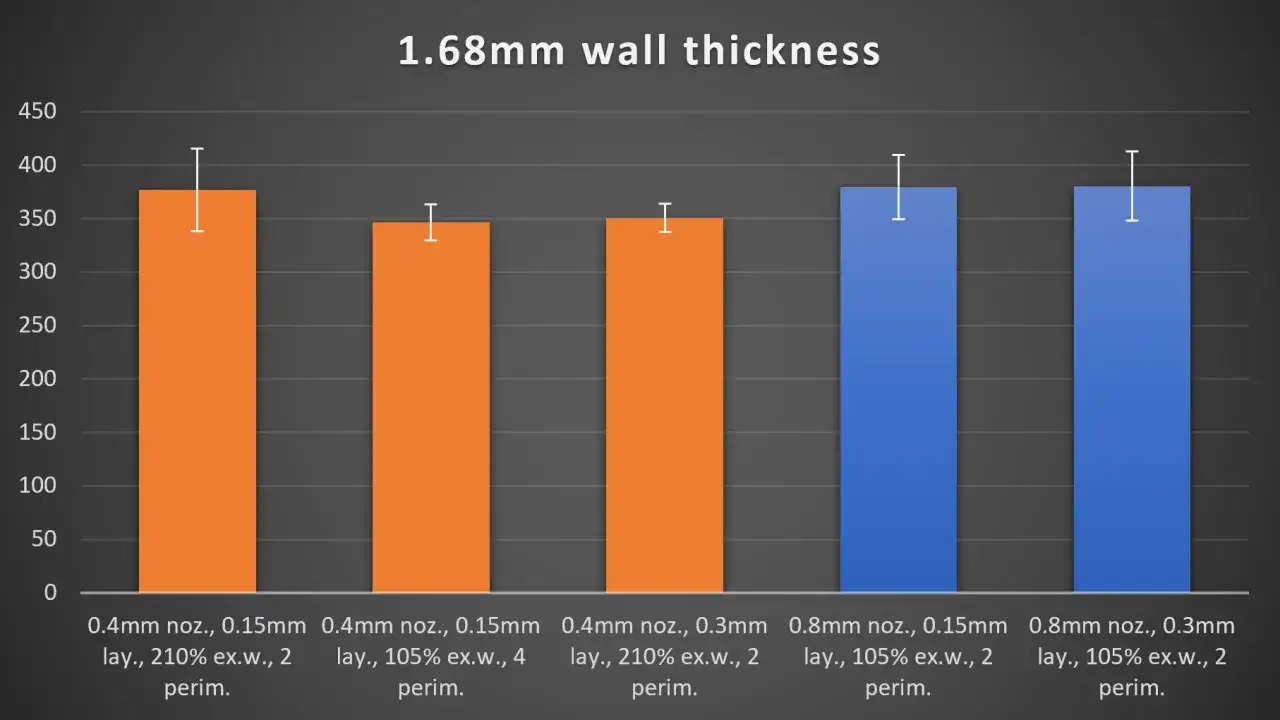
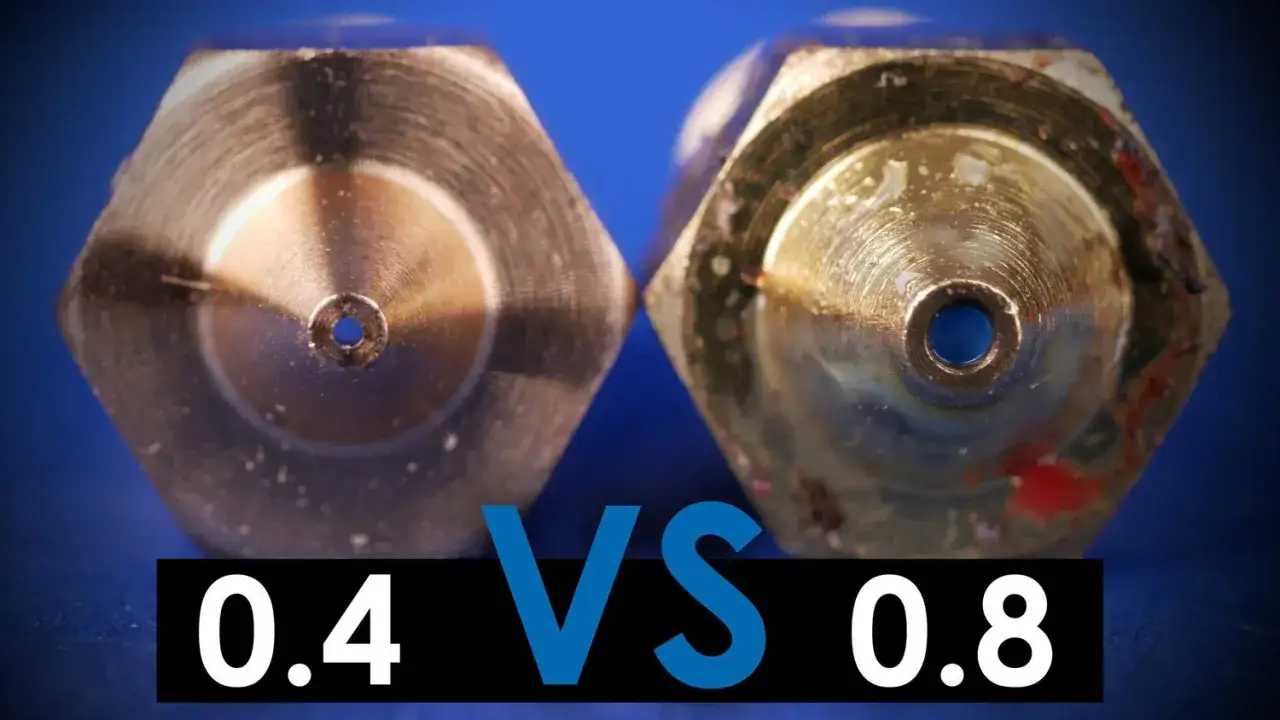
Nozzle size is tied to that decision. With a standard 0.4 mm nozzle, I usually want the layer height to stay below about 80% of the nozzle diameter, which puts the upper practical limit around 0.32 mm. If I want finer detail, I move to a 0.25 mm nozzle or a smaller extrusion width; if I want stronger walls and faster deposition, a 0.6 or 0.8 mm nozzle is often the better tool. The trade-off is simple: smaller nozzles improve detail and slow the job down, while larger nozzles favor throughput and robust functional parts.
Resin printers use a different language. They often quote XY resolution and layer thickness separately, which is healthier than pretending one number explains everything. A 50-micron pixel size sounds impressive, but it is not a guarantee of final surface quality or dimensional accuracy, because orientation, supports, and post-curing still shape the result. Once you separate detail from speed, the next bottleneck becomes how much material the machine can actually move.Speed, flow rate, and the difference between a fast printer and a fast part
Print speed on a spec sheet is easy to oversell. A quoted 300 mm/s does not mean a real part will finish anywhere near that pace, because perimeters, infill, supports, acceleration, travel moves, and cooling all reduce the effective rate. That is why I pay more attention to volumetric flow rate, measured in mm³/s, which tells you how much melted filament the hot end can reliably process.
The math is straightforward: extrusion width x layer height x speed = flow. For example, a 0.48 mm extrusion width at 0.20 mm layer height and 100 mm/s moves about 9.6 mm³/s. A well-tuned consumer hot end may sit around 10 to 20 mm³/s, while high-flow setups can push well beyond that. Once you start printing wide walls, thick layers, or dense infill, that ceiling matters more than the printer’s advertised top speed.
Resin printers should be read differently. Their speed is often published in mm/hour, and the useful comparison is typical speed across real materials, not the highest number in a hero setup. One current generation of resin platforms, for example, lists a maximum around 100 mm/hour and a typical average near 40 mm/hour across materials, which is exactly why I look for both figures. A machine that is blazing fast on one test part may be merely average once the geometry gets complicated. Speed only helps when the machine can sustain it, and that depends heavily on heat management and material control.
Materials, temperature, and enclosure design
If I know the application involves PLA only, the machine can be fairly simple. The moment I need ABS, ASA, nylon, filled composites, or functional parts that will live in warmer environments, the spec sheet gets stricter. Hotend temperature, bed temperature, chamber stability, and enclosure design decide whether the part comes off the plate flat or curled into scrap. For many engineering plastics, an open-frame printer looks fine on paper and then loses the job to warp, layer split, or weak adhesion.
For FDM machines, I usually check whether the printer can do three things well: hold a stable nozzle temperature, keep the bed hot enough for adhesion, and protect the print from drafts. Direct-drive extrusion helps with flexible materials and controlled retraction; a heated enclosure helps with warp-sensitive materials and larger parts. Filament drying is another quiet spec that matters in the real world, especially for nylon and PETG blends that pick up moisture quickly.
For resin systems, the equivalent concerns are light source, wavelength, layer thickness, wash workflow, and post-curing. A printer may claim excellent detail, but if the resin chemistry and curing process are not matched, the final part can still be brittle, sticky, or dimensionally off. In practice, the machine and the material are one system. Once I look at them that way, it becomes easier to judge which specs matter for a given production task.
Which specs matter most for prototypes, fixtures, and end-use parts
Different jobs reward different numbers. For visual prototypes, I care most about surface quality, fast layer settings, and easy material changes. For jigs and fixtures, I care more about stiffness, temperature resistance, and enough flow capacity to print thick sections without waiting all day. For end-use parts, repeatability, dimensional consistency, and material data matter more than a shiny top-end speed claim.
| Use case | Specs I would prioritize | What usually gets ignored |
|---|---|---|
| Concept models | Layer height, surface finish, build volume, ease of setup | Ultimate flow rate and chamber temperature |
| Functional prototypes | Nozzle size, flow rate, bed stability, material range | Ultra-fine vertical resolution that slows production |
| Fixtures and tooling aids | Enclosure, heat tolerance, wall strength, repeatability | Headline speed that collapses under dense geometry |
| End-use parts | Dimensional tolerance, consistency, material validation, post-processing control | Best-case demo prints and brochure images |
That table is useful because it forces the conversation away from generic “best printer” language and toward the job in front of you. A printer that is excellent for presentation prototypes may be frustrating for nylon tooling, and a production-minded machine can be overkill for simple PLA mockups. Once the application is clear, comparing two models becomes much more honest.
How I compare machines without getting fooled by marketing numbers
When two printers look close on paper, I compare the claims that are easy to misread. Build volume is useful only if the real part fits after supports. Speed is useful only if the vendor tells me whether that number is typical or best-case. Accuracy is useful only if the measurement method, feature size, and orientation are defined. If any of those details are missing, I treat the number as incomplete rather than impressive.
| Specification | What I verify | Common trap |
|---|---|---|
| Build volume | Real part size, supports, clearance, and removal path | Assuming the full envelope is usable |
| Layer height or XY resolution | Whether it affects the axis you care about | Confusing detail with actual accuracy |
| Print speed | Typical speed on real parts, not just a benchmark cube | Reading a hero number as normal production speed |
| Flow rate | Whether the hot end can keep up with your nozzle and layer settings | Ignoring the melt capacity of the machine |
| Material support | Temperature limits, enclosure, and validated profiles | Assuming every filament behaves the same |
| Dimensional tolerance | How the printer performs across different part sizes | Assuming a small test coupon predicts a large part |
This is where the exact phrase matters to me in practice: I only trust 3d printer specifications when they describe the same job in the same units. If one vendor gives max speed in a toy benchmark and another gives typical throughput on real materials, the second sheet is usually more useful even if it looks less dramatic. That habit saves time, and it usually saves money too. The last thing I check is whether the printer fits the way I actually plan to use it, not the way a brochure assumes I will use it.
The checklist I use before I recommend a printer
I keep the final check short. I want the machine to fit the part, support the material, and hold its numbers when the print gets real. Before I buy or recommend a printer, I ask whether I can run my main geometry, whether the enclosure and temperature control match the material, whether the flow rate is high enough for the layer settings I want, and whether the vendor shows typical performance instead of only peak claims.
- Confirm the part fits with supports, not just inside the raw build envelope.
- Match nozzle size and layer height to the level of detail the job actually needs.
- Check hotend, bed, and chamber temperature if you print ABS, ASA, nylon, or PC.
- Ask for typical speed, not only maximum speed.
- Look for dimensional tolerance across multiple feature sizes, not one ideal sample.
- Budget for the full workflow, including drying, post-processing, spare nozzles, and maintenance.
That is usually enough to separate a machine that merely looks capable from one that will stay useful after the novelty wears off. If you treat the spec sheet as a production tool instead of a sales sheet, the right printer becomes much easier to identify, and the wrong one becomes much easier to ignore.