
FDM and SLA solve different problems, even though both turn CAD files into real plastic parts. The FDM vs SLA choice usually comes down to what the part has to do: survive handling, look polished, hold fine detail, or stay affordable at scale. In this article, I break down the practical trade-offs that matter in 3D printing, from surface quality and strength to cost, workflow, and the applications where each process makes the most sense.
The quick take on FDM and SLA
- FDM is usually cheaper to buy and run, and it works well for larger, tougher, functional parts.
- SLA gives you smoother surfaces, sharper detail, and cleaner presentation-quality prototypes.
- Typical FDM layer heights are about 50 to 400 microns, while SLA commonly prints around 25 to 100 microns.
- FDM parts are generally stronger and more impact-resistant; SLA parts are often more brittle unless you use engineering resin.
- SLA adds washing and post-curing, while FDM usually asks for less cleanup but more sanding if you want a refined finish.
How FDM and SLA build a part in different ways
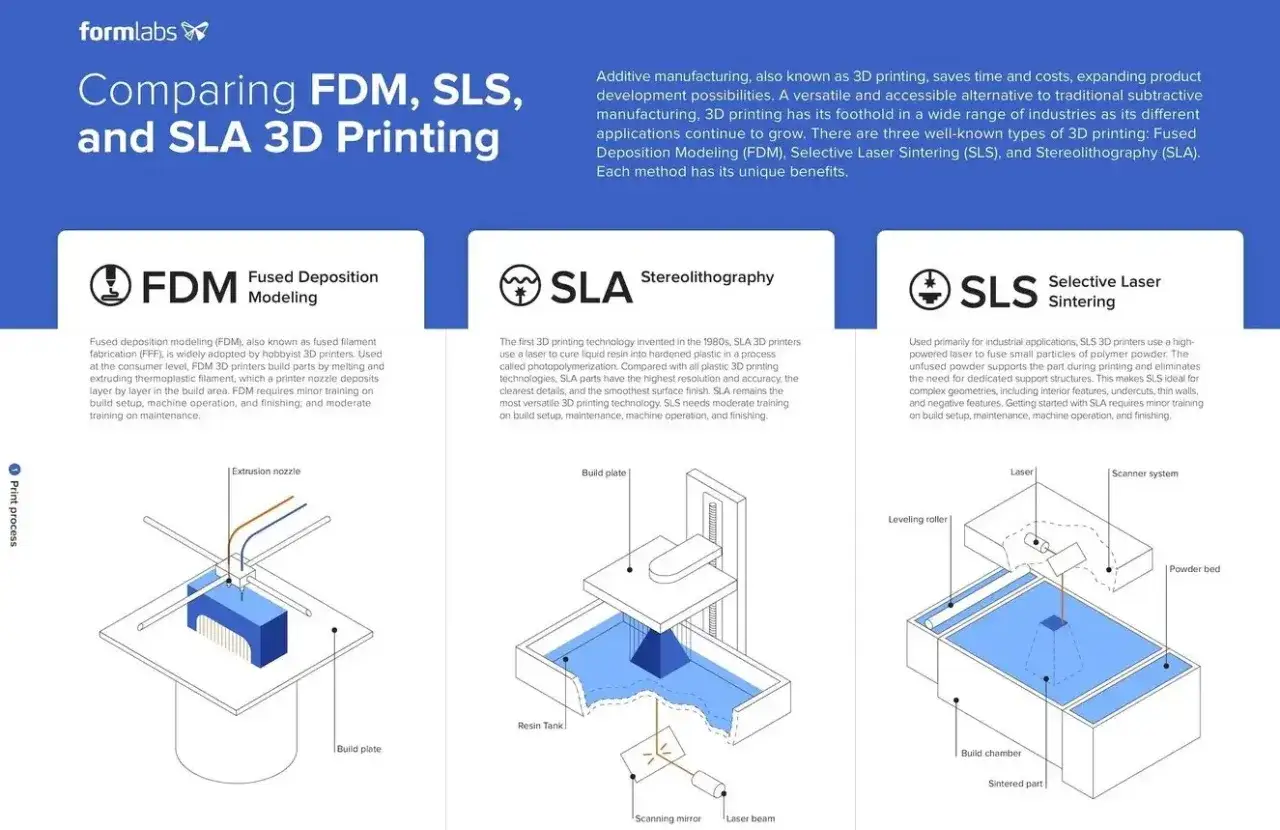
I usually start here because the manufacturing method explains almost every downstream difference. FDM, or fused deposition modeling, extrudes molten thermoplastic through a heated nozzle and lays it down in paths until the part is built. SLA, or stereolithography, cures liquid resin with light, turning each layer solid inside a vat.
How FDM behaves on the machine
Thermoplastic is plastic that softens when heated and hardens again when cooled. That makes FDM simple to understand, relatively easy to operate, and flexible in terms of materials. It also means the part is built from visible roads of filament, so the geometry of the nozzle and the layer height matter a lot.
Read Also: Strongest 3D Printer Filament - What's Best for Your Needs?
How SLA behaves on the machine
Photopolymer resin is a liquid that hardens when exposed to light. That gives SLA a major advantage when the part needs crisp edges, small features, or a smooth outer skin. The trade-off is that the print is not finished when it leaves the machine; it still needs cleaning, and often post-curing, before it reaches full strength and stability.
That process difference is why the same CAD file can lead to two very different results, and it sets up the real question: what does the finished part actually need to look and feel like?
What the finished part tells you before the spec sheet does
When I evaluate a printed part, I do not look at the machine name first. I look at the part itself. If the surface has to pass a visual inspection, if tiny text must stay readable, or if mating features need to fit cleanly, SLA tends to be the easier route. If the part is mostly about function, speed, and budget, FDM usually gives a better starting point.
The numbers reflect that difference. FDM prints often use layer heights around 50 to 400 microns, which is fine for many prototypes but leaves visible layer lines, especially on curved surfaces. SLA commonly works around 25 to 100 microns and can capture very fine details with much less visible stepping. That does not mean every SLA printer is automatically more accurate, but it does mean the process is built for a finer finish from the start.
There is one nuance people miss: resolution alone is not the same as accuracy. A part can have a beautiful surface and still be dimensionally off if the printer, settings, resin, or orientation are wrong. That is why the next comparison is so useful in practice.
A side-by-side view of the trade-offs
When the decision is not obvious, I put the two processes next to each other and look at what will actually cost time later. This is the part of the comparison where the abstract debate becomes a real manufacturing choice.
| Criterion | FDM | SLA |
|---|---|---|
| Surface finish | Visible layer lines are normal; sanding is often needed for a clean look | Smooth surfaces with minimal visible layering |
| Detail level | Good for medium features, but nozzle width limits tiny text and sharp edges | Excellent for small details, thin walls, and crisp geometry |
| Strength and durability | Usually tougher and more impact-resistant, especially with ABS, PETG, or TPU | Often more brittle, though engineering resins narrow the gap |
| Build volume | Often larger and easier to scale for bigger parts | Usually smaller on desktop systems, though benchtop machines can be much larger |
| Material cost | Typically lower | Typically higher |
| Post-processing | Support removal and sanding; no wash-and-cure step | Wash, support cleanup, and post-curing |
| Best fit | Functional prototypes, brackets, housings, jigs, fixtures | Presentation models, dental and jewelry parts, master patterns, small detailed parts |
The table makes one thing obvious: FDM usually wins on simplicity and size, while SLA wins on appearance and detail. The real cost question, though, is not just the printer or the plastic. It is the amount of labor you will spend before the part is actually usable.
Why cost and cleanup change the answer
Desktop FDM machines are usually the cheaper entry point, often starting around a few hundred dollars, while desktop SLA systems commonly start closer to the four-figure range. On materials, filament is usually far less expensive than resin. A practical rule of thumb is roughly $20 to $50 per kilogram for common FDM filament, compared with about $50 to $200 per liter for SLA resin, with specialized materials costing more in both camps.
That only tells half the story. FDM often needs little or no cleanup if the part is simple and support-free, but supported prints can require time-consuming removal and sanding. SLA parts come out smoother, but they need washing and, in many cases, post-curing to reach their final properties. In other words, SLA shifts some of the work away from surface finishing and into the post-process chain.
This is why I do not judge cost by material alone. A simple bracket is usually cheaper in FDM from start to finish. A small, intricate part can be cheaper in SLA once you account for the time saved on sanding, repainting, and rework. The more complex the geometry, the more that labor gap matters.
Once cost and cleanup are visible, the next question is not price anymore. It is how the material itself will behave once the part is in the real world.
Material behavior is where many buyers make the wrong call
For functional plastics, this is the section that prevents expensive mistakes. FDM thermoplastics such as PLA, ABS, PETG, and TPU cover a broad range of needs. Some are stiffer, some are tougher, some are more heat-resistant, and some are flexible enough for snap fits or soft-touch components. That variety is a big reason FDM stays popular in shops that need practical parts.
SLA resins are more specialized. Standard resins can produce excellent detail, but they are often more brittle than thermoplastics. Engineering resins can improve toughness, heat resistance, flexibility, or optical clarity, but they still need to be matched carefully to the application. SLA also tends to produce more isotropic parts, which means strength is more uniform in all directions. That matters when the load path is unpredictable or the part has thin, detailed features that would be awkward in FDM.
I also pay attention to the environment. If the part will sit in sunlight, see moisture, or live outdoors, many common FDM materials are a safer default than standard resin. If the part is going to be handled gently but must look flawless, resin is often the better fit. The mistake is assuming one material family is universally better. They are optimized for different kinds of risk.
That leads naturally to the final practical question: what should you actually print with each process?
The applications each process handles best
In a plastic design workflow, I think about use case before technology. The best process is the one that reduces risk in the final part, not the one that sounds more advanced.
- FDM: jigs, fixtures, brackets, enclosures, ducting, large mockups, and early concept models. These parts benefit from lower cost, larger build volumes, and better everyday durability.
- SLA: jewelry masters, dental models, transparent parts, presentation prototypes, small housings with fine detail, and casting patterns. These parts benefit from smooth surfaces and crisp geometry that would take more work in FDM.
There is a simple pattern behind those examples. If the part will be handled hard, assembled often, or scaled up, FDM is usually the smarter first choice. If the part will be inspected closely, photographed, or used as a visual master, SLA usually saves time later in the workflow.
When people force FDM into a cosmetic role, they often end up spending more time sanding than they expected. When they use SLA for rugged parts, they sometimes discover that the finish is excellent but the part does not survive the job. Both mistakes are avoidable if you define the part’s job before you choose the process.
The rule I use when the choice is still unclear
When the project is genuinely ambiguous, I use a simple three-step filter. First, choose FDM if the part is large, functional, budget-sensitive, or likely to take abuse. Second, choose SLA if surface quality, fine detail, or clean presentation is the main goal. Third, if you are still torn, prototype in FDM and move to SLA only for the version where finish or precision justifies the extra workflow.
That approach keeps the decision practical instead of emotional. It also matches how most real shops work: FDM for fast iteration and rough utility, SLA for precision and finish. If I had to compress the whole comparison into one line, it would be this: choose the process that makes the part easier to use, not just easier to print.
For plastic design and fabrication work, that distinction is usually what saves both time and budget. The right process is the one that matches the part’s real job, the expected surface quality, and the amount of post-processing you are willing to absorb.