The practical takeaways at a glance
- Best use case: black tempera on clear glass, especially for low-cost one-off engraving with a diode laser.
- Best starting mix: roughly 1:1 paint and water for spray or airbrush use, then adjust for even coverage.
- Best rule of thumb: thin, uniform coats beat a heavy coat every time.
- Best fit for plastics: use tempera mostly as a temporary fill or test aid, not as a durable finishing system.
- Biggest avoid: tempered or laminated glass, plus any job that needs a long-wearing, rub-resistant finish.
- Best alternatives: acrylic paint for engraved recesses and dedicated marking spray when consistency matters more than price.
Why the coating works at all
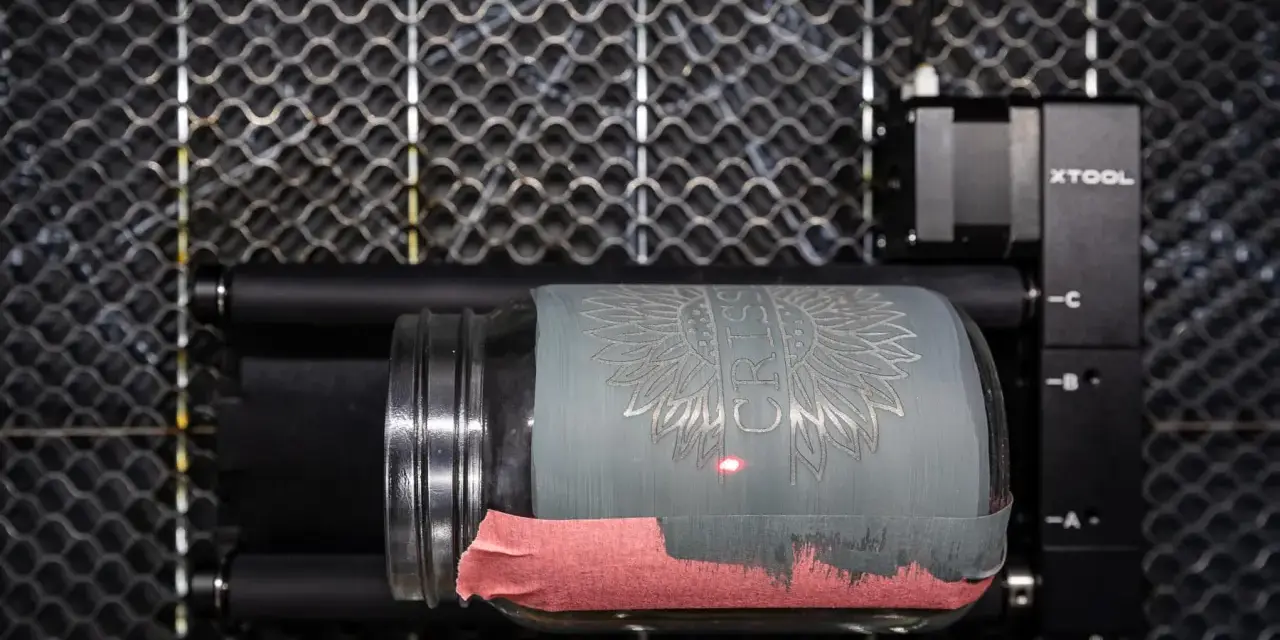
Tempera is not the thing doing the engraving. The pigment layer absorbs part of the beam, heat builds in that coating, and the heat transfers into the surface underneath. On clear glass, that extra absorption is often the difference between a weak mark and a visible frosted image.
That is why I start with black or very dark tempera whenever I am using a blue diode laser. Light colors are much less reliable because they do not absorb the beam as consistently. In practice, the coating is acting like a temporary energy sink, not a finish, and that distinction matters the moment you move away from glass.
On plastics, the story changes quickly. The laser already interacts with many plastics differently from glass, and a tempera layer usually does not improve the result in a meaningful way. If I am engraving acrylic, ABS, or another fabricated plastic part, I treat tempera as a post-engrave aid or a quick test medium, not as the core of the process.
That line between a useful absorber and a poor finish is the first thing to get right, because it decides whether tempera is a shortcut or a dead end.
Where I would use it and where I would not
Before I mix anything, I ask one question: what material am I actually marking, and do I need the paint to survive after the engraving is done? That answer separates a smart low-cost method from a frustrating one.
| Material | What tempera does | My take |
|---|---|---|
| Clear glass | Creates an absorbent layer that helps a diode laser produce a visible frosted mark | Best fit for the method |
| Ceramic tile and slate | Can help as a coating or test layer, but results vary by surface texture | Worth testing for one-off work |
| Wood and MDF | Not needed for direct engraving; can be used as a temporary color fill after engraving | Useful only when the goal is a fill, not the engraving itself |
| Acrylic and other common plastics | Usually a weak pre-coat and often too temporary for handling | Use acrylic or enamel for durable color fill instead |
| Tempered or laminated glass | Poor candidate for consistent engraving results | Avoid it for this workflow |
| Metal | Not a direct marking solution | Use a proper metal-marking system |
xTool’s support guidance also warns against tempered and laminated glass, and that matches the failure mode I see in practice: the coating may be fine, but the substrate is the wrong one.
For plastics, I keep the decision even simpler. If the part needs a clean engraved recess with color inside it, tempera is a temporary helper at best. If the part needs to survive handling, cleaning, or abrasion, it is the wrong finish.
Once the material makes sense, the next question is execution, because the coating only helps if it is mixed and applied cleanly.
A workflow that gives clean results
This is the part that usually makes or breaks the job. I would rather spend three minutes getting the coat right than ten minutes trying to fix a smeared one.
- Clean the surface first. On glass, wash off oils, fingerprints, and dust. A quick soap-and-water clean followed by an alcohol wipe is enough for most jobs.
- Mix a small batch. A common starting point is roughly 1 part tempera to 1 part water for spray or airbrush use. If the mix beads up, I add a few drops of dish soap to help it flow.
- Apply thin coats. I prefer a foam brush, a simple spray bottle, or a cheap airbrush. One or two light coats are better than one heavy coat that pools at the edges.
- Let it dry fully. The surface should look evenly matte and should not feel tacky before the engraving starts.
- Engrave with the lightest useful setting. Start with the lowest power that still gives a clean frost. On back-side engraving, mirror the artwork first so the final reading direction is correct.
- Wash the residue off. Warm water and mild soap remove most of it. If pigment clings to a textured area, a soft nylon brush usually finishes the job.
The mistake I see most often is overcoating. A thick layer looks safe, but it tends to smear, trap pigment, and leave residue that is harder to clean than the engraving itself.
When the coat is thin and even, the process becomes surprisingly repeatable. When it is not, you start blaming the laser for a paint problem.
Tempera versus the alternatives
I compare these options by finish quality, cleanup, and whether the result needs to last beyond the day it is made. That is usually a better filter than asking which one is simply cheapest.
| Option | Typical US cost | Best for | Main tradeoff |
|---|---|---|---|
| Tempera | About $3-$8 per bottle, or less per ounce in multipacks | Glass tests, classroom work, one-off hobby engraving | Less durable and more variable than dedicated products |
| Acrylic paint | About $4-$12 per bottle | Color fill on wood, acrylic, and engraved recesses | Harder cleanup and more chance of staining if overapplied |
| Dedicated laser marking spray | About $20-$60 per can | Repeatable glass or ceramic marking, especially in production | More expensive, but much more consistent |
| Spray paint or chalk paint | About $6-$15 per can | Quick surface coating on larger areas | Overspray, odor, and uneven removal are common |
For engraved plastic parts, acrylic paint usually beats tempera because it grips the recess better and survives handling more reliably. For customer-facing glass work, I would move to a dedicated marking spray as soon as repeatability starts to matter more than saving a few dollars.
The tradeoff is straightforward: tempera is the low-friction option, while dedicated sprays buy you consistency. The right choice depends on whether you are prototyping a piece or sending out a finished job.
The problems that show up most often
When tempera disappoints, the cause is usually easy to spot once I separate coating problems from laser problems. The paint is often the first thing people blame, but the fix is not always in the paint.
Patchy frosting
Patchy results usually come from dirty glass, an uneven coat, or a color that is too light to absorb enough energy. I fix that by cleaning the surface again, switching to black tempera, and applying two thin coats instead of one heavy one.
Residue that will not wash off
If the coating survives the rinse, it is often because the layer was too thick or the engraving ran too hot. Warm water and a soft brush usually solve the cleanup, but the better fix is to reduce the coat thickness and recheck the power balance on the next pass.
Chipping or rough edges
That is usually a material problem, not a paint problem. Too much energy, poor focus, or the wrong glass type will create stress that turns into chips. If the substrate is tempered or laminated, I stop trying to force it and change the material or the marking method.
Read Also: SLS TPU - Design Flexible Parts That Actually Work
Color fill that rubs out of plastic engravings
That happens when tempera is being asked to do a job it was never meant to do. If the part will be handled, cleaned, or shipped, I switch to acrylic or enamel for the fill. Tempera is fine for test pieces and temporary decoration, but not for a finish that needs real wear resistance.
Once you know which failure you are looking at, the fix is usually obvious: change the coat, change the machine setting, or change the material.
What I would keep on the bench for real shop work
For a low-cost glass prototype, I keep black tempera, a foam brush, a small spray bottle, and a scrap piece from the same batch of glass. That is enough to verify the artwork, the focus, and the basic energy balance before I commit to the real part.
For a customer order, I move up a level. A dedicated marking spray is worth it when the result has to look the same from part to part, especially if the job is part of a larger laser cutting and engraving workflow where consistency matters more than saving a few dollars per piece.
For plastics, I keep tempera out of the main process and use it only when I want a temporary test fill or a quick visual mockup. If the part needs to survive handling, I reach for acrylic paint or another more durable filler instead.
The mental model I trust is simple: tempera is a cheap temporary absorber, not a universal finish. Once you treat it that way, it becomes a practical tool in a laser shop instead of a workaround you keep fighting.